Calling Xbox Live Services from Your Title Service
Updated: July 29, 2019
With the correct setup and flow, Xbox Live Services can also be accessed from title services through service-to-service (S2S) access, also known as backend-to-backend (B2B), which enables new gameplay and interaction scenarios. For example, custom matchmaking services can use S2S access to create and read multiplayer session information and player data.
While the RESTful request pattern for Xbox Live service endpoints is identical between the Xbox One console and title services, the authentication path is significantly different. Title services require additional authentication steps before Xbox Live service calls can be performed. The following sections describe the flow for this authentication path to enable S2S access for your service.
Configuration of Xbox Live
Service-to-service access is not enabled by default for each title and first needs to be configured on a publisher level.
Registering your service with Xbox Live
Before your title service can be authenticated for access to Xbox Live Services, it must first have credentials registered on Xbox Live. Specifically, your service must have a Business Partner Certificate, which is an X509 certificate issued by an Xbox Live certificate authority (CA). You can obtain a Business Partner Certificate through the Xbox Live Web Services page within Partner Center.
Business Partner Certificate
As previously noted, Business Partner Certificates are X509 certificates issued by an Xbox Live CA. To maintain the security of the private key to be associated with a specific certificate, this involves generating a key container together with a public/private key pair on a private computer then uploading the public certificate to Partner Center. This can be performed on any computer running Windows; it does not need to be the server hosting your service.
To generate and configure a Business Partner certificate:
- Select the Settings Icon in the upper right and then Developer Settings

- Next select Xbox Live -> Web services
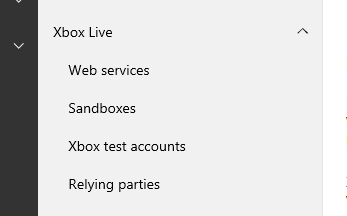
- Select New Web Service
- Select your publisher from the drop down (there is normally only one, but may be more)
- Enter a name to identify your web service (this can be the host URL or any string name to help you identify where the certificates will be used and manage them)
- Click Save
- On the Web Service page, you should now see your new Web Service listed
- Click Generate Certificate for your new Web Service
- Click the Show Options link to see a PowerShell script to create the needed key. You can run this script on any machine and then export the certificate to other machines.
- Run Windows PowerShell as an Administrator
- Copy in the script from step 9 and press Enter
- Copy the resulting string CSP blob string from PowerShell into the text box under Download the CSP Certificate (remove any word wrap line breaks from the console window first)
- Leaving the drop-down on Select sandbox will result in a BP cert that can be used in any of your sandboxes and RETAIL which is recommended. If you want this certificate to only work with one specific sandbox you can select the sandbox from the drop-down list.
- Click Download
- Save the .cer file on the PC that ran the script in step 11, rename it with the name you used in step 5 to distinguish it against the others.
- Follow the instructions under Binding the Certificate on the Partner Center page.
- Make sure once imported that the certificate has the private key bound to it (indicated by the small key icon on the top left)

- If you plan to call the commerce services, record the first section (8x4x4x4x12 GUID) of the Issued To name on the certificate as it will be needed later.
- Right click on the certificate and select All Tasks->Export.
- Follow the export Wizard and make sure to select Yes, export the private key
- Select to secure the exported cert with a password
- Finish exporting the certificate through the wizard
Note that if you import the certificate into the Current User certificate store, it will not bind to the private key. Windows will recognize the key container that was used to issue the certificate and will import the private key together with the certificate. After the certificate has been imported, you can then export the certificate, with its private key, to a .pfx file that you will install on your servers. If the import is unsuccessful and the certificate does not bind to the private key, repeat this process with a new key pair by running the PowerShell script again.
Configuring Xbox Live Services access with Business Partner Certificates
To enable a server with a Business Partner Certificate to access Xbox Live Services, each title must grant access rights to the web service for which the Business Partner Certificate was generated. This configuration is performed in the Access Policies tab of the Xbox Live Gameplay Settings page of your title in Partner Center.
To grant access for your custom service to interact with your Title’s Xbox Live services a service, do the following:
-
Go to the Services -> Xbox Live -> Gameplay Settings -> Access Policies page of your title.
- Click the tab of the sandbox where you want the changes to be made at the top of the page.
- Select the service scope (such as Multiplayer manage, for example)
- Select Add app/service
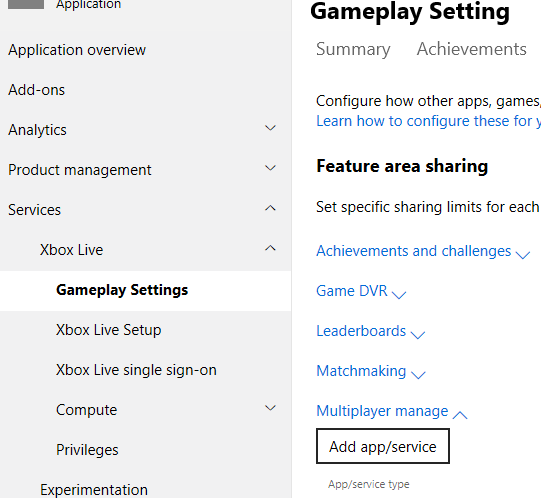
- Select Web services from the App/service drop-down
- Select your defined web service tied to the Business Partner Cert you created above.
- Select Read-only or Full access based on what your service needs.
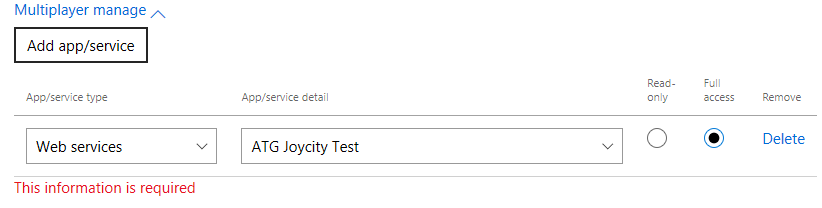
- Click Save
- Click Publish and Confirm to push the changes out for testing
Note that this process must be repeated for each web service that policies are created for.
Removing an existing policy will prevent certificates created under that web service from being able to call Xbox Live Services in the context of that title. You can use this process if you want to block access because of a process change, server or certificate compromise, and so forth. You would need to remove the policy from all sandboxes (or copy and publish the change across any affected sandbox) to have the policy removed everywhere.
Business Partner Certificates and sandboxes
If you are using a Business Partner Certificate without a sandbox specified in it (the recommended approach), the certificate will work across all of your development sandboxes as well as the Microsoft–managed sandboxes (such as CERT, CERT.DEBUG, RETAIL).
If you have sandbox-specific certificates, you will need a separate Business Partner Certificate for each of your development sandboxes and each Microsoft–managed sandbox. You must also ensure that your service uses the correct certificate for the sandbox that the title is running in when it calls Xbox Live Services. In most cases, using a certificate for a different sandbox than the one specified in the token from the title will result in an error from Xbox Live.
To avoid using the incorrect certificate for the current environment, the best approach is to dynamically detect which certificate is needed for that environment. All certificates are present on the server, and the client identifies which sandbox it is using. The safest way to do this is to use the Sandbox claim in the Xbox Security Token Service (XSTS) token and parse this information on the server. The server can then dynamically select the correct certificate based on the Sandbox string.
Additional configuration to call Xbox Live on behalf of a user: delegation
To make service-to-service calls to Xbox Live on behalf of a user, your service must already be configured for single sign-on with Xbox Live. That is, it must be able to receive and process X tokens from clients (Xbox One or other clients in the future) and extract user claims from those tokens.
If your service is configured in this way, you must also ensure that the token definition for your relying party includes the “DelegationToken” claim. This claim contains the information needed by the XSTS to issue tokens on behalf of the user. You can verify or update your relying party definition by selecting your service’s relying party from the Relying Party configuration page in Partner Center. Look for the Delegation Token (dlt) token in the claims list or select it from the Select additional claims drop-down if it is not already added.
Note Changes to relying parties and token definitions are global and apply to all titles or services that are configured to use this token. These changes also apply across all sandboxes. Because tokens are cached on the client you will need to completely power off and on your Dev kits or PC’s where you will be using the new tokens to clear the cache.
The delegation token for a user has an expiration time of 30 days after issue, but should only be used as long as a user is signed in or requests for the user are necessary. It is strongly recommended that titles avoid caching delegation tokens that are no longer needed.
Business Partner Certificate expiration
Like any other certificate, Business Partner Certificates have an expiration time and should be updated before expiration. Expired Business Partner Certificates will not work after their expiration date and will result in errors when trying to obtain S-Tokens or XSTS tokens related to them.
Developers are required to track the expiration date of any Business Partner Certificates in use and refresh them through Partner Center before the expiration date approaches.
Service authentication flow: overview
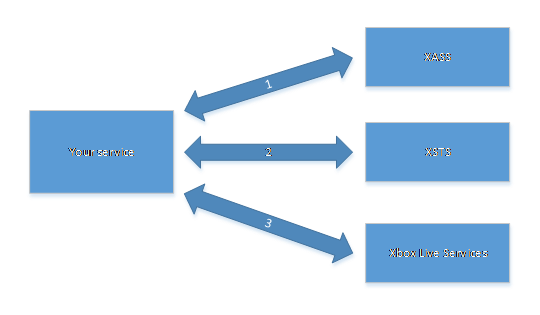
The following diagram depicts the three steps that are involved in authenticating your service with Xbox Live Services.
-
First, your service performs an authentication POST request to the Xbox Service Authentication Service (XSAS) noting the sandbox, proof keys, and token type in the body of the request. When making that call, the Business Partner Certificate obtained earlier needs to be used as a client SSL certificate. For a successful request, XSAS will return an S (Service) token, which has a default lifetime of two weeks.
XSAS: https://service.auth.xboxlive.com/service/authenticate
-
The S token can then be exchanged for an authorization token called an X token. This is done by making a POST request to XSTS, passing in the S token, the ID of the sandbox that you’re trying to access, and the name of the relying party you are requesting a token for as the properties of the request.
-
Optionally, you can add to the request the DelegationToken claim in case the call needs to be made on behalf of the user for whom you obtained that claim. In such a scenario, the supplied SandboxId must be accessible by the user of the DelegationToken claim. Using the X token(s) thus obtained, your service can make authenticated calls to various Xbox Live services.
Proof keys
Use of proof keys prevents a man in the middle from capturing tokens and authoring messages on behalf of the true token owner. For a full code example of generating proof keys and signatures please see the XSTS Server sample available for download.
More specifically, when obtaining a security token, the caller first generates a public/private key pair. The caller then keeps the private key for itself and sends the public key with the security token request (explained in a later section of this document, Obtaining a service token). The public key is then embedded in the token. Each time the caller sends a request to a service, it passes the token to the service and signs the message with the private key—which only the caller has. The service receiving the message verifies the validity of the token and then validates the signature of the request by using the public key contained in the token. If the request signature validates, it proves that the caller is in possession of the private key. Assuming that the caller has kept its private key safe, this proves that the caller is the same party that provided the public key to the security token service.
The key itself is a JSON Web Key as defined in the following IETF specification: http://tools.ietf.org/html/draft-ietf-jose-json-web-key-08
The URL, path, query string, Authorization header, and timestamp are always signed. Thus, they are implicitly in the signature policy to be used to sign the request. Each service that exposes authenticated endpoints can require additional headers that must be included in the signature, and can also specify the maximum size (in bytes) of the request body required to sign. Each service defines the set of signing algorithms it supports.
The signature policy looks like this in JSON form:
{
    "Version": 1,
    "SupportedAlgorithms": [ "ES256", "ES384" ],
    "ExtraHeaders": [ ],
    "MaxBodyBytes": 8192
}
Clients - your title service, in this case - need to learn about the required signing policy for the endpoints they need to call. They create a data stream to sign from the request (the exact process is described in Steps 1 through 7, below), hash the data stream by using Secure Hashing Algorithm 256 (SHA256), and then encrypt it by using the private key to produce a signature.
The signature is transmitted through an HTTP header and is made of three parts. The first part is the signature policy version and is expressed as a 4-byte integer value in network-byte order (big-endian). The second part is a 64-bit Windows file time in network-byte order. The third part is the resulting signature bytes. These three parts are combined as a single byte stream and encoded as a base-64 string that is sent with the request as an additional header—the Signature header.
Because the signature is transported as an HTTP header, any message that includes a hash of the body must be hashed in memory before any bytes of the body are written to the request stream. The signature is computed over the actual bytes sent over the wire. Obviously, the signature must be computed after any request-body transformations.
The exact process of creating the data stream to sign is shown below; all string data, such as the headers and URL, are encoded in ASCII. The body is an opaque blob and is signed as-is.
The values of these elements are explained as follows:
-
The policy version as a 4-byte unsigned integer in network-byte order, followed by a null byte.
-
The timestamp (from the Signature header) in network-byte order, followed by a null byte.
-
The HTTP method, in all caps (GET or POST, for instance), followed by a null byte.
-
The absolute path and query string, followed by a null byte.
-
The value of the Authorization header (if present), followed by a null byte.
-
The other headers specified in the signature policy, each followed by a null byte if you’re adding any header. If there are no additional headers, no byte should be added.
-
Let N be the maximum number of bytes of the body to sign, as specified by the signature policy for the endpoint to be called. Let M be the size of the uncompressed body. If M > N then use the first N bytes of the uncompressed body. If M <= N then use the entire uncompressed body (without padding). A null byte is appended (the null byte must be appended even if there is no request body).
Each of the elements above is separated by a null byte (0x00) to mitigate any ambiguity from concatenation without a separator. The null byte is used because the HTTP standard forbids the use of non-printable characters in the headers. Thus, any attempt to insert or extend the data would need to include the null byte, and would thus be an invalid HTTP request.
The absolute path and query string are obtained from the URI of the request that is signed. If the URI of the request was “https://service.xbox.com/service1/foo?q0=v0&q1=v1\#frag,” the absolute path and query string would be “/service1/foo?q0=v0&q1=v1\#frag”. Note that the absolute path must start with a “/”.
Any headers in the request that are specified in the policy must be included in the signature in the same order as they appear in the signature policy. The Authorization header is always signed. If the policy specifies a header that is not present in the request, it does not have to be in the signature. For example, if the policy specifies headers [ H~1~, H~2~, H~3~ ] and the request includes only H~1~ and H~2~, then H~3~ can be left out. This is needed if the global policy specifies headers such as Range, which does not apply for POST requests. Note, however, that if a header is missing, the corresponding null bytes must still be included. This also applies if no headers are specified at all. So the data stream to sign would include two null bytes between the H~1~ and H~3~ headers if H~2~ were missing. Another way to think of this is to consider missing headers as an empty string.
Obtaining a service token
Details regarding the request, response, and error handling associated with obtaining a service token are explained in this section. For a full example code implementation of requesting and managing Service Tokens please see the XSTS Server sample available for download.
Request
XSAS provides the following REST endpoint to handle service authentication:
https://service.auth.xboxlive.com/service/authenticate
That endpoint requires a valid Business Partner Certificate to be used as a client SSL certificate in the request.
Your service performs a POST, with a body obeying the following XSASRequest data contract:
[DataContract]
public class XSASRequest
{
    [DataMember(EmitDefaultValue = false)]
    public string RelyingParty { get; set; }
    [DataMember(EmitDefaultValue = false)]
    public string TokenType { get; set; }
    [DataMember]
    public XSASPropertyBag Properties { get; set; }
}
[DataContract]
public class XSASPropertyBag
{
    [DataMember(EmitDefaultValue = false)]
    public Ecc256ProofKey ProofKey { get; set; }
}
[DataContract]
public class Ecc256ProofKey
{
    [DataMember(Name = "alg", Order = 0)]
    public string Algorithm { get; set; }
    [DataMember(Name = "kty", Order = 1)]
    public string KeyType { get; set; }
    [DataMember(Name = "use", Order = 2)]
    public string Use { get; set; }
    [DataMember(Name = "crv", Order = 3)]
    public string CurveType { get; set; }
    [DataMember(Name = "x", Order = 4)]
    public string X { get; set; }
    [DataMember(Name = "y", Order = 5)]
    public string Y { get; set; }
}
The only required property in the PropertyBag for the XSASRequest is the ProofKey. The ProofKey needs to be a JSON Web Key, as indicated in an earlier section of this document.
Note, you will want to cache or keep a record of the Proof Key for this S Token as you will need to use that Proof Key to generate the signature for calls to Xbox Live using tokens obtained with the S Token.
Additionally, the following headers must be included in the request:
| Header name | Header value |
|---|---|
| x-xbl-contract-version | 1 |
| content-type | application/json |
| signature | Message signature computed following the specification in the section of this document on proof keys. </br> The signing policy for the XSAS service is as follows: </br> { </br> Version = 1, </br> ExtraHeaders = [ ], </br> MaxBodyBytes = long.MaxValue, </br> SupportedAlgorithms = new[] </br> { "ES256" } </br> } |
Following is the code for a sample request:
    POST 'https://service.auth.xboxlive.com/service/authenticate'
    x-xbl-contract-version: 1,
    Signature: AAAAAQHPR6izYEzPeW1W5ghsfJP+Vzop0bEleqi6+XNG1eMt2htQr22W84Nku4y4fLqnryN1dFZF/0RuLD3UyY5U3uaBr37p+27TuA==,
    Content-Type: application/json,
    Content-Length: 242
    {
        "Properties":
        {
            "ProofKey":
                {
                    "alg":"ES256",
                    "kty":"EC",
                    "use":"sig",
                    "crv":"P-256",
                    "x":"G5lQkFZPAGDEKmd4BUdpinSWa8ptp8JrCvpNZu0t-I0",
                    "y":"mqHWdo9l3cq99t4xdI2gqhzLpf984oNF9jYA4D5mfnc"
                }
        },
        "RelyingParty":"http://auth.xboxlive.com",
        "TokenType":"JWT"
    }
Note Ensure that curve points x and y are an even length when converting them from decimal representation to hexadecimal representation. Failing to do this can result in an incorrect conversion length that will be rejected by the service.
Response
The data contract for the response appears below:
[DataContract]
public class XASTokenResponse
{
    [DataMember]
    public DateTime IssueInstant;
    [DataMember]
    public DateTime NotAfter;
    [DataMember]
    public byte[] Token;
}

Sample Response Body:

{
    "IssueInstant":"2014-03-24T21:56:33.31115Z",
    "NotAfter":"2014-04-07T21:56:33.31115Z",
    "Token":"eyJlbmMiOiJBMTI4Q0JiY...<truncated>...WxnIjoiUGagXRLVVC-L4",
    "DisplayClaims":null
}
Error handling
If the proof key signature is invalid, the server returns a 403 error.
Note For the SSL channel to be successfully established, the full trust certificate chain for the Business Partner Certificate needs to be installed on the client. The certificate chain is published and the appropriate certificates can be downloaded by opening the Business Partner Certificate, selecting the Certification Path tab, and viewing/downloading the individual certificates in question.
Obtaining an XSTS token for service to service calls
Details regarding the request, response, and error handling associated with obtaining an X token are explained in this section. For a full example code implementation of requesting, managing, and using XSTS tokens for S2S calls please see the XSTS Server sample available for download.
Request
The XSTS service provides the following REST endpoint to handle authorization:
https://xsts.auth.xboxlive.com/xsts/authorize
Your service performs a POST, with a body obeying the following XSTSRequest data contract. Note that when obtaining an XSTS token that is for your service only you do not include the DelegationToken value. That is used when you are generating an XSTS token to call Xbox Live on behalf of a specific user as previously mentioned above.
[DataContract]
public class XSTSRequest
{
    [DataMember(EmitDefaultValue = false)]
    public string RelyingParty { get; set; }
    [DataMember(EmitDefaultValue = false)]
    public string TokenType { get; set; }
    [DataMember]
    public XSTSPropertyBag Properties { get; set; }
    public byte[] ProofKey { get; set; }
}
Following is the code for a sample request:
POST https://xsts.auth.xboxlive.com/xsts/authorize HTTP/1.1
x-xbl-contract-version: 1
Signature:
AAAAAQHPljBFa8IDokJK3DPInYd8yzJiQOw5dvhAwN9JEPjkqaC7PirhKpUuhhG1Bt3S9EGlYNlzDNQi0raKe0Swes/vpHQk6UT90w==
Content-Type: application/json
Host: xsts.auth.xboxlive.com
Content-Length: 6473
{
  "RelyingParty": "http://xboxlive.com",
  "TokenType": "JWT",
  "Properties": {
    "ServiceToken": "eyJlbmMiOiJBM**<truncated>**AY",
    "SandboxId": "XDKS.1"
  }
}
The RelyingParty property
Tokens are issued (and encrypted) for specific relying parties. A service configured for a given relying party will only be able to consume tokens issued for that relying party.
Therefore, depending on the Xbox Live service that you need to call, you might need to retrieve different tokens, each time specifying the relevant relying party that you need a token for.
The following table indicates which relying party you need to get a token for in order to successfully access each Xbox Live service.
| Xbox Live Service HostName | Relying Party Name |
|---|---|
| https://musicdelivery-ssl.xboxlive.com | http://music.xboxlive.com |
| https://cloudcollection-ssl.xboxlive.com | http://music.xboxlive.com |
| https://music.xboxlive.com | http://music.xboxlive.com |
| https://collections.mp.microsoft.com | http://licensing.xboxlive.com |
| https://inventory.xboxlive.com | http://licensing.xboxlive.com |
| https://licensing.xboxlive.com | http://licensing.xboxlive.com |
| https://accountstroubleshooter.xboxlive.com | http://accounts.xboxlive.com |
| https://*.xboxlive.com (if not listed above) | http://xboxlive.com |
It is also possible to retrieve a token for a custom relying party that is specified for a title endpoint (for example, http://mytitle.com/ or rp://mytitle,com/). Note that custom relying party names, unlike Xbox Live relying party names, have a trailing ‘/’.
The PropertyBag property
The PropertyBag data contract for XSTS is as follows:
[DataContract]
public class XSTSPropertyBag
{
    [DataMember(EmitDefaultValue = false)]
    public string ServiceToken { get; set; }
    [DataMember(EmitDefaultValue = false)]
    public string[] UserTokens { get; set; }
    [DataMember(EmitDefaultValue = false)]
    public string SandboxId { get; set; }
    [DataMember(EmitDefaultValue = false)]
    public string DelegationToken { get; set; }
}
The ServiceToken property should contain the Token value of the response from XSAS.
The SandboxId property should contain the name of the sandbox that you’re trying to access, for example, “ABCD.1”. The main sandbox for all retail users and content is named “RETAIL” (note that the name is uppercase; it is case-sensitive). You can always set this dynamically by looking for the sandbox claim in the client side XSTS token used to authenticate the client with your service.
Note For the case where the Business Partner Certificate you’re using has been issued for a specific sandbox, you must use the same value here.
The DelegationToken property is optional in this scenario, and should be used only if you’re calling Xbox Live on behalf of the user. Here you should include the value of the DelegationToken claim extracted from an X token that you have previously received from an Xbox One console or other client. The DelegationToken claim can be added to your XSTS tokens as detailed in the section Additional configuration to call Xbox Live on behalf of a user: delegation, earlier in this white paper.
The UserTokens property should be used only if you’re making calls to Xbox Live from a website where the web servers get authenticated with a Business Partner Certificate, and the user gets authenticated to your website by using the Microsoft account OAuth flow for user authentication. In that case, the UserTokens property should be an array of one element that contains the token retrieved by exchanging the user’s access token retrieved from the Microsoft account for a U (User) token at the XASU (Xbox Authentication Service for Users) service.
Headers
| Header name | Header value |
|---|---|
| x-xbl-contract-version | 1 |
| content-type | application/json |
| signature | Message signature computed following the specification in the section of this document on proof keys. </br></br> The same key must be used to sign this message as was used to sign messages to other authentication services (XSAS or XASU). </br> The signing policy for the XSTS service is as follows: </br> { </br> Version = 1, </br> ExtraHeaders = [ ], </br> MaxBodyBytes = long.MaxValue, </br> SupportedAlgorithms = new[] { "ES256" } </br> } |
Response
The data contract for the XSTS response is as follows:
[DataContract]
public class XSTSTokenResponse
{
    [DataMember(Name = "IssueInstant", Order = 0)]
    public string IssueInstant { get; set; }
    [DataMember(Name = "NotAfter", Order = 1)]
    public string NotAfter { get; set; }
    [DataMember(Name = "Token", Order = 2)]
    public string Token { get; set; }
    [DataMember(Name = "DisplayClaims", Order = 3)]
    public XSTSDisplayClaims DisplayClaims { get; set; }
    public byte[] SigningProofKey { get; set; }
}

[DataContract]
public class XSTSDisplayClaims
{
    [DataMember(Name="xui")]
    public XuiClaims[] XuiClaims { get; set; }
}

[DataContract]
public class XuiClaims
{
    [DataMember(Name = "agg",EmitDefaultValue=false)]
    public string AgeGroup { get; set; }
    [DataMember(Name = "gtg", EmitDefaultValue = false)]
    public string Gamertag { get; set; }
    [DataMember(Name = "prv", EmitDefaultValue = false)]
    public string Privileges { get; set; }
    [DataMember(Name = "xid", EmitDefaultValue = false)]
    public string Xuid { get; set; }
    [DataMember(Name = "uhs", EmitDefaultValue = false)]
    public string UserHash { get; set; }
}
If no DelegationToken or UserTokens properties were specified in the request, the response will not contain any display claims.
Otherwise, the DisplayClaims property of the response will contain a set of information about the user, as defined in the preceding data contract:
- Agegroup: this can be Child, Teen, or Adult.
- Gamertag: the gamertag of the user.
- Privileges: the set of privileges that the user has. (For more information about privileges, refer to the Relying Party SDK documentation.)
-
Xuid: the xuid of the user.
Note You must not store the user xuid in your databases unless you have been given express consent by Microsoft (through your DAM) to do so.
- UserHash: unique identifier for the user to be used when constructing Authorization headers for requests to Xbox Live Services. See Calling Xbox Live Services for more information.
Note that not all relying parties expose all DisplayClaims. To receive all claim members, use the http://xboxlive.com relying party name.
Following is the code for a sample response for the “http://xboxlive.com” relying party:
HTTP/1.1 200 OK
Cache-Control: no-cache, no-store
Content-Length: 3196
Content-Type: application/json
X-Content-Type-Options: nosniff
X-XblCorrelationId: bafef442-9a66-4351-ae48-ef1812295b8e
Date: Wed, 02 Jul 2014 20:00:29 GMT
{
   "IssueInstant":"2014-07-02T20:00:29.3191631Z",
   "NotAfter":"2014-07-03T04:00:29.3191631Z",
   "Token":"eyJlbmMiO**<Truncated>** FtM",
   "DisplayClaims":{
      "xui":[
         {
            "agg":"Adult",
            "gtg":"Cool Gamertag here",
            "prv":"190 191 193 194 196 198 199 200 201 203 204 205 206 207 208 209 214 217 220 224 227 228 235 238 245 247 249 250 252 254 255",
            "xid":"2814630418365389",
            "uhs":"1283950176146904870"
         }
      ]
   }
}
Error handling
If the XSTS token request is rejected, the response will, in some cases, contain data indicating why it was rejected.
[DataContract]
public class AuthorizeResponseNotAuthorized
{
    [DataMember(Name = "Identity")]
    public string Identity { get; set; }
    [DataMember(Name = "XErr")]
    public uint XErr { get; set; }
    [DataMember(Name = "Message")]
    public string Message { get; set; }
}
The Identity and Message properties can be ignored.
The XErr property can have the following values:
| Value | Description |
|---|---|
| 0x8015DC03 | There is an issue with the user account (Enforcement Ban). The user should be advised to resolve any issue either on the console or by signing in to https://xbox.com. |
| 0x8015DC05 | There is an issue with the user account (Parental Restriction). The user should be advised to resolve any issue either on the console or by signing in to https://xbox.com. |
| 0x8015DC09 | There is an issue with the user account (Account Creation Required). The user should be advised to resolve any issue either on the console or by signing in to https://xbox.com. |
| 0x8015DC0A | There is an issue with the user account (Terms of Use not Accepted). The user should be advised to resolve any issue either on the console or by signing in to https://xbox.com. |
| 0x8015DC0B | There is an issue with the user account (Country not Authorized). The user should be advised to resolve any issue either on the console or by signing in to https://xbox.com. |
| 0x8015DC0C | There is an issue with the user account (Age Verification Required). The user should be advised to resolve any issue either on the console or by signing in to https://xbox.com. |
| 0x8015DC0D | There is an issue with the user account (Account Curfew). The user should be advised to resolve any issue either on the console or by signing in to https://xbox.com. |
| 0x8015DC0E | There is an issue with the user account (Child not in Family). The user should be advised to resolve any issue either on the console or by signing in to https://xbox.com. |
| 0x8015DC0F | There is an issue with the user account (CSV Transition Required). The user should be advised to resolve any issue either on the console or by signing in to https://xbox.com. |
| 0x8015DC10 | There is an issue with the user account (Account Maintenance Required). The user should be advised to resolve any issue either on the console or by signing in to https://xbox.com. |
| 0x8015DC13 | There is an issue with the user account (Gamertag Change Required). The user should be advised to resolve any issue either on the console or by signing in to https://xbox.com. |
| 0x8015DC12 | Access to the sandbox specified in the request was denied. You should verify that the correct sandbox was specified in the request, and/or that the appropriate access policies were created through your DAM. |
| 0x8015DC1F | An expired service token was passed in the request. |
| 0x8015DC22 | An expired User token was passed in the request. |
| 0x8015DC26 | An invalid User token was passed in the request. |
| 0x8015DC27 | An invalid service token was passed in the request. |
| 0x8015DC31 | Xbox Live authentication infrastructure is currently experiencing an outage. |
| 0x8015DC32 | Xbox Live authentication infrastructure is currently experiencing an outage. |
Calling Xbox Live Services
The objective of obtaining X tokens from the XSTS service is to make authenticated calls to various Xbox Live Services.
For that to be successful, an Authorization header must be specified when making calls to these services. The Authorization header takes the following structure:
authorization: XBL3.0 x=<userHash>;<XToken>
The userHash part of that header should be set as follows:
- For the case where a DelegationToken or UserTokens property was set in the XSTS request, the UserHash property from the DisplayClaims element of the XSTS response should be used.
Example:\
XBL3.0 x=1077552597660441275;eyJlbmMiO...(truncated)
- For the case where only a ServiceToken was specified in the XSTS request, the UserHash property should be set to the character “-“.
Example:\
XBL3.0 x=-;eyJlbmMiO...(truncated)
The XToken part of that header should be set to the value of the Token element in the XSTS response. Note that X tokens have an expiration date and time, as specified in the NotAfter element of the XSTS response. If an expired token is used to call Xbox Live Services, the request will be denied with an HTTP status of 401 and an indication in the www-authenticate header of the response that the token was expired.
Xbox Live Services also require a message signature computed following the specification described earlier.
When calling Xbox Live Services from your service, be sure to reuse X tokens until they are expired instead of requesting a new token with each request. Also batch calls together where possible such as social calls to increase throughput and avoid request throttling. For specific information on calling the Xbox Live Multiplayer services s2s, please see Service-to-service multiplayer session management.