Simple Constant Buffers
The following sections demonstrate how to create and use constant buffers on the Xbox One dev kit:
- What is a Constant Buffer?
- Declaration:
- Initialization:
- Update Data:
- Prepare to Render:
- Using Constant Buffers in HLSL:
- Multiple Shaders with Unique Constant Buffers
What is a Constant Buffer?
A constant buffer is a buffer that is shared between your local project and your HLSL files. They enable you to provide information to the HLSL functions without passing it as part of a vertex struct. Constant buffers are typically used to store data every vertex needs for rendering, that will not change on a per-vertex basis. For example, camera data is unlikely to change mid-frame and is therefore reasonable to store in a constant buffer.
Declaration:
Every constant buffer must be declared in multiple places. Your local project must define the constant buffer struct, and any HLSL file that will use that buffer must also declare it. The order of elements must be identical across all buffer declarations.
The constant buffer declaration in your local project must be slightly different from the declarations in HLSL files. The elements must be arranged in the same order, but the data types used will be different. The DirectX namespace provides several data types for use in constant buffers that can be directly translated into HLSL data types. For example, DirectX::XMFLOAT4 translates to float4 in HLSL. DirectX::XMMATRIX tranlates to matrix. For a complete list of data types, see DirectXMath.h.
Constant buffer declarations in HLSL files must also define which register the buffer will be stored in. Be sure to always assign the same constant buffer to the same register: if the same constant buffer is shared by your vertex shader and pixel shader, be sure to assign each constant buffer to the same register.
Here is a simple constant buffer declaration from a .h file:
C++
struct CB_ViewMtx
{
  XMMATRIX mView;
  XMFLOAT2 zoomMinMax;
};
The matching constant buffer declaration from a pixel shader HLSL file:
cbuffer cb_ViewMtx : register( b0 )
{
  matrix View;
  float2 zoomMinMax;
};
Notice that the HLSL declaration uses a different variable type, but the order of elements is the same. The HLSL declaration also defines which register the constant buffer occupies.
A note on memory alignment:
HLSL assumes that constant buffer data is arranged by type into 16-byte segments. If the data is not 16-byte aligned, the HLSL file will inject padding bytes to force the alignment. Some care must be taken to ensure that data is properly aligned between the C++ struct definition and the HLSL definition.
Consider the following two identical-seeming constant buffer definitions:
| HLSL Constant Buffer Definition: | C++ Constant Buffer Definition: |
|---|---|
cbuffer CB_FrameInfo : register( b1 )
{
  float value_1;
  float value_2;
  float value_3;
  float2 Vector;
};
|
C++
struct CB_FrameInfo
{
  float value_1;
  float value_2;
  float value_3;
  XMFLOAT2 Vector;
};
|
The definitions shown above appear to be identical, but the memory layout for each is actually quite different. The diagram below demonstrates the memory layout for each constant buffer.
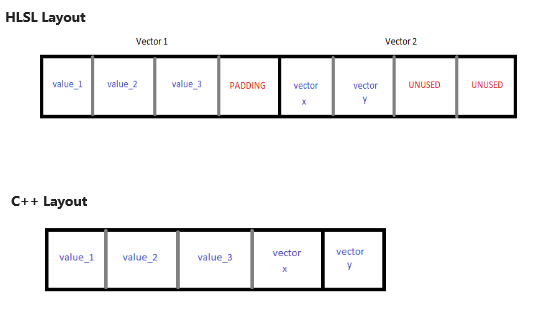
When the constant buffer is updated, the X value of the vector will be stored in the padded area, and the Y value will be stored in the X component of the HLSL vector, leading to unexpected results.
Add a padding variable to the C++ constant buffer daclaration to correct this issue:
C++
struct CB_FrameInfo_Padded
{
  float value_1;
  float value_2;
  float value_3;
  float padding;  // Provide the byte alignment padding that HLSL expects
  XMFLOAT2 Vector;
};
Initialization:
You will need a local ID3D11Buffer pointer to reference the constant buffer.
A buffer description (D3D11_BUFFER_DESC) is necessary to initialize the constant buffer. Set ByteWidth to the size of the constant buffer you are using, and set the BindFlags to D3D11_BIND_CONSTANT_BUFFER.
How you set the Usage and CPUAccessFlags parameters depends on whether the data stored in the constant buffer is going to be rarely or frequently updated. These parameters also affect how the constant buffer gets updated, which is discussed in the next section.
Dynamic Constant Buffers
Use D3D11_USAGE_DYNAMIC for any constant buffers that will be frequently updated. Set the CPUAccessFlags to D3D11_CPU_ACCESS_WRITE. This is the superior method for most cases, as it is generally much faster than default usage. Call ID3D11Device::CreateBuffer() to create the buffer.
C++
D3D11_BUFFER_DESC Dynamic_CB_Desc;
ZeroMemory( &Dynamic_CB_Desc, sizeof(Dynamic_CB_Desc) );

Dynamic_CB_Desc.Usage = D3D11_USAGE_DYNAMIC;
Dynamic_CB_Desc.ByteWidth = sizeof(CB_ViewMtx);
Dynamic_CB_Desc.BindFlags = D3D11_BIND_CONSTANT_BUFFER;
Dynamic_CB_Desc.CPUAccessFlags = D3D11_CPU_ACCESS_WRITE;

DX::ThrowIfFailed(m_d3dDevice->CreateBuffer( &Dynamic_CB_Desc, nullptr, m_CB_ViewMtx.GetAddressOf() ));
Default Constant Buffers
If the data stored in this constant buffer is going to change very rarely, set the Usage parameter to D3D11_USAGE_DEFAULT, and set CPUAccessFlags to zero. Updating this type of constant buffer incurs a higher CPU execution overhead. Once the buffer description is ready, create the constant buffer by calling ID3D11Device::CreateBuffer().
C++
D3D11_BUFFER_DESC Default_CB_Desc;
ZeroMemory( &Default_CB_Desc, sizeof(Default_CB_Desc) );

Default_CB_Desc.Usage = D3D11_USAGE_DEFAULT;
Default_CB_Desc.ByteWidth = sizeof(CB_ProjMtx);
Default_CB_Desc.BindFlags = D3D11_BIND_CONSTANT_BUFFER;
Default_CB_Desc.CPUAccessFlags = 0;

DX::ThrowIfFailed(m_d3dDevice->CreateBuffer( &Default_CB_Desc, nullptr, m_CB_ProjMtx.GetAddressOf() ));
Update Data:
The update process is different for dynamic and default constant buffers. In each case however, you will need to create a local instance of the constant buffer struct. Populate the local instance with whatever data you wish to store in the constant buffer.
Dynamic Constant Buffers
In order to update a dynamic constant buffer, you will need to create a D3D11_MAPPED_SUBRESOURCE object. Call ID3D11DeviceContext::Map() to prevent the GPU from accessing the constant buffer while you write to it. While the constant buffer is locked, call memcpy() to copy data from the local instance into your constant buffer. Finally, call ID3D11DeviceContext::Unmap() to release the constant buffer and allow the GPU to resume accessing it.
C++
CB_ViewMtx cbViewMtx;
cbViewMtx.mView = XMMatrixTranspose( g_ViewMtx );
cbViewMtx.zoomMinMax = g_zoomMinMax;
D3D11_MAPPED_SUBRESOURCE mappedResource;

m_d3dContext->Map( m_CB_ViewMtx.Get(), 0, D3D11_MAP_WRITE_DISCARD, 0, &mappedResource );
memcpy( mappedResource.pData, &cbViewMtx, sizeof( cbViewMtx ) );
m_d3dContext->Unmap( m_CB_ViewMtx.Get(), 0 );
Default Constant Buffers
Default constant buffers are simpler to update, all you need to do is call ID3D11DeviceContext::UpdateSubresource() to copy data from the local instance into the constant buffer.
C++
CB_ProjMtx cbProjMtx;
cbProjMtx.mProjection = XMMatrixTranspose( g_ProjectionMtx );

m_d3dContext->UpdateSubresource( m_CB_ProjMtx.Get(), 0, nullptr, &cbProjMtx, 0, 0 );
Prepare to Render:
You can have multiple instances of the same constant buffer type, but only active constant buffers can be seen by the HLSL files. Use ID3D11DeviceContex::SetConstantBuffers() to set a particular buffer as the active buffer. There are different versions of this function for each stage of the graphics pipeline, all with similar names and identical input parameters. To set a vertex shader constant buffer, call ID3D11DeviceContext::VSSetConstantBuffers(). To set a pixel shader constant buffer, call ID3D11DeviceContext::PSSetConstantBuffers()
Regardless of which shader you are setting constant buffers for, the parameters are the same. The first parameter determines which register you are populating, the second parameter determines how many registers you are populating, and the third parameter is a pointer to the buffer or buffers you wish to set. If you are setting more than one buffer in a single call, the first buffer will be placed at the register defined by the first input parameter, subsequent buffers will be placed in subsequent registers incrementally. Be sure to properly arrange the buffer pointer table so that it aligns with the constant buffer definitions in your HLSL files.
C++
// Set constant buffers
m_d3dContext->VSSetShader( m_VertexShader.Get(), nullptr, 0 );
m_d3dContext->VSSetConstantBuffers( 0, 1, m_CB_ViewMtx.GetAddressOf() );
m_d3dContext->VSSetConstantBuffers( 1, 1, m_CB_ProjMtx.GetAddressOf() );
m_d3dContext->VSSetConstantBuffers( 2, 1, m_CBforVS.GetAddressOf() );
Using Constant Buffers in HLSL:
Now that the constant buffers are set up in your local project, your HLSL files can interact with them. Shaders can reference constant buffer variables directly by name, no instance of the constant buffer is necessary. For example, if your pixel shader uses a constant buffer containing a variable named MeshColor, then the shader refers to that variable directly as MeshColor. The variable does not need to be preceeded by an identifier. You do not need to write ConstantBuffer.MeshColor or ConstantBuffer->MeshColor.
Examine the following constant buffer and the pixel shader that references it. Notice the constant buffer variables are referenced directly by name.
Constant Buffer Definition:
C++
cbuffer cbForPS : register( b0 )
{
  float4 vMeshColor;
  float4 vLightDir[2];
  float4 vLightColor[2];
};
Pixel Shader Referencing Constant Buffer Variables:
C++
float4 main( PS_INPUT input) : SV_Target
{
  //apply texture values
  float4 finalColor = txDiffuse.Sample( samLinear, input.Tex ) * vMeshColor;

  //do NdotL lighting for 2 lights
  for(int i=0; i<2; i++)
  {
    finalColor += saturate( dot( (float3)vLightDir[i],input.Norm) * vLightColor[i] );
  }
  finalColor.a = 1;

  return finalColor;
}
Multiple Shaders with Unique Constant Buffers
If you have multiple instances of the same shader stage (two different pixel shaders, for example) they can share the same constant buffers, but are not required to. If both shaders use the same constant buffer, simply set the shader you want to be active, and continue drawing. If the shaders use different constant buffers, you have two options: assign the constant buffers to different registers, or swap out the constant buffers when you change shaders.