Web Service Management
This topic describes how to create and manage your web services and endpoints in Xbox Developer Portal (XDP).
To create a web service
- Click Manage in the upper left to open its drop-down menu, then click Web Services to access the Web Service Management page.
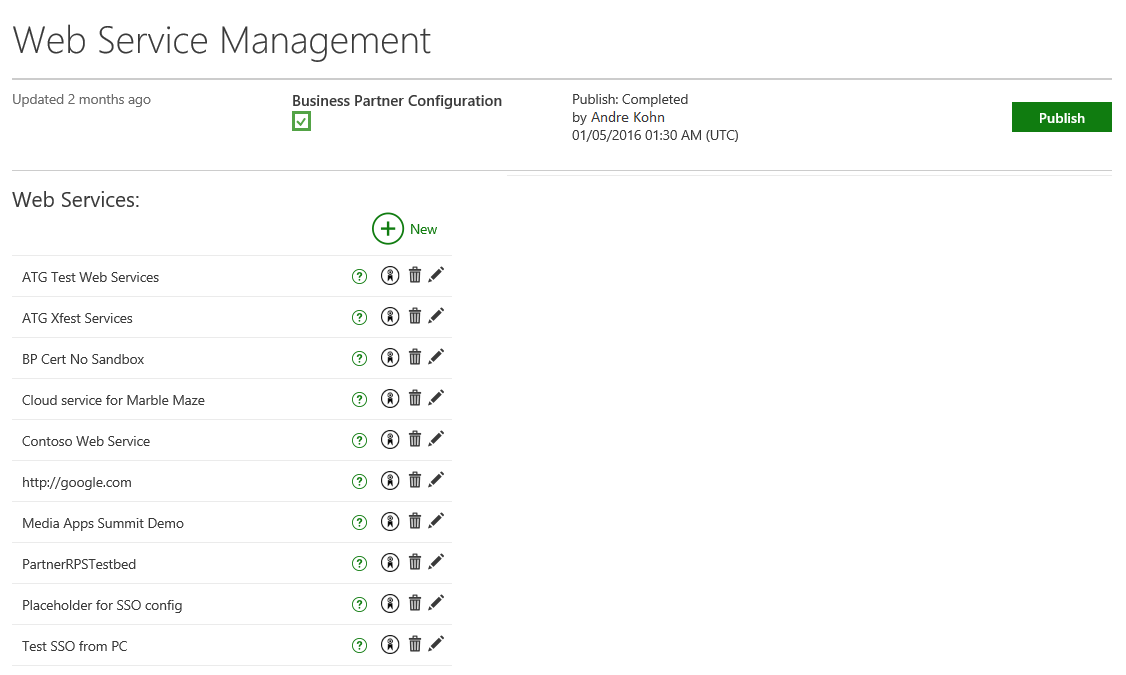
- Under Web Services, click New to open the Add New Web Service dialog box.
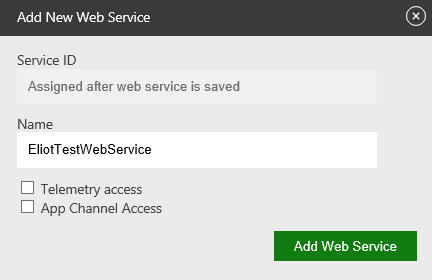
- Enter a friendly name that describes the purpose of the web service in the Name field.
- Set up content isolation policies by checking Telemetry access and/or App Channel Access. Telemetry access enables the partner to use a certificate generated for this web service to authenticate when calling specific Xbox Live services. App Channel access gives the media provider owning the service the authority to programmatically publish app channels for consumption on console through the OneGuide twist.
- When you are ready, click Add Web Service to create the web service. The Service ID will be generated automatically.
You can delete a web service by clicking the trash can icon, or edit it by clicking the pencil icon.
You can generate and download a Business Partner Certificate that can be used by your web services to make server to server calls to Xbox Live by clicking on the ribbon icon. For more information on certificates and how to create them, see Making service to service calls from your service to Xbox Live services.
Your web services will need endpoints that they call into, which you can create by following the steps outlined below.
To create an endpoint for your web service

- Click on the web service to which you want to add an endpoint, then click New under Endpoints to open up the Add New Endpoint dialog.
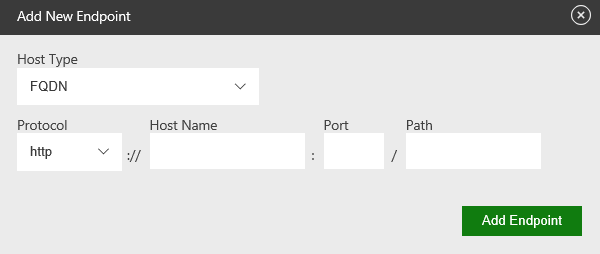
- Specify the Host Type-choose from the following:
- FQDN: fully qualified domain name-use if you want an exact match with the host name
- IP: an exact IP address
- CIDR: a range of IP addresses
- Wildcard: if you will use subdomains
- Specify the Protocol that your endpoint will use: http, https, udp, or tcp.
- Enter the Host Name and Port of your endpoint. If you are using http or https as your Protocol, you can also optionally enter the Path.
- If your endpoint is using https as its Protocol, you can check Requires Single Sign On Token to bring up more fields that allow you to specify a Token Type, Token Definition, and Signature Policy Set that your web service can use to enable SSO. For the latter two fields, you can select a pre-existing item or click Add New to create a new one. For more information on setting up SSO, see Provide Single Sign-On (SSO) to Xbox Live users. Finally, you can optionally select a Service certificate chain for your endpoint to use.
- If your endpoint is using udp or tcp, you need to specify both a Client Certificate Chain and a Service Certificate Chain. Again, you can either select a pre-existing one or click Add New to create a new one.
- Click Add Endpoint to create your new endpoint.
You can delete an endpoint by clicking the trash can icon, or edit it by clicking the pencil icon.
The settings you should use when setting up your endpoints differ depending on what you are trying to accomplish-see the other topics in this section for more information.
Business Partner Configuration
When configuring domain redirection, you need to click the checkbox under Business Partner Configuration to access the Business Partner: <Publisher name> page. Here you can view your PartnerId, which is a unique identifier for the publisher, as well as the MSA Subtarget, a publisher-wide configuration setting used to appropriately anonymize user and device identities.
For the full process of configuring domain redirection, see Configuring Pairwise ID for a Web Service.
To publish your changes
To publish any changes you make on the Web Service Management page, including (but not limited to): creating a new web service; checking or unchecking the Telemetry access or App Channel Access checkboxes; adding, removing, or editing an endpoint under a web service; and adding or editing any aspect of a relying party definition, click the Publish button.
It may appear as if nothing has happened, and you may need to refresh the page. But once you do, XDP will display Publish: Completed with your name and the date of publish (UTC) below.