Enabling Assembly Language Code Development in Visual Studio
Simon Cooke, Xbox Advanced Technology Group
Updated August 23rd 2017
In this topic
The pros and cons of using raw assembly language
Working with assembly language in Visual Studio 2015/2017
How to enable MASM in the Visual Studio IDE
Adding an assembly language file to your project
Creating a C++ function declaration for your function
Introduction
In today’s world of modern C++ compilers, it’s rarely necessary to roll up your sleeves and dive into assembly language development for ultra-tight inner loops and micro-optimizations. 99.999% of the time you will never need to drop down to assembly language.
However, those scenarios still exist.
Typically they revolve around careful padding and alignment of functions, careful ordering of code instructions (which will be re-ordered by the CPU anyway, but can be meaningful in some cases), or working around rare compiler bugs.
By default, Visual Studio no longer supports MASM (Microsoft Macro Assembler) development. Instead, you should use compiler intrinsics, which can achieve the same thing without missing out on all the power of the optimizer, portability, and maintenance, and take register-management off your hands. They make life easier, and avoid your needing to know the nitty-gritty of calling conventions, epilog/prologue code and stack-based unwinding. Unlike assembly language functions, they also enable full inlining, and integrate seamlessly into existing code blocks.
The pros and cons of using raw assembly language
There are more disadvantages to using assembly language for development than advantages. Proceed with caution.
Disadvantages
Following are distinct disadvantages to using assembly language for ordinary development, even if you are an expert.
The compiler cannot inline your assembly language code, or modify it in any way. This means that it will always generate a call, and cannot optimize your code. It can do this for compiler intrinsics. This is a key point in that the compiler can’t merge the function into other call-points, and it forces the compiler’s optimizer to take the most conservative possible stance towards your code. The cost of the branch to call the function may actually outweigh your optimizations for smaller functions.
You need to rigorously honor the calling convention standards (ABI) at the entry point to and exit from your assembly language code, including properly saving and restoring nonvolatile registers. The overhead of this can often outweigh the same solution written with intrinsics and inlined by using link-time code generation. It can also be difficult to remember the rules. X64 native codgen must closely follow critical platform rules to remain a valid program, and writing in assembly means following all those rules manually.
It will be more difficult to debug.
Other team members may not be familiar with assembly language development to your level of proficiency. This will make it difficult for them to maintain or support your code.
The compiler is often better at remembering the cost of instructions than you are, particularly on architectures with complex instruction sets such as x64. It will vary the code generated (often radically) to exploit this knowledge, including reordering reads and writes comprehensively to avoid pipeline bubbles, cache stalls, etc.
Intrinsics can be portable, assembly language never is. If your x64 native codebase also builds for x86 (32-bit)—or ever will—using intrinsics instead generally just works. The DirectXMath library makes heavy use of this fact and the codepaths for both x86 and x64 native are 100% identical as a result.
The compiler is free to emit the best possible instruction sequence for a given intrinsic based on compiler settings. For example, the compiler will use the VEX prefix version of SSE/SSE2 instructions when building with /arch:AVX, while the same intrinsics code will not use it for general x64 native builds for compatibility with non-AVX platforms.
Advantages
That being said, there are some advantages to assembly language development—even today!—although they do tend to be limited to very specific scenarios such as the following.
You have specific and precise control over the instructions that are used. This can be important if you know of an optimization that the compiler does not. Note that on a fixed platform like Xbox One, this control can be carefully applied. Keep in mind that just because you have perfectly hand-tuned your assembly language for the Xbox One console, that same code running on x64 Windows PCs will likely have widely different timing/scheduling across the array of CPUs it might run on.
You need to manually layout branches and code for optimization purposes, and cannot rely on Profile Guided Optimization.
You need to target the specific characteristics of a specific processor in a CPU family. Visual C++ generates code that is optimized for families of CPUs, and has to generate code that will operate well on all CPUs in that family. It does not target individual CPUs. Note that Xbox One builds use /favor:AMD64, which allows the compiler to make some better tradeoffs between Intel vs. AMD CPUs, something that your assembly has to be manually coded to do for each target CPU.
You can guarantee that you can do a better job than the compiler. These scenarios are rare today, and most instances can be covered by using appropriate compiler intrinsics, but there still may be cases where you can hand-craft solutions which do not fit the C++ model well.
Best practices
If you still decide to go ahead and write assembly language code, you should follow this list of best practices first.
Write the code in C++ first, and profile it. Is it fast enough already? If so, your job is done.
Make your C++ code conditionally compilable, and keep it handy, alongside the assembly language version. This can be used by other programmers—and yourself—as a guide to help you when you return to the code later and need to debug it or make changes. You can also keep the code side-by-side with your optimized version, and compare outputs as a unit-test to ensure that your assembly language matches the behavior of the C++ equivalent. This will also help with future portability.
Rewrite the C++ version using intrinsics and profile it. Is it fast enough already? If so, your job is done. Relax and reconsider your course of action. If it is not, and you believe you can do better by hand, comment out this version and keep it as you did for the C++ version, and then put it in your unit test framework as a validation check. Take a look at the DirectXMath implementation, which is fully inline code, for usage patterns and inspiration.
Examine the disassembly of the intrinsic version, and look for ways you could optimize it. This will guide your work and help to ensure that you don’t forget steps, and are heading down the correct path. This will also help ensure that you write the correct prolog and epilog code for your assembly language version.
Write the assembly language version. Using your elite skills, come up with the code that will beat the compiler. To those about to go “unto the breach”—we salute you.
Write a C++ header file that allows access to the function you have created. To call your assembly language function, you will need to create a C++ function declaration that matches it so that the rest of your title can find it. The details about how to do this can be found in the section Creating a C++ function declaration for your function later in this topic.
Add your code to your unit-test framework and profile it. Once completed, add it to your unit test framework so that you can compare it to your baselines, and consider using the PIX CPU profiling tools to examine the results.
Note: Profiling the code in isolation is not a valid benchmark—it’s a micro-benchmark and validation test. For a true test, compare the use of your assembly language code vs. the same, non-assembly language code in a production environment (building with LTCG and Profile Guided Optimization). If the assembly version isn’t really that much better than the C++ version, ditch it and go back to C++. It’s quite possible that all of your work will be in vain, and will not actually give you better results than the compiler. You should not make assumptions here, which is why the profiling step is important. If your assembly version is awesome, be sure to keep the original C++ version around for portability AND be sure to isolate the assembly version to only your Xbox One build unless you have vetted it on a wide array of PC hardware.
If the assembly version isn’t really that much better than the C++ version, ditch it and go back to C++. It’s quite possible that all of your work will be in vain, and will not actually give you better results than the compiler. You should not make assumptions here, which is why the profiling step is important.
If your assembly version is awesome, be sure to keep the original C++ version around for portability AND be sure to isolate the assembly version to only your Xbox One build unless you have vetted it on a wide array of PC hardware.
Working with assembly language in Visual Studio 2015/2017
The Visual Studio 2015/2017 compiler (and earlier versions) do not expose assembly language development to end users, and inline assembly (__asm {} blocks) is not supported for x64 development (inline assembly is also not supported for Windows ARM platforms).
Compilation of standalone assembly language files is still supported, however—it just needs to be enabled in the IDE.
How to enable MASM in the Visual Studio IDE
- Open your solution in Visual Studio.
- Right-click the project file and then select Build Dependencies > Build Customizations.
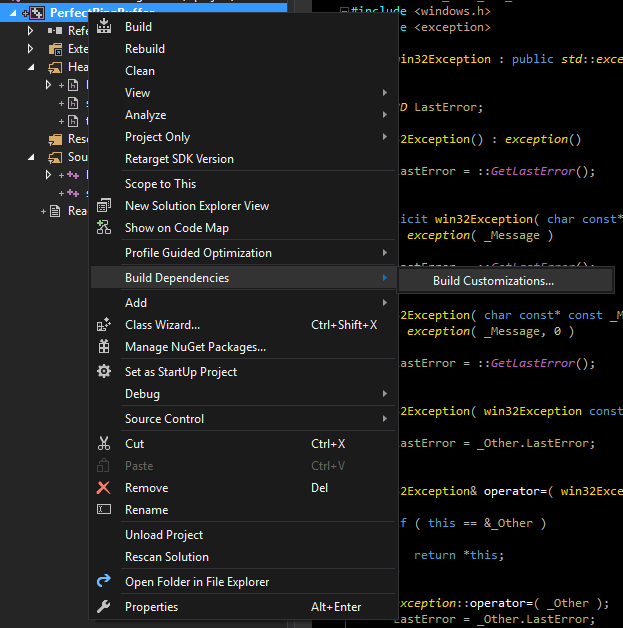
- In the Visual C++ Build Customization Files dialog, select the masm (.targets, .props) check box, and then click OK.
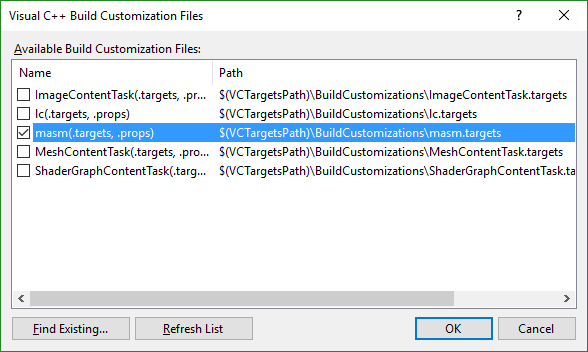
This will enable the MASM file types in your project.
Syntax highlighting is not supported for MASM files, but you may be able to find third-party Visual Studio add-ins on the web that you can use. Alternatively, you can modify usertype.dat to add keywords.
Breakpoints and debugging are supported in assembly-language files.
Adding an assembly language file to your project
There are no default item templates in Visual C++ 2015/2017 for assembly-language files. To add a file:
- Select Project > Add New Item.
- Under Visual C++ > Utility, select Text File.
- Give the file a name, and the suffix .masm. This will then be recognized as a MASM file.
Using macros
There are a variety of predefined macros that make developing against the standard Windows calling conventions easier. These can typically be found in
C:\Program Files (x86)\Windows Kits\[version of Windows]\Include\[build_version]\shared\.
macamd64.inc contains the bulk of the macros you will need for developing your own routines. ksamd64.inc is also included in the kit, but contains macros intended for kernel and driver development.
What’s included in macamd64.inc
The version of macamd64.inc that ships with the Windows 10 SDK includes the following macros.
| Macro name | Description |
|---|---|
| push_reg <reg> | This macro emits a single-byte push reg instruction in a nested prologue, as well as the associated unwind code. |
| rex_push_reg <reg> | This macro emits a single-byte push reg instruction in a nested prologue, as well as the associated unwind code. This differs from push_reg only in that a redundant rex prefix is added. rex_push_reg must be used in lieu of push_reg when it appears as the first instruction in a function, as the calling standard dictates that functions must not begin with a single byte instruction. |
| push_eflags | This macro emits a single-byte pushfq instruction in a nested prologue, as well as the associated unwind code. |
| rex_push_eflags | This macro emits a single-byte pushfq instruction in a nested prologue, as well as the associated unwind code. This differs from push_eflags only in that a redundant rex prefix is added. rex_push_eflags must be used in lieu of push_eflags when it appears as the first instruction in a function, as the calling standard dictates that functions must not begin with a single byte instruction. |
| ret_zero | This macro emits a three-byte return instruction. This differs from the typical ret in that it adds additional padding bytes that prevent branch misprediction problems when the ret is the target of a (un)conditional branch, or is immediately preceded by a conditional branch. |
| alloc_stack <Size> | This macro emits an opcode to subtract Size from rsp, as well as the associated unwind code. |
| save_reg <Reg>, <Offset> | This macro emits an opcode to save the non-volatile 64-bit general purpose register indicated by Reg at offset Offset, relative to the current position of the stack pointer. It also generates the associated unwind code. |
| save_xmm128 <Reg>, <Offset> | This macro emits an opcode to save the 128-bit non-volatile xmm register indicated by Reg at offset Offset, relative to the current position of the stack pointer. It also generates the associated unwind code. |
| push_frame | This macro emits unwind data indicating that a machine frame has been pushed on the stack (usually by the CPU in response to a trap or fault). |
| set_frame <Reg>, <Offset> | This macro emits an opcode and stack unwind data establishing the use of <Reg> as the current stack frame pointer (via .setframe). It also sets the stack frame pointer (rsp) to the value of reg (or reg + offset). Reg – supplies the integer register to use as the current stack frame pointer. Offset – supplies the optional offset of the frame pointer relative to the stack frame. In stack frames greater than 080h bytes, a non-zero offset can help reduce the size of subsequent opcodes that access portions of the stack frame by facilitating the use of positive and negative single-byte displacements. If not supplied, no offset is assumed (omitting the offset is slightly more efficient than providing a 0 offset). |
| END_PROLOGUE | This macro marks the end of the prologue. This must appear after all of the prologue directives in a nested function. |
| LEAF_ENTRY <Name>, <Section>, <NoPad> | This macro indicates the beginning of a leaf function. A leaf function is one that DOES NOT: <ul><li>manipulate non-volatile registers</li><li>manipulate the stack pointer</li><li>call other functions</li><li>reference an exception handler</li><li>contain a prologue</li><li>have any unwind data associated with it</li></ul> Name - supplies the name of the function Section - Supplies the name of the section within which the function is to appear NoPad - If present, indicates that the function should not be prefixed with 6 bytes of padding. This is for internal use only; the calling standard dictates that functions (nested and leaf) must be prefixed with padding. For usage with PIX CPU traces, padding must always be included. |
| LEAF_ENTRY_ARG1 <Name>, <Section>, <Arg1>, <NoPad> | This macro indicates the beginning of a leaf function, as LEAF_ENTRY above, and declares one input parameter so that debug info will be generated for it. The other forms, LEAF_ENTRY_ARG2 and LEAF_ENTRY_ARG3, are similar. |
| LEAF_ENTRY_ARG2 <Name>, <Section>, <Arg1>, <Arg2>, <NoPad> | See LEAF_ENTRY_ARG1. |
| LEAF_ENTRY_ARG3 <Name>, <Section>, <Arg1>, <Arg2>, <Arg3>, <NoPad> | See LEAF_ENTRY_ARG1. |
| LEAF_END <Name>, <Section> | This macro indicates the end of a leaf function. It must be paired with a LEAF_ENTRY macro that includes matching Name and Section parameters. |
| NESTED_ENTRY <Name>, <Section>, <Handler>, <NoPad> | This macro indicates the beginning of a nested function. A nested function is one that does any of the following: <ul><li>manipulates non-volatile registers</li><li>manipulates the stack pointer</li><li>references an exception handler</li><li>calls other functions</li></ul> A nested function must include a prologue with unwind data. Name - supplies the name of the function. Section - supplies the name of the section within which the function is to appear. Handler - supplies the name of the handler for exceptions raised within the scope of this function. NoPad - if present, indicates that the function should not be prefixed with 6 bytes of padding. This is for internal use only – the calling standard dictates that functions (nested and leaf) must be prefixed with padding. For usage with PIX CPU traces, padding must always be included. |
| NESTED_END <Name>, <Section> | This macro indicates the end of a nested function. It must be paired with a NESTED_ENTRY macro that includes matching Name and Section parameters. |
| ALTERNATE_ENTRY <Name> | This macro indicates an alternate entry point in a function, or a synonymous name for an existing function. |
| Yield | This macro generates a yield instruction, interpreted as an indication of a stall or idle condition. This is useful within spinlocks, as it reduces bus usage and read-overhead due to pipelined reads when spinning by canceling any pending speculative reads, as the spinlock only wants the latest and the tight loop will have reads several in-flight. It is the equivalent of the mmpause intrinsic. |
We highly recommend using these macros instead of writing your own equivalent code because they support correct unwinding behavior in exception handling and on function return.
Creating a C++ function declaration for your function
The simplest way to define a function declaration in C++ that can be used by C++ code to call your assembly-language function is to use extern “C” to create a declaration that is undecorated and matches your assembly language function name.
For example, if you create a leaf function with the name CoolAmd64Assembly that takes no parameters and returns nothing, you might declare it in a C++ header file as:
extern “C”
{
   void CoolAmd64Assembly();
}
When you link with the obj file that the compiler generates from your .asm file (this should happen by default), your assembly language function should now be accessible.
Summary
Assembly language programming is not normally needed during Xbox One development due to the presence of compiler intrinsics and libraries such as DirectXMath that hide the details from you and under most circumstances deliver equivalent performance. However, in increasingly rare circumstances, dropping down to assembly language may prove a useful tool in your toolkit.
While Visual Studio 2015/2017 does not blatantly expose support for writing assembly language code, it’s still present and available for your use should you choose to do so.
Remember to treat writing assembly as last-resort, rarely used case that is specific to your target platform. It should not be the first thing you think of, and you will want to keep the original C++ implementation around and working. Following the best practices in this document should make it safer for you to do, and more productive in the rare cases where you need to.
References
- Compiler Intrinsics guide for VC++ 2015 - A list of compiler intrinsics supported by VC++ 2015, and how to use them.
- Compiler Intrinsics guide for VC++ 2017
- Optimizing subroutines in assembly language: an optimization guide for x86 platforms (Agner Fog) - This paper is an excellent guide to the ins and outs of optimizing assembly language for x64 and x86 platforms.
- Agner Fog Software Optimization Resources - An excellent set of resources for software optimization, focused specifically on x86 and x64 CPUs, and particularly on the differences between different CPUs within Intel and AMD families.
- AMD64 Architecture Programmer’s Manual (Volumes 1-5 - A series of reference guides to the AMD64 instructions.
- Xbox One AMD64 CPU Instruction and ABI Quick Reference Guide (Simon Cooke, Xbox ATG) – A quick reference guide to the instructions, registers, and compiler conventions used by the Xbox One platform.