Note This article only applies if you are using Stats 2013 or Achievements 2013.
First glance For Xbox One
For titles configured on XDP using Data Platform 2013, this article will walk you through configuring an event and stat on XDP, and then adding code to your title to send events and update stats.
1. Log in to the Xbox Developer Portal (XDP)
The following examples use the Xbox Developer Portal (XDP) to configure the Xbox Live experience for the game.
After your company has an agreement to create products for Xbox One, you can begin to configure your content in the XDP. If your company is not yet set up with XDP access and you are developing a game, contact your Microsoft account manager; if you are developing an application, contact Xbox App Partner Requests (xboxapps@microsoft.com); and if you are working with the ID@Xbox program contact ID Setup (idsetup@microsoft.com).
The ID@Xbox program enables qualified game developers of all sizes to unleash their creativity by self-publishing digital games on Xbox One, giving studios the tools and support needed to maximize their success. Visit http://www.xbox.com/en-us/Developers to learn more.
Once you have access to XDP, you will need Microsoft to create a product group for your game. Your Microsoft account manager can assist with this process.
Once a product group has been created for your game, you can use XDP to configure Xbox Live for your game. The Xbox Live configuration for your game is also referred to as its Service Configuration.
The following steps will navigate to the location in XDP where you can add the events, stats, achievements, and leaderboards for your game:
- Log into the XDP.
- Select the product group that contains or will contain your game.
- On the Product Group page, either select your game, or click the Add New Product button to create a new entry.
- If you are creating a new product, enter a name for your product.
- For resource access, select Exclusive Resource Access (ERA).
- Select if you need to produce physical media for the game, or if it will be digital download only.
- Click the Create Product button.
- On the bottom of the left navigation pane, expand the sandbox that your product was created in.
Service configurations are defined at the sandbox level. If you export your product to another sandbox, you will also need to export your service configuration.
- On the sandbox sub-menu, click Service Configuration. From this page, you can configure Xbox Live service for your app, in the current sandbox.
2. Identify and define the events you’ll need for your scenarios
In XDP, before we can define the rules that implement the player experiences we want to achieve, we need to identify and define the events which will drive those experiences.
Since achievements and leaderboards are based on user stats, we can look at the stats that we will define in order to see what events our title will need to send.
To power the experiences we will define in this example, we will use an event that we send at the end of each lap in a race.
We’ll call this event LapCompleted, and it will be the event that we’ll use to drive our customized experiences. In order to power those experiences, we’ll also define the following fields as part of our LapCompleted event:
- LapTime - a field that indicates the time in minutes to complete a lap.
- CarModel - a string field that indicates the model of the car used to complete the lap.
- WeatherCondition - a string field that identifies the weather condition of the track when the lap was completed.
- TrackId - the ID of the track that the lap was completed on.
Now, we’ll define this event in XDP:
- In XDP, on the left navigation pane, navigate to Test Sandbox > Service Configuration > Events & Stat Rules.
- Click New to create a new event:
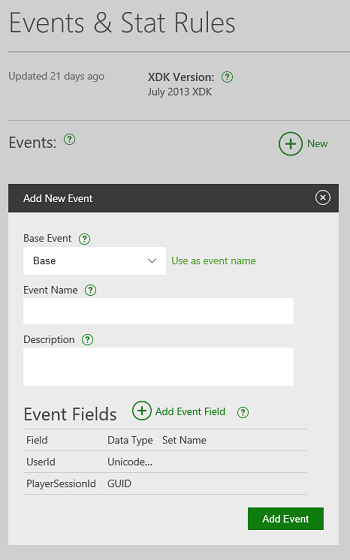
- Select Base as the Base Event.
- Enter LapCompleted as the Event Name.
- (Optional) Enter a description for the event.
- Click Add Event Field.
- Enter LapTime for the field name, and specify the Type as Double.
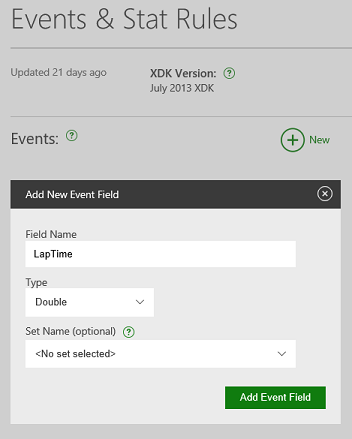
- Click Add Event Field.
- Repeat the process to add the following event fields:
- CarModel - UnicodeString
- WeatherCondition - UnicodeString
- TrackId - Int32
- Your event should look something like this:
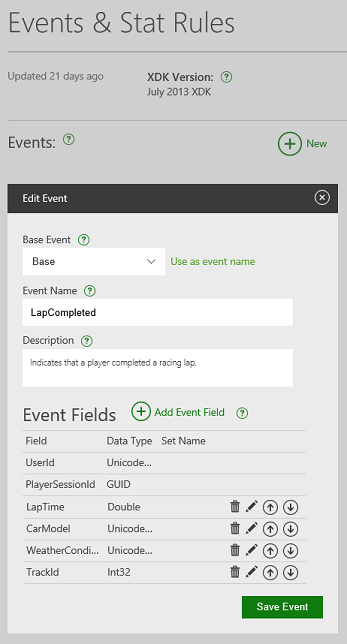
- Click Save Event to save the event in your sandbox.
3. Design Stat Rules
Now that we have defined the player experiences, we can start creating the Stat Rules that implement those experiences. Since we’re using Lap Time for all three scenarios (Featured Stats, Achievements, and Leaderboards) we’ll go ahead and configure that first.
This stat will show up as a Featured Stat (also known as a Hero Stat) and will also be used for a Global Leaderboard with additional metadata.
The game fires in-game events when certain actions happen in the game and are considered to be the raw data for creating stats. At least one stat should be created or updated by every event (generating multiple stats in a single event will be covered in the Player Stats topic).
On the Events & Stat Rules page, select the LapCompleted event from the list of events.
Click New (to the right of Stat Rules) to create a new Stat Rule. The new stat rule will be based on the selected event.
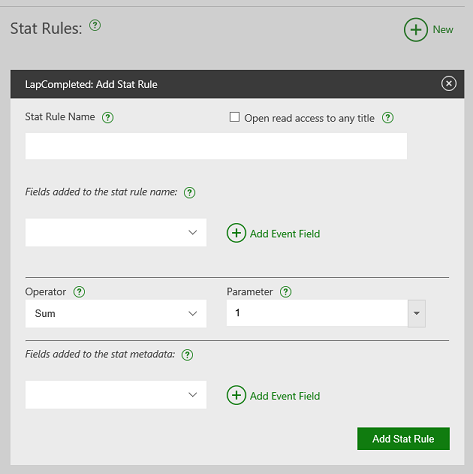
Enter FastestLap for the Stat Rule Name.
Since we want other apps and titles, such as the Windows 10 Xbox Live app, to be able to access stats created by this rule, check the Open read access to any title box.
Stat Rules have logic that defines how the event will create or update the stat. Since we want to track the fastest lap, we only want to update the stat value if the new Lap Time is lower than the existing fastest lap time.
To do this, select LapTime as the Parameter, and Min as the operator:
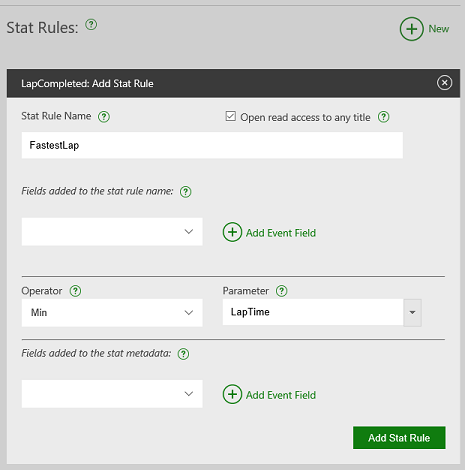
Finally, we need to make sure that the event contains all the extra data (known as Stat context or metadata) that we need for this specific stat: the player’s car, track, and weather conditions.
Select CarModel and click Add Event Field to add the field to the metadata.
Repeat this for the WeatherCondition and TrackId fields:
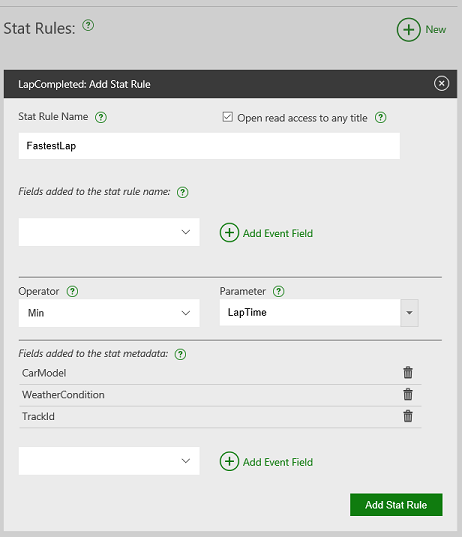
Click the Add Stat Rule button to create the stat rule.
4. Featured stats, leaderboards, and achievements
Featured stat
Now that the stat rule is complete, we want the stat to show up in the GameHub’s Achievement tab so we have to configure a Featured Stat (known as a Hero Stat in XDP).
- In XDP, on the left navigation pane, navigate to Test Sandbox > Service Configuration > Hero Stats.
- Click New to add a new featured/hero stat.
- Enter Fastest Lap for the display name.
- Select ShortTimespan as the display format, and Seconds as the display units.
- Select Best for the display semantic. This indicates to companion apps that the value represents a best score for the stat.
- Click Select an Instance, and select FastestLap as the stat instance. This indicates that the featured stat is based on the FastestLap stat value.
- Enter 1 for the ordinal value. This indicates that this featured stat should be displayed first when listing the featured stats.
- Select Ascending for the sort order. This indicates that lower values are better than higher values.
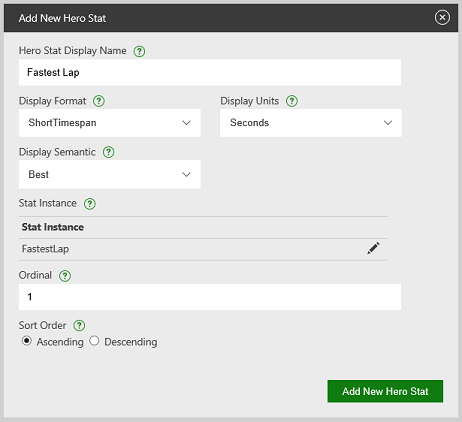
- Click Add New Hero Stat to create the featured/hero stat.
Global Leaderboard
Using the same Lap Time stat, we can configure a leaderboard so that every player can see how their lap time ranks against all other players across the world.
- In XDP, on the left navigation pane, navigate to Test Sandbox > Service Configuration > Leaderboards.
- Click New to create a new global leaderboard.
- Enter FastestLap as the Leaderboard ID.
- Click Select an Instance, select the FastestLap stat rule that we created earlier, and click Add Stat Instance.
- Select Ascending for the sort, which indicates that lower times are better.
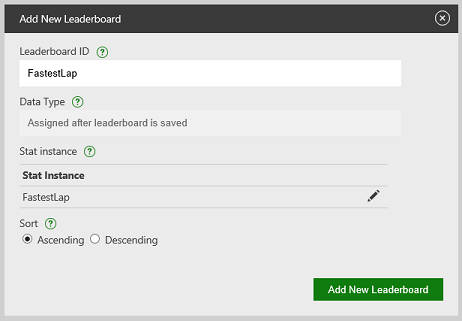
- Click Add New Leaderboard to create a new global leaderboard.
As player stats get updated, the leaderboard will also be updated to reflect any change in the rankings.
If there are already existing player stats when the leaderboard is created, it may take several hours before the new leaderboard is updated with the pre-existing stats.
Achievements
We want players to really go all out and challenge themselves to find a track and car combination that let’s them finish a lap in under a minute. This is how we would go about and configure the Achievement.
- In XDP, on the left navigation pane, navigate to Test Sandbox > Service Configuration > Achievements & Challenges.
- Click New to add a new achievement.
- Enter Under 60 seconds for the achievement name.
- Enter Completed a lap in under 60 seconds for the description. This is the description that is displayed to users when the achievement is unlocked.
- Enter Complete a lap in under 60 seconds for the not achieved description. This is the description that is displayed to users when the achievement is still locked.
- Upload a 1920x1080 pixel png file to serve as the achievement icon.
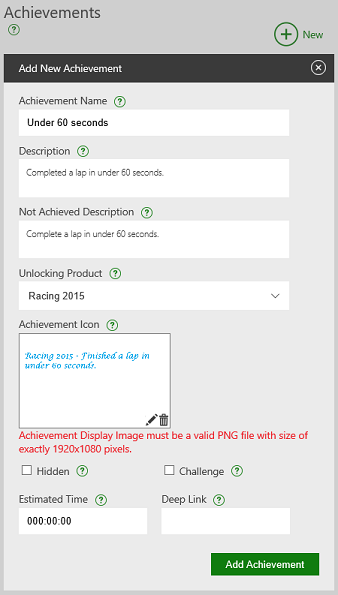
- Click Add Achievement to create the achievement.
- Make sure that the Under 60 seconds achievement is selected in the list of achievements, and click the New* button to the right of **Rewards in order to give the player a reward for unlocking the achievement.
- We’ll give the player 20 Gamescore points for unlocking this achievement. For reward type, select Gamerscore.
- Enter 20 for the value.
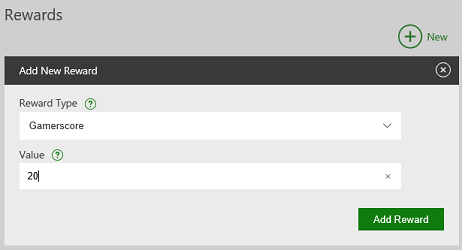
- Click Add Reward.
- Make sure that the Under 60 seconds achievement is still selected in the list of achievements, and click the New* button to the right of **Rules in order to define the conditions that unlock the achievement.
- Enter Under 60 seconds rule for the rule name. This value is not visible to the user, so you can call it whatever you want.
- For the action, select Min. This indicates that the achievement is unlocked when the select stat instance is less than or equal to the threshold value.
- Enter 60 for the threshold value.
- Click Select an Instance, select the FastestLap stat rule, and click Add Stat Instance.
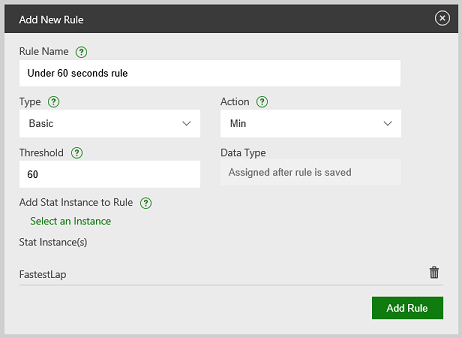
- Click Add Rule to create the rule for the achievement.
Add code to send the event from your title
Now that we’ve defined the LapCompleted event that Xbox Live will use to update our user scenarios, we need to add code to our title in order to send the event when a player completes a racing lap in the game.
For Xbox One console games, you’ll need to create wrapper functions to send the event from your code. You do this by downloading a manifest file from XDP, and then using a tool to create a custom header file for you.
Once you have authenticated your player and created an XboxLiveContext object for the player, you can get a handle to the EventsService class from the XboxLiveContext.EventsService property.
The EventsService class contains the overloaded WriteInGameEvent() method, which is the method you’ll use to write the game event. In C++, the equivalent method is called write_in_game_event().
If your game event doesn’t need any additional data for your user scenarios (for example, a “FoundSecretLair” event), you can use the simple form of the WriteInGameEvent method, which takes a single event name as the only parameter:
WriteInGameEvent("FoundSecretLair");(WinRT)write_in_game_event("FoundSecretLair");(C++)
Note The event names are not case sensitive. However, the name of the event must match the exact spelling of the event that you defined in your service configuration. If your title writes an event that does not match any stat rules that are defined for your configuration, the Xbox Live service silently ignores the event, and your title recieves no notification that the event was ignored.
In order to include data with your event, you’ll need to use the second version of the API, which includes two additional parameters. The first parameter is the set of dimension values for your event, and the second parameter is the set of measurement values:
WriteInGameEvent("LapCompleted", dimensions, measurements);(WinRT)write_in_game_event("LapCompleted", &dimensions, &measurements);(C++)
In WinRT, these sets of values are defined as PropertySet values. In C++, the sets are defined as web::json::value objects.
The following example demonstrates a WinRT example of a method that writes the LapCompleted event, along with contextual data about the event:
public void WriteLapCompleted(
  Microsoft.Xbox.Services.XboxLiveContext xboxLiveContext,
  int lapTime,
  string carModel,
  string weatherCondition,
  int trackId )
{
    string xuid = xboxLiveContext.User.XboxUserId;

    try
    {
        var measurements = new Windows.Foundation.Collections.PropertySet();
        measurements.Add("LapTime", lapTime);

        var dimensions = new Windows.Foundation.Collections.PropertySet();
        dimensions.Add("CarModel", carModel);
        dimensions.Add("WeatherCondition", weatherCondition;
        dimensions.Add("TrackId", trackId);

        xboxLiveContext.EventsService.WriteInGameEvent("LapCompleted", dimensions, measurements);

    }
    catch (Exception e)
    {
        // Handle errors
    }
}