NUIView
Use this tool to view NUI infrared, video, depth, skeleton and identity information that originates from the Kinect sensor. It allows you to record and play back Xbox raw files (XRFs), to record and play back Xbox event files (XEFs), and to identify users who are already enrolled on the console.
Important NUIView is not installed on your dev kit by default. You must manually install this app from the %XboxOneXDKLatest%\sideload\NuiView folder under your XDK installation.
The following image shows the default view of the NUIView tool with one user present in the field of view of the Kinect sensor.
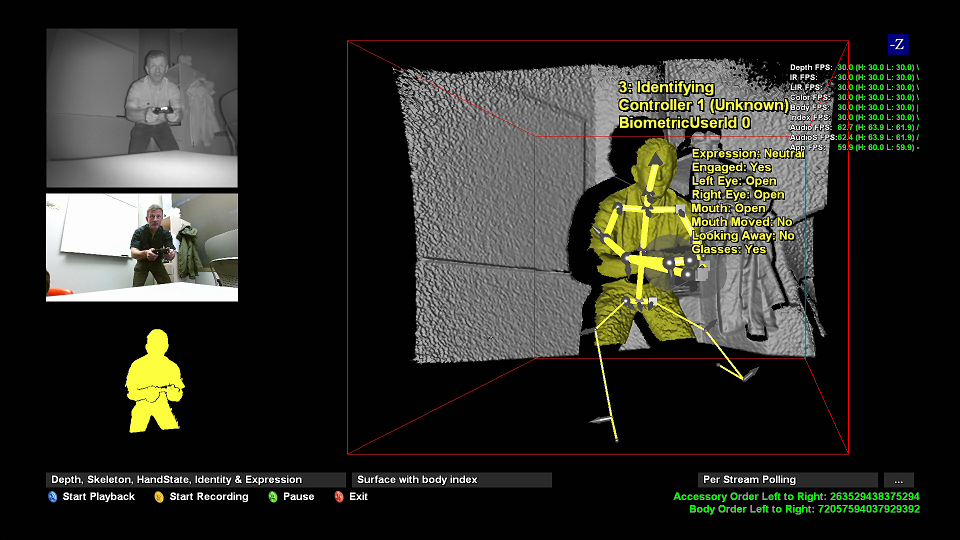
To install NUIView, use the xbprovision command. To run the tool from the Development Kit launcher, scroll down to NuiView, then press the A button. The default view appears, which contains three windows and a toolbar:
- The main window on the right side of the screen
- Secondary windows on the left side of the screen
- A toolbar at the bottom of the screen
The windows display different visualizations of NUI streams.
- Main Window
- Secondary Windows
- Toolbar
- Recording and Playback of Files
- Identifying a User Already Enrolled on the Console
Main Window
The main window provides the following types of information:
Depth and Skeleton
Pixels from the depth stream, transformed into 3D space, with an overlaid wireframe skeleton.
Skeleton
The current position and orientation of the player’s skeleton as a wireframe model.
Depth
Pixels from the depth stream, or color or IR data transformed into 3D space.
Identity and Expression
Display identity information by toggling the display mode.
When the skeleton is tracked, Skeleton and Depth and Skeleton also display the hand states using color-coded circles: green(open), red(closed), blue(lasso), grey(unknown).
To switch between 3D view and 2D view, use LB and RB.
Secondary Windows
There are three secondary windows:
IR
Infrared information is displayed in the top window.
Color
Color information is displayed in the middle window.
Player Index
Player index (player mask) is displayed in the bottom window.
All windows are placed on the left edge of the screen.
Toolbar
Use the toolbar or a game controller to control the tool using the following commands:
(B) Exit
Exits the application.
(LB) Prev
Cycles through available visualizations and 2D/3D modes for the main window only.
(RB) Next
Cycles through available visualizations and 2D/3D modes for the main window only.
(A) Pause
Pauses visualization of the data streams, if running; otherwise, resumes visualization.
(Y) Start Recording
Starts recording.
(X) Start Playback
Starts playback.
There are also additional controls that are not displayed on the toolbar:
DPAD
Select any view in order to make it fullscreen, or any of the combo boxes at the bottom of the screen.
Left stick
Controls the orientation and zoom of the current visualization. Pushing up zooms in, pushing down zooms out, and pushing left or right moves across the visualization accordingly.
Right stick
Controls the rotation and tilt of the current visualization. Pressing up tilts the visualization up, pressing down tilts it down, and left or right rotates the visualization accordingly. Pressing down togges between frame modes.
Left/Right triggers
Raises (left trigger) and lowers (right trigger) the camera height of the visualization.
Recording and Playback of Files
Use NUIView to record and playback Xbox Raw Files (XRFs) and Xbox Event Files (XEFs). The difference between these formats is as follows.
Clips that contain raw data captured directly from the sensor array (Xbox Raw Files) are not directly usable by titles, whereas clips that contain processed data (Xbox Event Files) are directly usable by titles. Raw data is stored in an Xbox Raw File (XRF); processed data is stored in an Xbox Event File (XEF).
To convert an XRF into an XEF, use the Kinect Studio Clip Conversion Tool (KSConvert.exe). KSConvert is a command-line tool that converts raw data into processed data; it is also used to upgrade raw data from an older format to the current format.
To record an XRF
- Press the Y button to start recording. You will see a message something like this: “Raw Recording to Memory (used 5%)”.
- Press the Y button to stop recording. You will see a message something like this: “Saving Raw Recording (25%) to d:\clips\filename.xrf”.
To play back an XRF
- Press the X button. You will see a message something like this: “File: d:\clips\Recording001.xrf Frame: 55555”.
Identifying a User Already Enrolled on the Console
If the user is already enrolled, they only need to press LB/RB until the main window shows identity info, then stand in front of the sensor.