Project View - SpeechLab
Project View
Here is an example of the project view:
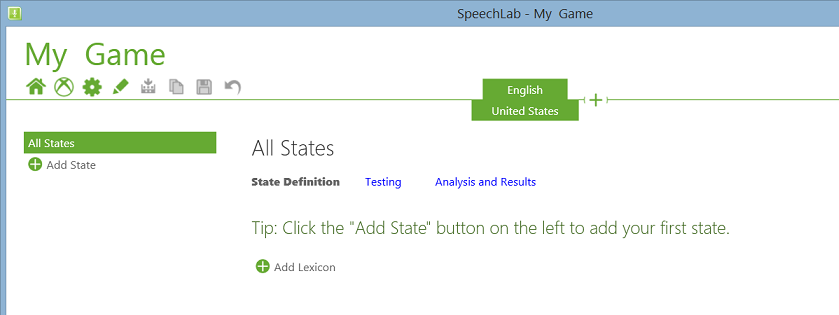
Controls in the Upper Left
- Name of project - An asterisk next to the name means that there is a change that has not been saved
- Home button - takes you back to the splash page
- Xbox button – enables you to specify which Xbox console devkit to use
- Audio repository management button - enables you to import audio from other audio collections created using SpeechLab, as well as change where your audio repository is located
- Build button – creates a set of files (GRXML, CFG, JSON, and XML) for each state and locale in your project
- Pencil button – lets you rename the project
- Clipboard button – copies the actions, phrases, and accuracy results for the currently selected state to the clipboard. The format is tab separated values.
- Save button – saves the project to disk. The button is activated/deactivated based on whether there is an unsaved change
- Revert button – reverts all changes made since the last save
Locales
- You can select the locale you want to work with by clicking the language and country boxes in the upper middle part of the screen
- The ‘+’ button lets you add locales to the project
- Clicking the ‘X’ next to a country name removes that locale from the project
Custom Lexicons
If your project requires the use of a custom lexicon (a .pls file), you can provide it on the “All States” page.
State Management
- The list of states appears on the left.
- Click on the “Add State” button to add a new state
- When you click on a state, you can do several things
- Click on the pencil icon to rename the state
- Click on the ‘X’ to delete the state
- State Definition – add/edit actions (i.e., what can you do in each state)
- Testing – test and collect data for the phrases in actions
- Analysis and Results – review test results and set confidence values
- All States is a special state. It summarizes all of the other states.
State Definition
The speech platform automatically adds the phrases “Xbox” and “Xbox…” to all grammars because it is a reserved keyword. They appear in the “[System Added]” action. You cannot modify these phrases, and you also cannot use “Xbox” in your grammar.
There are two methods of creating actions.
- Directly adding them using the Stock Grammars or a custom set of action.
- Importing them from existing GRXML or CFG files.
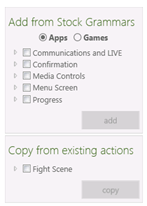
Creating and Editing States Directly Through SpeechLab
When working directly in the SpeechLab UI, actions can be created using the Stock Grammars or customized for your app or game.
- A set of actions are provided under “Add from Stock Grammars”. We recommend that you look through this list for actions that correspond to functionality you want to include. For example, select the actions under Games/Main Menu to get started building the main menu for your game.
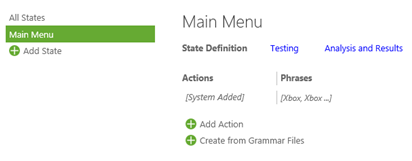
You can also provide custom actions in addition to or instead of the Stock Grammars. We recommend that you look at the Stock Grammars first before adding custom actions. In this example, the custom action “social” was added to the Main Menu state.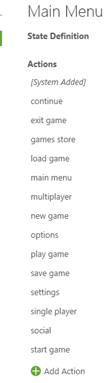
When adding/editing phrases:
- Click on the phrase to add additional phrases, and add one per line
- Click the pencil icon to edit a phrase
- Click the ‘x’ to remove a phrase
Importing an Existing GRXML or CFG File
Instead of authoring grammars directly in SpeechLab, you can also import existing grammars into a state. For example, you may maintain all strings for speech in a separate system or build your grammars directly in your source code (e.g., through GrammarBuilder objects). You can use the SerializeGrammarToFolderAsync() API to capture the state of your game’s grammar to a CFG file while the game is running.
Note Note that SpeechLab doesn’t support empty garbage rule (i.e. ‘…’) or external rule-refs so if your grammar contains them, the import/test/analysis of this grammar will not work as expected.
SpeechLab allows you to select which grammar files to import through the “Create from Grammar Files” button when creating a new state. You must choose between adding custom or Stock Grammar, or importing from existing files.
After selecting the files, SpeechLab lists all the rules found within the grammars. By default, enabled rules are selected.
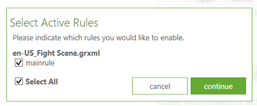
SpeechLab PC uses SpeechLab on the console to map the phrases in the grammar to actions. After the mapping operation is complete, SpeechLab PC displays the new state.
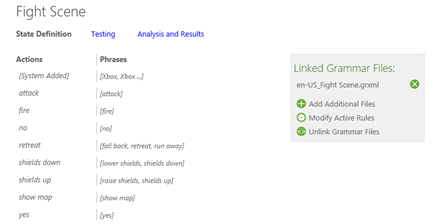
The “Linked Grammar File” section lists the GRXML and/or CFG files that were imported to the state and the available actions that you can take.
- “Add Additional Files” lets you import additional grammar files into the state.
- “Modify Active Rules” lets you select which rules from the imported grammar files should be included in this state.
- “Unlink Grammar Files” removes the link to the imported grammar files. The actions and phrases that were imported remain in the state. After files have been unlinked, you can edit actions and phrases, but those changes are not tied to the grammar files.
- To remove an individual grammar file and its actions and phrases from a state, click the “x” that appears when you hover over its names.
There are some limitations on what kinds of grammars can be imported. SpeechLab does not support grammars that use the following.
- Display, lexical, and pronunciation tokens
- External rulerefs
- Custom pronunciations (i.e., .pls files)
- Custom lexicons (i.e., lxa files)
- The “<token>” tag
Using the Garbage Rule
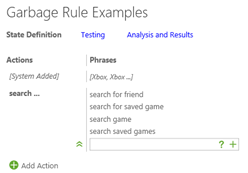
The “garbage rule” is a special rule in a speech grammar. It instructs the speech engine to recognize any utterance that matches the format of the rule. For example, you may want to handle the case where the user says “search for saved game” in the Main Menu, and have the game treat it as if the user had said just “search”. This can be accomplished by adding “search …” as another phrase for the “search” action.
The garbage should be used with care. It can result in a much larger FA for that phrase.
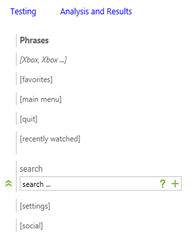
In order to use the SpeechLab tools suite to collect data and run test automation, there is on additional step that is required. There must be a state that contains only examples of garbage rule usage. This state can be called anything (e.g., “Garbage Rule Examples”).
Tips for Grammar Creation
When constructing grammar, whether directly in SpeechLab or elsewhere, keep in mind the following.
- Do not include punctuation in the strings that you expect people to say. For example, use “cast fireball” instead of “cast fireball!” If you want the punctuation to appear in the UI, use the “display” text.
- To minimize any confusion, spell out all numbers. For example, use “one hundred two” instead of “102”.
Testing
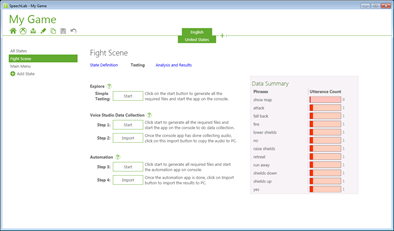
The testing tab lets you test your grammar and collect data for it.
- Explore – launches SpeechLab Console in Explore Mode. This lets you sanity check your grammar
- Voice Studio Data Collection
- Start – launches Voice Studio on the console. This lets you collect data for your grammar.
-
Import – when you’re done collecting data, press the ‘import’ button to retrieve the wav files from your console and put them into your Audio Repository.
- Automation – run an automated test pass using data that you’ve already collected.
- Start – launches SpeechLab Console in Automation Mode to run the test pass.
- Import – imports the test pass results from SpeechLab Console at the end of the test pass.
On the right side of the screen is a “Data Summary”. It shows how many utterances are available in your Audio Repository for each phrase in the selected state, or for all phrases in all states if “All States” is selected. The Data Summary also shows a bar graph to visually indicate if there are enough utterances for each phrase for test results to be statistically meaningful. The colouring of the graph gradually changes from red to green depending on the utterance count, with 10 being the minimum number of utterances before a phrase is marked green.
While running automation, SpeechLab will try to select OOG phrases for your state from your audio repository. This is done by selecting any phrase which doesn’t contain any word present in your state.
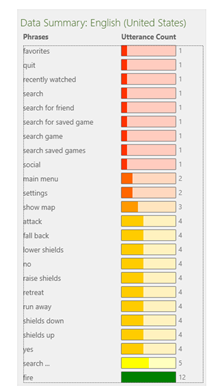
When collecting data using Voice Studio, it is very important to keep the following in mind.
- Always use native speakers for the locale that you are collecting data for. For example, a data collection for our example game should be done by native US English speakers, not other dialects of English (e.g., Australian and British English) or native speakers of other locales (e.g., Italian or Japanese).
- The Data Summary shows utterance counts only for locales enabled in SpeechLab for your game.
Analysis and Results
Lets you review test pass results and set confidence values
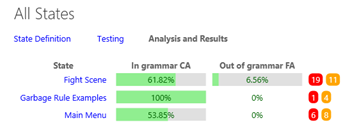
- For the “Overall” state, the aggregate test results are displayed.
- You can see the overall correct accept (i.e., how many phrases were recognized correctly) and false accept (i.e., how many phrases were recognized incorrectly) rates for each state.
- Click on the state name takes you to the detailed results for that state.
- The red and yellow bubbles indicate the number of errors and warnings encountered.
- An error is an issue that needs to be addressed for an optimal speech experience.
- A warning is an issue that should be addressed for an optimal speech experience, but is not expected to be critical to a good experience.
* For each state, you can see the CA and FA results for each phrase.
- Using the “Optimize threshold for” drop down, you can select whether you care more about higher CA, lower FA, or a balance between the two. Note that optimizing for higher CA oftentimes means that the FA rate will also be higher, and optimizing for lower FA oftentimes means that the CA rate will also be low.
- Using the “Conf. threshold” slider, you can set the per-phrase confidence value that gives you the balance between CA and FA that you want for that specific phrase.
- Clicking on a phrase takes you to the detailed results for the phrase.
-
Hovering over the error and warning bubbles show what errors and warnings were encountered.
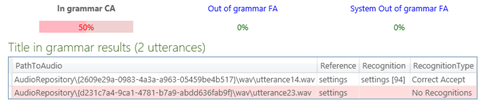
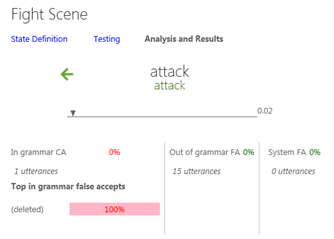
- For each phrase, you can see
- In grammar CA: the CA percentage
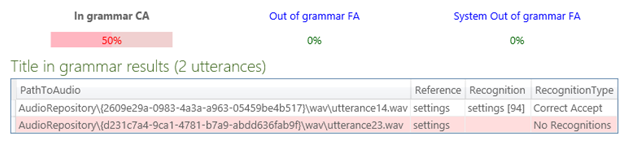
- Out of grammar FA: the FA percentage against the game’s grammar
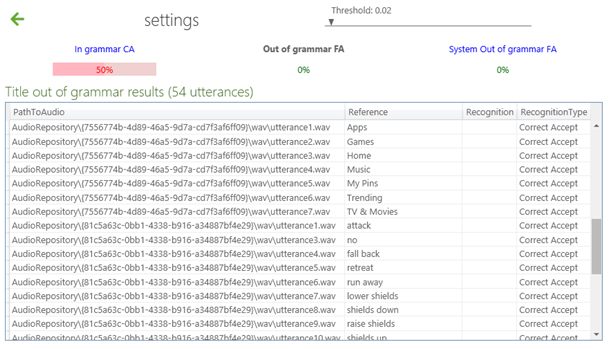
- “System Out of grammar FA”: the FA against the system grammar.
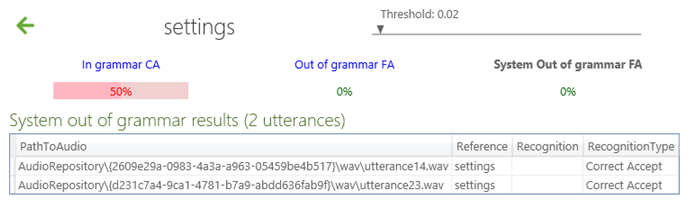
- The table within each result set lists the utterances used.
- PathToAudio: the wav file containing the audio for the test. Clicking on it brings up additional details. Clicking on the path brings up the default wav player so that you can listen to the audio. If it is not of good quality (e.g., a lot of static), click the “x” icon to remove it from your audio repository.
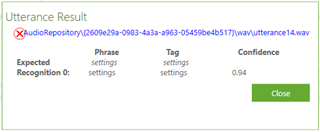
- Reference: the phrase that should be captured in the audio file
- Recognition: what the speech engine returned, with the confidence
- RecognitionType: whether the recognition was a CA, FA, or no recognition.
- PathToAudio: the wav file containing the audio for the test. Clicking on it brings up additional details. Clicking on the path brings up the default wav player so that you can listen to the audio. If it is not of good quality (e.g., a lot of static), click the “x” icon to remove it from your audio repository.
Advanced Usage: Audio Repository Management
The audio repository can be managed in two ways.
- Changing its location to be different path on the local filesystem or a network share.
- Importing audio from a data collection done using a different instance of SpeechLab.
Both of these are handled through the Audio Repository Manager.
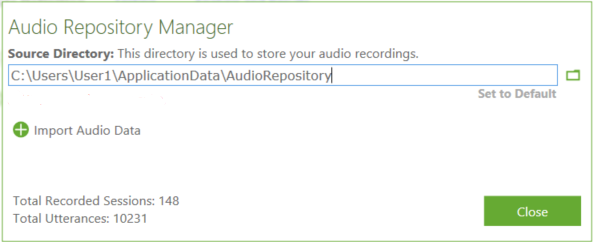
- The “Source Directory” is the path to the audio repository.
- “Set to Default” will change the Source Directory to the default path.
- The “Import Audio Data” button allows you to import collections from a different repository. SpeechLab will scan a directory for collections within it, so make sure to select the parent directory of the collections.
The Audio Repository Manager also provides some statistics on your repository, in the form of total number of sessions and total number of utterances.
Files and Folders
- All SpeechLab data is stored in the users “Documents” folder, in the “speechlab” directory.
- Projects are in directories under “speechlab\projects”, with each project in a separate directory.
- Audio files are under “speechlab\ApplicationData\AudioRepository” by default. This can be changed by clicking the “Audio Repository Management” button to point to another location on your PC or on a network share.
It is important that you do not edit any of the files or folders directly. Doing so can cause SpeechLab to become unstable and may result in data loss.
Extras: Stock Grammar Wav Files
In addition to free translations for stock grammars found in SpeechLab, use the wav files in the optional downloads section of the XGD XDK download page for testing. To install, download the locale pack(s) that you intend to use and follow the readme.txt instructions found within the zipped folder(s).