Render to Texture
The following sections describe how to render a scene onto a texture using the Xbox One dev kit:
What is rendering to a texture
Texture rendering allows you to record a live 3D scene onto a texture, instead of displaying the image directly to the screen. This texture can then be used for a multitude of purposes.
Common reasons to render to a texture:
- Capturing/storing screenshots.
- Splitscreen: render each player’s viewpoint/HUD/etc onto a different texture, then display those textures onscreen.
- Picture-in-picture: view the same scene from multiple viewpoints, or with different filters.
- In-game applications: render to texture enables convincing water/mirror reflections, or displaying a live scene on an in-game tv or screen.
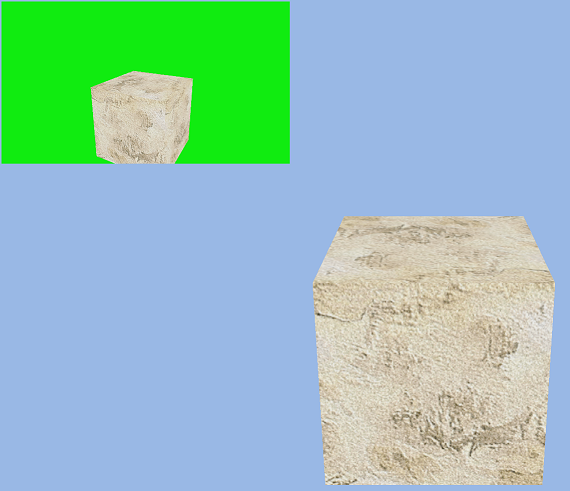
An example using render to texture to display the same scene from multiple viewpoints:
Necessary data types:
- ID3D11Texture2D: The buffer that stores the texture.
- ID3D11RenderTargetView: Identifies the render-target subresources that can be accessed during rendering.
- ID3D11ShaderResourceView: Specifies the subresources a shader can access during rendering. For example, texture buffers and constant buffers are both shader subresources.
- ID3D11DepthStencilView: Accesses a texure resource during depth-stencil testing.
Initialization
Initialize and create render target texture:
Create a D3D11_TEXTURE2D_DESC struct to describe the texture. Populate the texture description with data, then call ID3D11Device::CreateTexture2D() to apply the texture description to the ID3D11Texture2D struct.
C++
D3D11_TEXTURE2D_DESC textureDesc;
ZeroMemory( &textureDesc, sizeof( textureDesc ) );

// Setup the render target texture description
textureDesc.Width = TextureWidth;
textureDesc.Height = TextureHeight;
textureDesc.MipLevels = 1;
textureDesc.ArraySize = 1;
textureDesc.Format = DXGI_FORMAT_R32G32B32A32_FLOAT;
textureDesc.SampleDesc.Count = 1;
textureDesc.Usage = D3D11_USAGE_DEFAULT;
textureDesc.BindFlags = D3D11_BIND_RENDER_TARGET | D3D11_BIND_SHADER_RESOURCE;
textureDesc.CPUAccessFlags = 0;
textureDesc.MiscFlags = 0;

// Create the render target texture
DX::ThrowIfFailed( d3dDevice->CreateTexture2D( &textureDesc, NULL, &m_renderTargetTexture ) );
Initialize and create render target view:
Create a D3D11_RENDER_TARGET_VIEW_DESC struct to describe the render target view. After populating the description with data, call ID3D11Device::CreateRenderTargetView() to apply the description to ID3D11RenderTargetView.
C++
D3D11_RENDER_TARGET_VIEW_DESC renderTargetViewDesc;
ZeroMemory( &renderTargetViewDesc, sizeof( renderTargetViewDesc ) );

// Setup the description of the render target view
renderTargetViewDesc.Format = textureDesc.Format;
renderTargetViewDesc.ViewDimension = D3D11_RTV_DIMENSION_TEXTURE2D;
renderTargetViewDesc.Texture2D.MipSlice = 0;

// Create the render target view
DX::ThrowIfFailed( d3dDevice->CreateRenderTargetView( m_renderTargetTexture, &renderTargetViewDesc, &m_RTV ) );
Initialize and create shader resource view:
Create a D3D11_SHADER_RESOURCE_VIEW_DESC struct to describe the shader resource view. After populating the description with data, call ID3D11Device::CreateShaderResourceView() to apply the description to ID3D11ShaderResourceView.
C++
D3D11_SHADER_RESOURCE_VIEW_DESC shaderResourceViewDesc;
ZeroMemory( &shaderResourceViewDesc, sizeof( shaderResourceViewDesc ) );

// Setup the description of the shader resource view
shaderResourceViewDesc.Format = DXGI_FORMAT_R32G32B32A32_FLOAT;
shaderResourceViewDesc.ViewDimension = D3D11_SRV_DIMENSION_TEXTURE2D;
shaderResourceViewDesc.Texture2D.MostDetailedMip = 0;
shaderResourceViewDesc.Texture2D.MipLevels = 1;

// Create the shader resource view
DX::ThrowIfFailed( d3dDevice->CreateShaderResourceView( m_renderTargetTexture, &shaderResourceViewDesc, &m_SRV ) );
Note During shutdown, remember to call Release() on the texture, render target view, and shader resource view.
Rendering
Prepare resources for rendering to a texture:
Call ID3D11DeviceContext::OMSetRenderTargets() to point to the desired depth stencil and render target view.
C++
// Bind render target view and depth stencil buffer to the output render pipeline
d3dDeviceContext->OMSetRenderTargets( 1, &m_RTV, DepthStencilView );
Now that you are using the correct render target and depth stencil, you need to clear them so they can be written to. Call ID3D11DeviceContext::ClearRenderTargetView() to clear the render target. The color value input determines what color the texture is wiped to. To clear the depth stencil, call ID3D11DeviceContext::ClearDepthStencilView().
C++
float color[4];

// Setup the color to clear the buffer to
color[0] = Red;
color[1] = Green;
color[2] = Blue;
color[3] = Alpha;

// Clear the back buffer. Wipes the texture to a single, user defined color
d3dDeviceContext->ClearRenderTargetView( m_RTV, color );

// Clear the depth stencil
d3dDeviceContext->ClearDepthStencilView( DepthStencilView, D3D11_CLEAR_DEPTH, 1.0f, 0 );
Render:
Now that all the resources are properly initialized and set, draw the scene using the same process you would use to render to the screen. Instead of rendering directly to the screen, Draw() calls will now be rendered onto the specified texture instead of the screen buffer. Once you are finished drawing to the texture, call ID3D11DeviceContext::OMSetRenderTargets() again to reset variables back to their defaults. Now you may render to the screen as normal, and the texture you just rendered to is now available for use.