Configure Community Managers (Service Configuration)
This topic provides procedures for configuring community managers in the service configuration for a product.
For an overall introduction to the various elements of service configuration, see Introducing Service Configuration.
Sections in this topic:
What are community managers?
Configure a community manager to make posts on your product’s game hub. The account linked to a community manager will use the localized title of the product as its gamertag and the box art as its gamerpic. Followers of the game hub will see the community manager’s posts on their activity feeds, and anyone can view the posts on the game hub itself.
Configure community managers
To configure a community manager
- Create a new Xbox Live user account specifically for use as a community manager. Don’t use a personal account because any personal activity will also be posted to your product’s game hub feed. You can create a new Microsoft account and then link that to Xbox Live. You don’t need an Xbox Live Gold subscription to be a community manager.
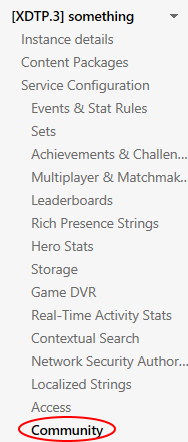
- In XDP, navigate to your product, expand the product instance in the left navigation, and select Community.
 Note You can only configure community managers in development sandboxes; however, community managers will only show up in the game hub once the product instance has been published to the RETAIL sandbox. Therefore, you should configure your community managers in your development sandbox, verify that the XUIDs correspond to the correct gamertags (see the next step), and then publish the product instance to the RETAIL sandbox. Then you’ll be able to see the community managers’ posts on the game hub.
 - On the Community page, under Xbox User Account Lookup, select Gamertag, enter the Gamertag of the account you wish to use, and select Search. This will give you the XUID (Xbox User ID) of the account.
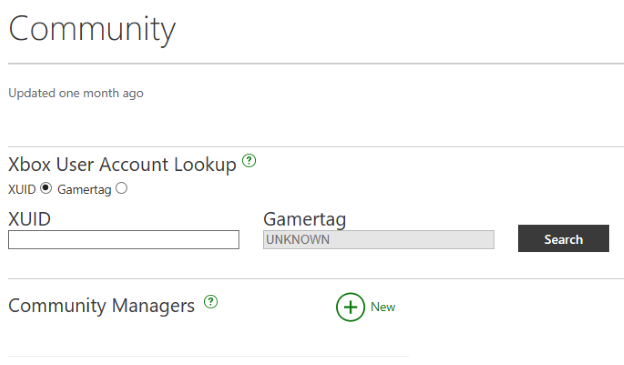
- Next to Community Managers, select New.
- In the Add Community Manager dialog box, enter the XUID you got before.
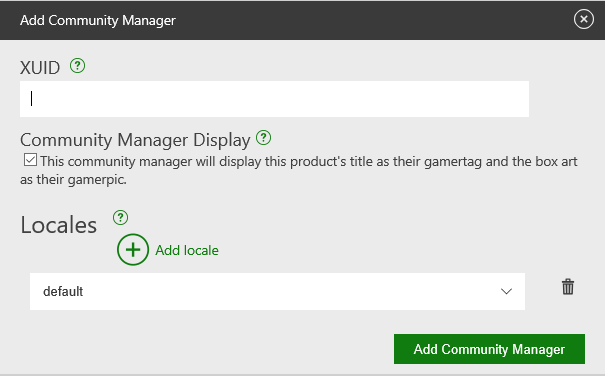
- If you want this product to be your community manager’s primary product and replace the gamertag and gamerpic with the product’s title and box art, respectively, check the box under Community Manager Display. This also means that when a customer selects the community manager’s account, they will go to this title’s game hub. If you don’t set a primary product for a community manager or if you set multiple primary products for the same community manager, the primary product will default to the most recently linked product.
- In the drop-down menu under Locales, either select a locale for this community manager to post in, or leave it at default to post to all locales. You can also select Add locale to add multiple locales. To delete a locale, select the trash can icon next to the locale.
- Select Add Community Manager. This community manager is now linked with your product!
You can link an account to multiple products-for example, you can link it to both the full version and the demo version of a product, or to multiple entries in a series. However, Microsoft recommends that you not link one account to multiple unrelated products (for example, products in different series). When you post from an account that is linked to multiple products, the posts will appear on each product’s game hub.
You can also link multiple accounts to the same product. A common example of this is if you want different accounts for different locales.
To edit a community manager
- On the Community page for your product instance in XDP, locate the community manager account that you want to edit under Community Managers and select the pencil icon in its row.
- Make your edits. Note that if you change the locales, this affects both past and future posts. So for example, if you previously set the locale to default and later change it to en-US, all previous and future posts made by the community manager will now only be visible in en-US locales.
- Select Save Community Manager to save your edits.
To delete a community manager
- On the Community page for your product instance in XDP, locate the community manager account that you want to delete under Community Managers and select the trash can icon in its row.
- If you’re sure that you want to delete the account, select Delete in the warning dialog; otherwise, select Cancel.
Test community managers
If you want to test your community managers in a sandboxed environment before making them public, you’ll need to do the following:
- Create a development account for the development sandbox that the product instance is in (or use an existing one).
- Associate the development account with a community manager for the product instance.
- Publish the product instance to RETAIL.
Only accounts in that development sandbox will be able to see posts in the game hub made by that community manager.
Community managers are included in the Events, Stat Rules, Achievements… checkbox when publishing service configuration. See Publish the service configuration for more information.
Publishing to RETAIL means that anyone will be able to see your game hub (as well as see your product in the Store) so if you don’t want this to happen, configure Retail Embargo.
FAQ
- Can I use my personal account as the community manager account?
No, you must never use personal accounts. Create a new account specifically for use as your community manager account. - Do I need an Xbox Live Gold membership?
No, accounts with Xbox Live Free memberships can use all community manager functionality. - Under User Lookup, I enter a gamertag but don’t get a XUID.
Have you created an account? This feature is for linking an account to a product, not creating an account for you. - Can I link my account to more than one product?
Yes, you can link your account to closely related products, such as different versions of the same title (for example, the full game version and the demo version) or different entries in the same series, so that your posts can reach all of your title’s followers. However, you should never link one account to multiple unrelated products (for example, products in different franchises). - Can I use my community manager to manage franchises?
Your posts go to individual products’ game hubs-there is currently no concept of game hubs that comprise multiple products. - Can I link more than one account to the same product?
Yes-a common use case is locale-specific community managers. For example, Account A posts to the United States only and Account B posts only to French-speaking locales. - How do I post to all locales?
Select default as the community manager’s locale to have it post to all locales. - How do I obtain the gamertag that I want for my community manager?
You don’t need to change the gamertag. Once you have linked your community manager to the product, the gamertag will be replaced with the primary product name. - How do I change the title name that I post as?
That is currently impossible. When your community manager makes a post, it uses the localized name of the product that it’s linked to. - How do I change the image used for my posts?
That is currently impossible. When your community manager makes a post, it uses the product’s box art as its gamerpic. - If my account is linked to multiple products, how do I target posts to only one of the products?
That is currently impossible. When your community manager makes a post, the post will appear on the game hub feed of every product that the account is linked to. - What is a primary product?
A community manager uses its primary product’s localized name as its gamertag, box art as its gamerpic, and game hub as the game hub that customers go to from the community manager’s account. You can set the primary product for an account by selecting Community Manager will appear as this title when creating or editing a community manager. - My account is linked to multiple products, what happens when I make a post?
Any post that you make will appear on all game hubs that the account is linked to (and the feeds of the followers of those game hubs). The title of the account’s primary product will appear as the account’s gamertag, and the box art of the primary product will appear as the gamerpic. - What happens if my account doesn’t have a primary product set?
Posts will use the title and box art of the product most recently linked to the account. - What happens if my account has multiple primary products?
Posts will use the title and box art of the product most recently linked to the account. - What happens if I delete a community manager?
All posts made by that account on that product’s game hub will be removed. The posts have not been deleted from your Xbox Live account, they’re just no longer linked with that game hub. You can create another community manager for that product using the same account to return all of the posts to the game hub. - How do I edit or delete community managers that were created prior to this XDP feature?
The community managers created prior to this feature are not currently available in XDP. If you want to update old community managers, please contact gamehubsetup@microsoft.com.