Connecting the Xbox One Hardware
Connect peripheral devices to the Xbox One console as follows.
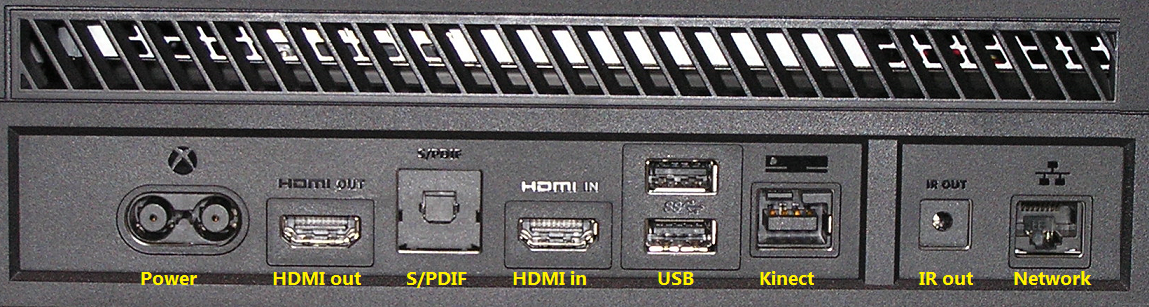
Figure 1. The Xbox One console rear panel.
To set up the console
- Connect a standard Ethernet network cable to the Ethernet port, the port to the far right at the back of the console.
- Connect a display device capable of a 1080p resolution to the HDMI OUT slot, the second slot from the left at the back of the console. Only 1080p monitors display the system UI properly.
- Attach a keyboard to one of the two standard USB ports on the back of the console.
 Note The Caps Lock and Num Lock keys are not currently supported for USB keyboards. Titles can use USB keyboards during development, such as for shortcuts to debug and diagnostic functionality. However, the Caps Lock and Num Lock keys are not supported for exclusive applications in current releases, with USB keyboards; Caps Lock and Num Lock cannot be set physically or programmatically.
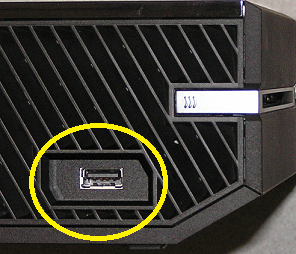
 - Attach the Xbox controller to the other USB port on the back panel, or the USB port on the left side of the console. All the USB ports have the same USB 3.0 spec. Figure 2. The side panel USB port is designed as a more accessible port for connecting a charge and play controller cable.
- Attach the Kinect sensor to the Kinect port on the back of the console, it is the port to the right of the two standard USB ports. Note the following when placing the sensor:
- Place the front edge of the sensor within one inch (2.5cm) of the edge of the surface on which it is placed.
- Position the sensor securely, to avoid drops and knocks.
- The sensor will need to have sight of the floor plane, so place it so it can be tilted if not enough of the floor is in view.
- Do not try to use the power or USB adaptors from earlier releases of the Kinect sensor or console.
- Attach the power cable, but for now, do not power on the console.