Title Mode Console Applications
By: Andrew Farrier, Xbox Advanced Technology Group
Published: September 20, 2016
In this topic
Creating a console application from scratch
Converting an existing console application
Introduction
It’s useful to create small console applications that run alongside an ERA title, to help with debugging, testing, gathering metrics, and similar prerelease activities. This paper covers the steps to either create or convert console applications for this purpose.
Xbox supports the development of tools that can run directly on the console to aid in debugging and manipulating an Exclusive Resource Application (ERA) title in real time. Though titles may not submit to Xbox certification or ship with these debug features enabled in retail, this capability is still a vital part of the game-development process.
The steps provided in this white paper show both how to create these tools from scratch and how to convert existing tools.
Creating a console application from scratch
To help you create a new console application, a VSIX (.vsix) file is available for download at XGD Fast Downloads, under file type “Developer Education Materials” and build/version “All NDA Samples”. It will add an XDK console application configuration to the New Project choices you see in Visual Studio. The generated project is the default project configuration for a console application, with the options detailed in Converting an existing application already applied to it.
To create a new console application, follow these general steps:
-
In Visual Studio, select File > New.
-
Select XDK Console.
-
Supply parameters as needed.
-
Add your code.
-
See the Using the console application section for details on deploying and executing the application.
Converting an existing console application
You probably already have existing console applications that it would be useful to convert to run on Xbox. There’s a straightforward path to add an Xbox One configuration.
The following sections explain the changes you’ll make.
Add the Durango configuration
-
Select Configuration Manager.
-
Select Active solution platform > New.
-
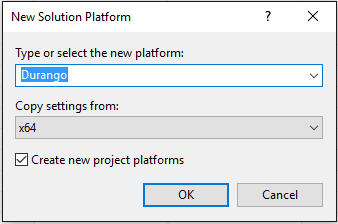
Type or select Durango, choose to copy settings from x64, and then select the Create new project platforms check box.
Figure 1. Specifying the new solution platform.
Set the project properties
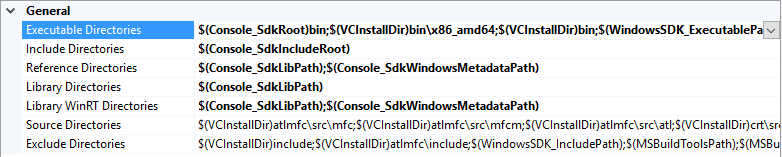
- The directories used by the build process must point to their XDK versions. Make the following changes in the VC++ Directories section of the project properties. These are the default directories for a new XDK project; alternatively, you can use any overrides already being used for your ERA title.
-
Executable directories
$(Console_SdkRoot)bin;$(VCInstallDir)bin\x86_amd64;$(VCInstallDir)bin;$(WindowsSDK_ExecutablePath_x86);$(VSInstallDir)Common7\Tools\bin;$(VSInstallDir)Common7\tools;$(VSInstallDir)Common7\ide;$(ProgramFiles)\HTML Help Workshop;$(MSBuildToolsPath32);$(FxCopDir);$(PATH); -
Include directories
$(Console_SdkIncludeRoot) -
Reference directories
$(Console_SdkLibPath);$(Console_SdkWindowsMetadataPath) -
Library directories
$(Console_SdkLibPath) -
Library WinRT directories
$(Console_SdkLibPath);$(Console_SdkWindowsMetadataPath)
Figure 2. Changing directory paths.
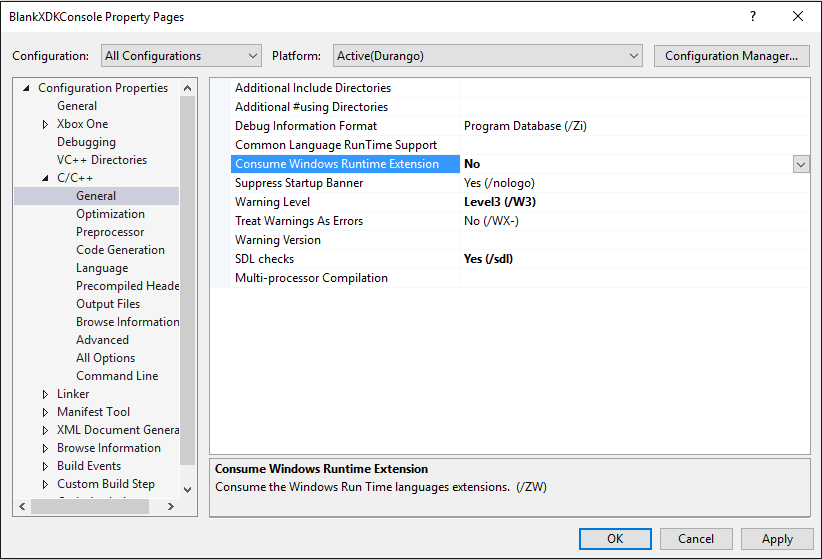
- A console application does not use the Windows Runtime, so you must disable this option. In the C/C++ > General section, set Consume Windows Runtime Extension to No.
Figure 3. Disabling the Windows Runtime Extension.
-
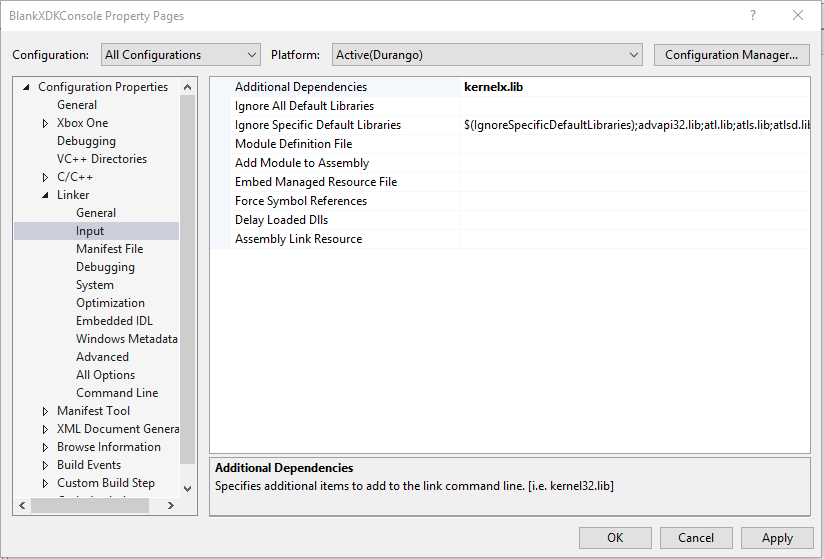
The default libraries were copied from an x64 project and refer to the Win32 versions, so they must be converted to use the Xbox versions. In Linker > Input, change the Additional Dependencies option:
a. Replace all default libraries with kernelx.lib.
b. If you need any other libraries, replace them with the XDK versions.
Figure 4. Replacing dependent libraries.
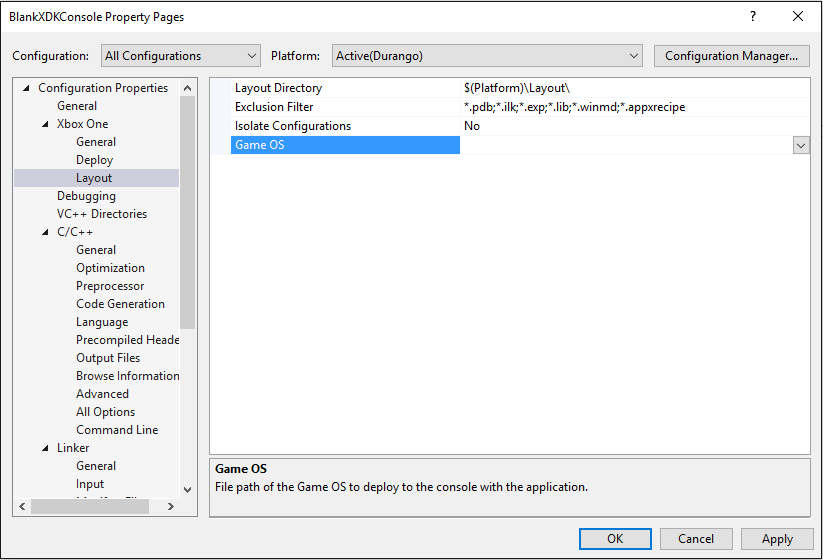
- The console application is not bundled with a Game OS version; it will use the version from the title. In the Xbox One > Layout section, clear the Game OS field.
Figure 5. Removing the Game OS dependency.
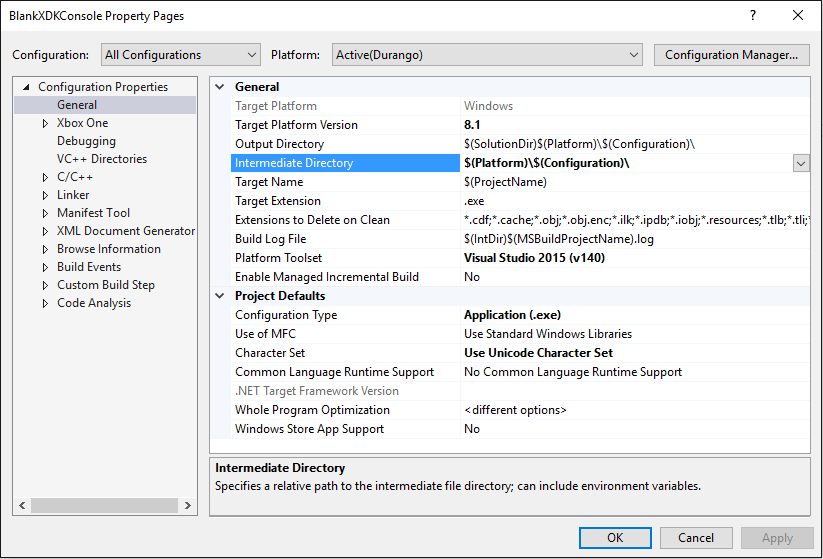
- By default, the Durango configuration separates its intermediate files from other output to avoid placing extra files within the final layout. This is not an issue for a console application. In the General section, replace the Intermediate Directory with the x64 version, which by default is $(Platform)\$(Configuration)\.
Figure 6. Changing the intermediate output directory to match x64.
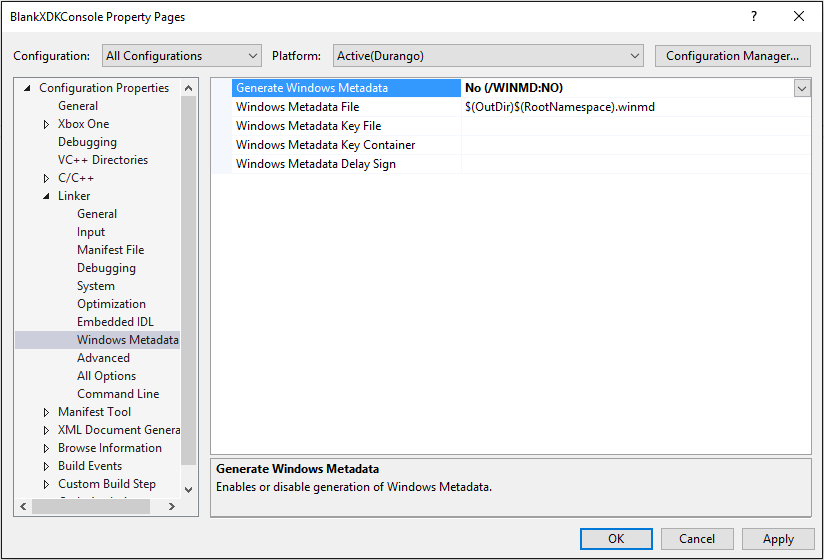
- The final change is to remove the metadata that’s created for the project. It’s not needed for console applications. In the Linker > Windows Metadata section, set Generate Windows Metadata to No (/WINMD:NO).
Figure 7. Disabling Windows Metadata creation.
Edit the project (.vcxproj) file
At this point you must make manual changes to the project (.vcxproj) file for your console application. First, add a block that eliminates the need for a manifest file. Insert the <PropertyGroup>…</PropertyGroup> section below before the block that includes Microsoft.Cpp.$(Platform).user.props.
    <PropertyGroup Label="UserMacros">
        <AppxPackage>false</AppxPackage>
    </PropertyGroup>
    <ImportGroup Label="PropertySheets" Condition="'$(Configuration)|$(Platform)'=='Debug|x64'">
        <Import Project="$(UserRootDir)\Microsoft.Cpp.$(Platform).user.props" Condition="exists('$(UserRootDir)\Microsoft.Cpp.$(Platform).user.props')" Label="LocalAppDataPlatform" />
    </ImportGroup>
The default language may not be set for a project that has the Durango platform added. The project must also be set to run in title mode. Add the <DefaultLanguage> and <ApplicationEnvironment> sections below to the Globals PropertyGroup.
    <PropertyGroup Label="Globals">
        <ProjectGuid>{973B96B9-8DC6-4F92-84AA-AA9C1BDA3842}</ProjectGuid>
        <Keyword>Win32Proj</Keyword>
        <RootNamespace>BlankXDKConsole</RootNamespace>
        <WindowsTargetPlatformVersion>8.1</WindowsTargetPlatformVersion>
        <DefaultLanguage>en-US</DefaultLanguage>
        <ApplicationEnvironment>title</ApplicationEnvironment>
    </PropertyGroup>
Finally, disable the creation of the layout directory that’s normally created with a title-mode application. To do this, you override the _DurangoDeploy property that comes from the default Durango build files. Add the <Target /> line to the end of the .vcxproj file.
        <Target Name="_DurangoDeploy" />**
    </Project>
Compile the application and resolve issues
At this point the application is ready for compiling and testing. The most common issue may be errors caused by the use of functions that do not exist on Xbox. Only the functionality available to an ERA title is available to the console application. Any code calling missing functionality must be adjusted to execute within the ERA application space.
Any output to stdout may also have to be checked. You must flush the internal buffers yourself to see the output on your development PC. If you’re using the C function interfaces, call the fflush function. If you are using the C++ stream operations, appending std::endl will cause a flush.[]{#_Using .anchor}
Using the console application
Deployment, execution, and debugging of your console application requires several manual steps. This section describes the steps needed to deploy, execute, and debug your console application.
Deployment
The application must execute within an already executing ERA title. For that reason it must also be deployed with the ERA title. There are two ways to handle this deployment: either include it within an ERA title package or copy over the application (using xbcp.exe) while an ERA title is executing.
The easiest way is to copy the application to the scratch drive with the following command. This enables you to run your console application with multiple ERA titles.
xbcp /x/title <console application> xd:\
Execution
The easiest way to start the console application is with the xbrun.exe command.
xbrun /x/title /O d:\<console application>
If the application is included as part of the title package, replace the drive letter with g.
xbrun /x/title /O g:\<console application>
The /O parameter captures stdout from the console application and pipes it back to the PC command prompt. You can omit this parameter if there’s no output from the console application.
Alternatively, the console application could be started by the title application. The CreateProcess function can be used for this purpose.
Debugging
Normal debugging—using F5 in Visual Studio—doesn’t work for a console application running with the ERA title. Visual Studio has no information about the special Xbox One deployment used. You must attach the debugger to a running copy of the console application.
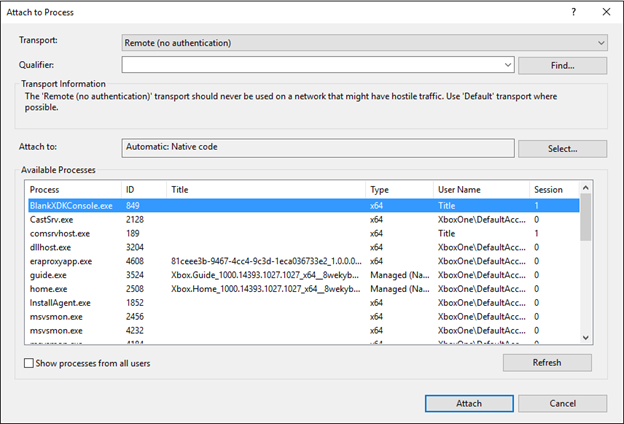
Select Debug > Attach to Process, select Remote (no authentication), and then provide the title’s IP address in the Qualifier box. After clicking Refresh, you should see your console application in the Available Processes list. Select the application, and then select Attach to attach the debugger.
Figure 8. Attaching the debugger to the process.
It may be useful to add the following code block near the entry point to your application. It pauses the application until the debugger is attached. This means you won’t have to race to attach the debugger before the application passes the areas of interest for debugging.
while (!IsDebuggerPresent());
Summary
Creating console applications to run alongside your ERA title is straightforward. By following the steps outlined in this paper, you can create a wide variety of tools that interact with your title.