Xbox One Deployment
Xbox Platform and Tools
Updated May 30th, 2017
In this topic
Game file location
Games are typically composed of thousands of individual files, including textures, shaders, audio, executables, DLLs, and more. Although each game development studio creates, stores, manages, and brings these files together into a single package for retail using a wide variety of workflows, there are two basic deployment approaches.
Single or monolithic
In a monolithic (also known as single) approach to deployment, all of the files associated with a title are contained in a single root folder, with subfolders for content and media. This folder structure represents the final package structure exactly. The single approach is generally used with the smallest or simplest of games and can be achieved through the use of symbolic links. Using the Visual Studio Direct3D Game template, this folder/file structure might look something the following:
| Physical location on dev PC (source) | Files |
|---|---|
| D:\Visual Studio\Projects\Direct3DGame1\XboxOne\Layout\Image\Loose |
appdata.bin AppxManifest.xml Direct3DGame1.exe Logo.png SmallLogo.png SplashScreen.png StoreLogo.png |
| D:\Visual Studio\Projects\Direct3DGame1\XboxOne\Layout\Image\Loose\Media |
All other game content, for example: Arial.spritefont, Background.dds |
Multiple or split
In the multiple (also known as split) approach, the base game executable and manifest required to register the application on the Xbox One development console (dev kit) are in one folder (by default, [projectfolder]\XboxOne\Layout\Image\Loose), while other supporting files are kept locally in a variety of locations on the development PC (dev PC) or on a server. Build or deployment tasks defined by the studio bring these files and folders together into a single package to be consumed by the dev kit.
| Physical location on dev PC (source) | Files |
|---|---|
| D:\Visual Studio\Projects\Direct3DGame1\XboxOne\Layout\Image\Loose |
appdata.bin AppxManifest.xml Direct3DGame1.exe Logo.png SmallLogo.png SplashScreen.png StoreLogo.png |
| C:\enlistment\fonts | Arial.spritefont |
| C:\workingfolder\textures | Background.dds |
Run from PC
Run from PC, or RfPC, is the method of deploying your game for testing on an Xbox One development console without having to transfer the entire contents of your game to the console. It provides dramatically better iteration times compared to push deployment, which requires all game files be transferred to the console before the game can be launched. RfPC replaces pull deployment to provide similar functionality with more flexibility and less setup overhead.
RfPC registers a network location with your console as a staging area for your game builds. File contents are streamed on demand to the console and are cached when necessary. The hosted files can be updated dynamically, even while the game is running.
Setting it up
This method of deployment uses a network share that’s made available to the console. After the share is registered, it is exposed to the console as the G: drive. The network share can be on your development PC or on a remote server that the console or consoles also have access to. Communication between the console and the network share requires user authentication. Because one of the main benefits of RfPC is the ability to service multiple consoles and thus to accommodate multiple developers, it’s impractical to use your own user credentials. It’s better to create an account with limited privileges for the express purpose of handling RfPC deployments.
PC and console
This section walks you through the steps to create a basic setup. The section that follows it describes more complicated setups for targeted scenarios. The steps assume you’re working in an administrator Xbox One command prompt.
Create an account
Although a dedicated account is not strictly required, it’s a good idea to have one with limited privileges for multiple developers to use to access your build share. This can be done by means of the Control Panel or the Settings app in Windows 10. The net user command can also be used if you want to automate this process. The command to create a new account with the correct privileges would look like this.
net user xbuser1 Super$ecret /ADD /ACTIVE:YES /COMMENT:"Xbox One deployment share account" /EXPIRES:NEVER /PASSWORDCHG:NO /LOGONPASSWORDCHG:NO
Note: This command will create the user on the PC on which the command is run. For example, if the PC is named Xb1Server, the resolved user name would be Xb1Server\xbuser1. Adding the /domain flag creates the user on the domain server. For example, if XbServer1 is connected to the domain StudioEast, the resolved user would be StudioEast\xbuser1. Creating domain users may require extra permissions not available to your account. If you need to create domain accounts, you may need to contact your network administrator.
This command creates an account with the name xbuser1 and the password Super$ecret. You can also specify * in place of the password if you’d prefer to enter the password manually without it appearing on screen, to increase security. Keep the following in mind when selecting a user name and password:
-
Some special characters must be escaped if you use them in batch files or on the command line. It’s simpler just to avoid these characters: ! & / ^> < - If you want to manage credentials on the console through Dev Home, the user name and password must be entered on the console. This will likely require the use of a gamepad. Excessively long passwords may improve security, but will take longer to enter with the virtual keyboard on the console. You can make this easier by using a USB keyboard connected to the console, or by managing credentials with the XbCred command-line tool from your PC.
- Your domain may have password requirements, such as a minimum length or the use of specific types of characters. Check with your admin if you’re unsure whether this will affect you.
Create the share
The next step is to create the space where the build output will be physically located. Depending on your circumstances, it may make sense to place the build output on a remote server location or on your local PC. The share can be created by right-clicking the folder in File Explorer and selecting Share with > Specific people and giving access to the account created in the previous step. You can also use the net share command if you prefer working with the command line or intend to automate the process. The command might look like this.
net share XB1RunFromPC=D:\Path\To\Build /GRANT:xbuser1,READ /UNLIMITED /REMARK:"Xbox One RfPC share"
The /GRANT option specifies which user is allowed access to the share. It can be specified multiple times if you want to grant access to the share to multiple accounts. Note that it can be used only for creating shares on the local machine. Remote access services are required for creating a share on a remote PC or server.
Note: In RfPC deployment, the files on the share are mapped to the G: drive on the console with read-only access. This is to prevent unexpected behavior when multiple consoles are using the same share. This is why users are granted READ access in the net share command.
Manage credentials on the console
After the user account is created, the credentials must be saved on the console. This allows the console to use those credentials to access the package files located on the share. You can do this in one of two ways: either with the XbCred command line tool from any development PC or through the Manage network credentials screen on the console. To reach the console screen, use the Menu button while in Dev Home, and then select Manage network credentials. You’ll find a link to more info about using XbCred in the References section at the end of this whitepaper.
Here’s an example of the use of XbCred.
XbCred add \\Xb1Server Xb1Server\xbuser1 Super$ecret
The XbCred documentation offers more info about how to add, remove, or view credentials. Note that when XbCred is used to save credentials, the username and password are sent to the console over the network unencrypted.
Note: Credentials do not persist when a console has been manually updated with a new flash from Game Developer Network (GDN). After flashing a console, network credentials must be reentered.
Note: The same credentials may be used by multiple consoles. This is one benefit of creating a single user account with limited access rights and widely known credentials.
Remember that only one user account may be used per server, even if that server is hosting multiple shares. Attempting to add multiple sets of credentials for different shares on the same server results in overwriting existing credentials. Only the most recently added set of credentials is saved.
For example, if you were to run the command XbCred \Xb1Server XbServer\xbuser1 Super$ecret followed by the command XbCred \Xb1Server XbServer\xbuser2 Super$ecret, then only the second set of credentials, xbuser2, would be saved on the console.
Registering the share
The final step is to register the share with the console from the server or PC on which the share is located. You do this with the XbApp RegisterNetworkShare command, which must be run from an Xbox One command prompt. Here’s an example of registering a share from the command line.
XbApp RegisterNetworkShare \\Xb1Server\Xb1RunFromPC Xb1Server\xbuser1 Super$ecret
Registering a share containing a package via the command line returns an App Model User ID (AMUID) to use to launch the title. After the share is registered, the package can be launched by any method that installed packages can be launched—for example, by using Xbox One Manager or the console dashboard.
Note: When you update your Xbox One Software Development Kit (XDK), existing network shares must be reregistered. This is because debugging tools and other tools are updated with the XDK.
For a link to the documentation for registering a network share, see References.
Runtime performance and network infrastructure
When RfPC is in use, data is retrieved as needed from files on the server share. The data from a file is retrieved in 4 KB aligned blocks when the file is accessed. Only the data that is requested will be transferred to the console. For example, if 1 MB of data is read from a 20 GB file, only that 1MB of data will be transferred to the console instead of the entire file. The data held in memory is managed by title code. If the data is discarded, another network request is invoked if the same data is requested again. This allows you to update game data on the fly by updating the contents of the network share when the file is not locked by title code.
This dependency on network transactions can affect runtime performance. If your network infrastructure is sufficiently fast, the network will not be a bottleneck for file-read throughput. To get the best performance, use a local subnet with a gigabit switch and gigabit Ethernet cables to connect your server to your development console. In some cases, file read times may even be faster than you’d expect in a retail environment. On larger networks with less available throughput, the first time a file is read (and the first time it is read after it’s been updated) will be slower than it is with push deployment. After file contents have been retrieved, however, subsequent reads will have throughput comparable to push deployment. Bear this in mind when considering performance. Installing an encrypted package on your console is still the only way to provide realistic runtime performance comparable to that in a retail environment.
When to use it
The ability to run a game or app from a server has obvious benefits for speeding up iteration times for the most basic scenario: a single developer working with their console on their desk. Unlike previous deployment solutions, RfPC is versatile enough to accommodate more complex scenarios without increasing the complexity of setup or test iteration.
Sharing a devkit
There are some situations where multiple developers share the same development hardware. If you’re in this situation, there are several advantages to using RfPC over standard push deployment. Push deployment can be painfully slow, especially when working with larger build packages. Maximizing your debugging time is especially important when sharing time with another developer.
You’ll have to decide whether to have a unique share for each developer or a single share that’s updated with each iteration. Deciding which is the better solution is up to you.
| Pros | Cons | |
|---|---|---|
| Single share | Simplicity in console setup | Possible contention with deployment package |
| Unique shares | Avoid file contention with other developers when populating share | Need to reregister network share when switching user |
With a single share, you can guarantee the console has the fastest connection between the share host and the console. This may be less important if the network topology that connects the console to two separate servers, or development PCs, is identical—for example, if two development PCs and the console are all plugged into the same router. However, if your setup is such that the two share locations are not on the same subnet, this can cause performance differences depending on which share is being used.
Single share
With a single share location, the files should be considered locked while the console is in use. This is technically true: files can be updated any time they aren’t actively being used by the game or app (for example, when the game doesn’t have the file open to read). However, if Developer A is running their build, it would be imprudent for Developer B, who’s queued up next for time on the console, to overwrite the contents of the share. Instead, it would be better to allocate one space as the share and another space as the staging area. Updating the share contents of a remote server is much quicker when the files are already located on the same hard drive as the share itself. For example, if Developer A is running a game located at D:\RfPCShare, then Developer B may push their build to D:\RfPCStaging. When Developer A is finished with the console, the contents of D:\RfPCStaging can be moved to D:\RfPCShare and Developer B is set to go.
This setup allows a static, optimized hardware setup using at least a gigabit Ethernet connection for the best runtime performance. It also avoids to need to run XbApp RegisterNetworkShare when switching users. This can be useful for developers who are not entirely comfortable using the command line, such as black-box testers or non-technical artists.
Unique shares
If each developer is working with their own network share, they can update their build package whenever they want without worrying about shuffling files on a share or overwriting their colleagues’ work. If you prefer this method, add the network credentials for each share in Dev Home. Running XbApp RegisterNetworkShare with your network share will point the console at your share when you’re ready to begin working.
Nightly build with distributed components
If you’re working with a build system that delivers generated content to different directories, using a single server share may not provide the streamlined deployment scenario that you’d expect from RfPC. However, Xbox One development consoles that are registered with a network share for RfPC can navigate symbolic links to accommodate distributed build output. For example, a share may be located at D:\Path\To\Build and contain the contents of the root of the build (for example, the main executable and package manifest). Assets can be located elsewhere, such as D:\Path\To\Assets. You can use MkLink to create a symbolic link to the Assets directory within the Build directory by running this command from an administrator command prompt.
MkLink.exe /J D:\Path\To\Build\GameAssets D:\Path\To\Assets
Note that you must include the /J argument to create a directory junction. If the assets are located on another server—a rendering farm, for example—you must use the /D argument instead. The command would look like this.
MkLink.exe /D D:\Path\To\Build\GameAssets \\RenderServer\Assets
Access to server shares requires the console to maintain credentials. Even though the assets on RenderServer are linked to from the build server, credentials for RenderServer must also be set up. In addition to the credentials mentioned in Setting it up, use this command to add another user to RenderServer and to the console.
XbCred add \\RenderServer RenderServer\xbuser2 Super$ecret
In the preceding examples, the game would access the game assets in the GameAssets subdirectory. Any number of symbolic links can be added to the root of the share.
Headless test lab
Automated white-box testing is often done on a large array of console simultaneously. This “headless” setup typically involves a single deployment server connected to a number of consoles, which may or may not have attached TVs or gamepads. If this entire process is completely automated, reducing deployment times or changing files on the fly may not be of primary importance. If these aspects are not important, push deployment may be sufficient. But if you want the flexibility to change game files at any time (for example, while the game is running) or want to reduce deployment times, consider investing in a Run from PC deployment solution.
This setup requires creating a single user and setting up a single share, and then adding the credentials to each console and registering each console individually with the share. You can register the share by using XbApp RegisterNetworkShare from any PC as long as you know the name of the server.
Note: Test builds often log progress to files directly on the console. Recall that, when the network share is created, the user is given only READ access. This is to prevent file contention; allowing multiple consoles to write to the network share would result in instability if more than one console were to write to a single file at once. Because the share is mapped to the local G: drive on the console, any log files must be written to another drive, such as the title scratch drive (T:). The log files can then be retrieved from the console when convenient.
Studio-wide game day
Pre-alpha and pre-beta user testing is often done by any individuals who have access to a development console within the local studio. This setup requires a single user account and a single share to be created, assuming that every individual will be playing the same game configuration. Each console must also be registered by running XbApp RegisterNetworkShare, targeting each console in turn. Each developer participating in the game day must add the user credentials and share in Dev Home. The configuration on the console needs to be done only once; the credentials will be stored for subsequent uses.
If test builds make use of logging, review the note at the end of Headless test lab, about handling log files.
Troubleshooting RfPC
Here are some common troubleshooting scenarios for RfPC.
Access denied from net user or net share commands
Creating new accounts from the command prompt requires administrative privileges. Make sure you’ve opened your command prompt as an administrator by right-clicking the icon and selecting Run as administrator.
Error 0x80070003 from XbApp RegisterNetworkShare
This error code indicates that the specified network share was not found. The most common reason for this is having the incorrect format for the network share argument. The proper form is:
\\<computer name>\<share name>
If your computer name is Xb1Server and the network share is named Xb1RunFromPC, the argument should be \Xb1Server\Xb1RunFromPC. Specifying Xb1RunFromPC alone is not sufficient. It’s also common to inadvertently specify the drive letter of the share location (for example, \Xb1Server\D$\Xb1RunFromPC). The drive letter should not be included.
Error 0x80070005 from XbApp RegisterNetworkShare
This error code means access to a resources was denied. This will occur if the credentials provided do not have access to the share hosting the loose package. Ensure no mistakes or typos were made when providing the username to the Net Share command, and that the username and password were correct when adding the credentials to the console with XbCred.
Error 0x80070520 from XbApp RegisterNetworkName
This error code is ERROR_NO_SUCH_LOGON_SESSION and means the user name has been incorrectly specified or formatted. Check that the user name is correct. Also ensure that the domain or PC name has been correctly specified. If you’re following the steps in this document, use this form:
<computer name>\<username>
If the user account is a domain account, use this form:
<domain>\<username>
For example, if you created the user XbUser1 on a server named Xb1Server, then the username should be Xb1Server\XbUser1.
Error 0x8007052E from XbApp RegisterNetworkName
The message along with this error code is self-explanatory: the user name or password is incorrect. Check that they are both correctly specified. The use of special characters on the command line or in batch files may be the culprit if the name and password appear correct. If special characters such as ! or & are used, ensure that they’re escaped properly or that the arguments are wrapped in quotation marks.
Application exited or crashed on launch
When attempting to launch a game or application, you may see this error message:
The application has exited or crashed before completing activation.
The problem may be with the credentials saved on the console. If time allows, check whether the problem also occurs with push deployment. If it does, the problem may be unrelated to the deployment setup.
D:D:D:D:D:Push deployment
With push deployment, all folders and files needed to run a game are located in a single package physically located on the hard drive of the dev kit.
Delta calculation strategies
Minimal fetch comparison
With the minimal-fetch comparison type of push deployment, the only files that are compared are those that are located on both the dev kit and the dev PC. Any files that are on the dev kit but not on the dev PC are ignored in calculating the delta between the two drives. Default Visual Studio settings and xbapp.exe deploy use this type of push deployment.
Full fetch comparison
In contrast, the full-fetch comparison type of push deployment compares all files on both drives to determine the delta between the two. The Remove Existing Files setting in Visual Studio and the xbapp.exe deploy /s switch enable this type of comparison.
The use of /s is a really big hammer. It’s expensive and heavy handed, but it is also extremely thorough. Essentially, it compares everything on the dev PC to everything on the dev kit and makes sure that all files match. This method is very costly in terms of deployment time, and in many cases it can be faster to use xbapp.exe uninstall and start clean with xbapp.exe deploy.
A point of clarification: Ensuring that there are no stale files (incremental deployment) is very different than ensuring that there are no orphaned files on the console (what /s is needed for). If incremental deployment is all that is needed, then don’t use the /s switch; simply using xbapp.exe deploy will more efficiently determine which files are out of date.
Approaches to push deployment
Delete and deploy
This push-deployment approach guarantees that the layout on the dev kit is an exact match to the layout on the dev PC, but it incurs the cost of a full deployment. It will often be less costly than a full fetch comparison.
| Pros | Cons | Best for |
|---|---|---|
| Absolutely guarantees that the layout on the dev kit is what was intended, that is, that it matches the layout on the dev PC exactly. | Incurs the cost of a full deployment every time it is implemented. | Cleaning up and getting a known good push deployment as a base from which you can use other approaches. |
Workflow
1.
xbapp.exe uninstall <packagefullname>
2.
xbapp.exe deploy <apppath>
Monitor and update
With this push-deployment approach, the game-development studio is fully in charge of maintaining the synchronization between the dev PC and the dev kit.
| Pros | Cons | Best For |
|---|---|---|
| Provides very granular control over exactly which files are updated and when. Least expensive when it comes to the amount of time needed to sync files between the dev PC and the dev kit. |
Not “fire and forget”: It may become tedious to maintain the files to be updated, or difficult to troubleshoot when things get out of sync. | Situations in which a single individual is making targeted changes to a largely static (unchanging) enlistment where the file changes external to the individual are minimal. |
Workflow
- Monitor changes in one of three ways:
- Manually.
- Using FileSystemWatcher helper application.
- Recursively comparing [local] with [server] to generate a change list.
- Use command-line tools as appropriate to update the package on the dev kit:
- xbdel.exe
- xbmkdir.exe
- xbrmdir.exe
- xbcp.exe
Iterative deploy
With the iterative deployment approach, the push-deployment system ignores orphan files in keeping the files in sync.
| Pros | Cons | Best for |
|---|---|---|
| “Fire and forget”: Synchronizes all files. | “All or nothing”: It prevents you from targeting specific files while leaving others alone. | Daily or weekly builds for play test scenarios in which there is not likely to be iterative development. |
Workflow
-
Make a change
-
cppXbapp.exe deploy <apppath>
Push deployment with static content or assets
The advantage of this deployment strategy is that after it has been set up once, very little additional scripting is required for subsequent updates.
Rather than copying the large amount of content into the solution folder structure, you will copy the relatively small number of loose files in the solution folder [solution][project]\XboxOne\ Layout\Image\Loose\ to where the content currently resides. Then you’ll run xbapp.exe deploy from that folder to copy the content over. You will only have to do this once; subsequent iterations are deployed from the solution folder by using Visual Studio F5.
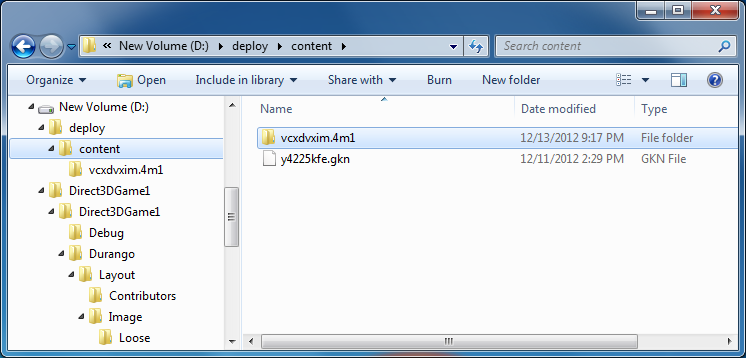
- Create a deploy folder.
- Within the deploy folder, create a content folder.
- Place the content (assets) in the \deploy\content folder.
After you have completed the preceding steps, the folder and file structure will resemble the structure shown in the following screenshot (note that in the example shown, the \deploy\content folder already contains content or assets).
- Launch Visual Studio.
- Create a new Direct3D Game.
- Save the project.
- Build Solution (F7)
This will result in the creation of a deeply nested folder like the following: [solution][project]\XboxOne\Layout\Image\Loose. The files in the \Loose folder are those that will be
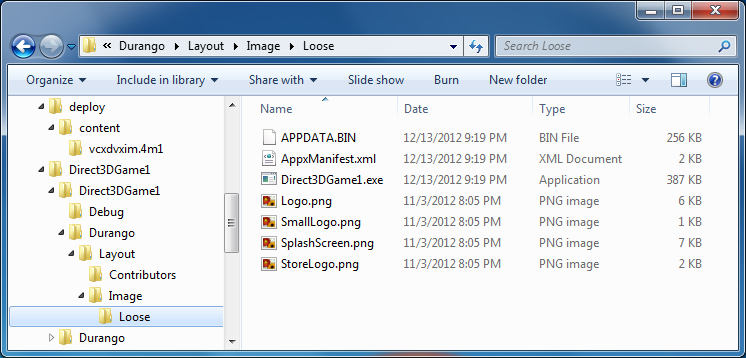
deployed to the Xbox One console.
- Edit the following script as appropriate and run the script within the context of an Xbox One XDK command prompt. Note that the xbconnect.exe [ipaddress] command is used to set the default console address.
REM Build the project in Visual Studio before running this script.
set iterativefolder="D:\Direct3DGame1\Direct3DGame1\XboxOne\Layout\Image\Loose"
set deployfolder="D:\deploy"
robocopy.exe %iterativefolder% %deployfolder%
xbapp.exe deploy %deployfolder% /v
del %deployfolder%\*.* /q
-
Launch the game on the console.
a. Note the blue color on the console.
- Return to Visual Studio.
- Make a change to game.cpp. For example, change
const float clearColor[] = { 0.39f, 0.58f, 0.93f, 1.000f };
to
const float clearColor[] = { 0.93f, 0.39f, 0.58f, 1.000f };
-
Press F5 to build and launch from Visual Studio.
a. Note the pink color on the console after the game has launched.
It’s up to you to decide how to update the content in the package on the console. One way would be to write a small app that uses a FileWatcher on the \deploy\content\ folder and generates a batch file to copy to the console package only the content files that have changed. The batch file could accomplish this by using the xbcp {PFN}:\ approach, or by silently copying the files over in real time.
Using Visual Studio with push deployment
Visual Studio uses push deployment by default for all Xbox One projects. The following sample output is representative of the data seen in the Output pane during push deployment when F5 is used to save, build, and launch the project.
Example of initial deployment output (push)
Push deploying 'D:\Direct3DGame1\XboxOne\Layout\Image\Loose' to '10.124.132.249'.
Calculating payload.
Transfer starting for 7 files (757690 bytes).
Transferring 1/7: D:\Direct3DGame1\XboxOne\Layout\Image\Loose\appdata.bin (262144 bytes)
Transferring 2/7: D:\Direct3DGame1\XboxOne\Layout\Image\Loose\AppxManifest.xml (1240 bytes)
Transferring 3/7: D:\Direct3DGame1\XboxOne\Layout\Image\Loose\Direct3DGame1.exe (478720 bytes)
Transferring 4/7: D:\Direct3DGame1\XboxOne\Layout\Image\Loose\Logo.png (5789 bytes)
Transferring 5/7: D:\Direct3DGame1\XboxOne\Layout\Image\Loose\SmallLogo.png (745 bytes)
Transferring 6/7: D:\Direct3DGame1\XboxOne\Layout\Image\Loose\SplashScreen.png (7126 bytes)
Transferring 7/7: D:\Direct3DGame1\XboxOne\Layout\Image\Loose\StoreLogo.png (1926 bytes)

Package Full Name: '1777df60-649d-42fd-ba63-e0aaf5ccd379_1.0.0.0_x64__zjr0dfhgjwvde'
757690 bytes in 7 files over 4.635 seconds.
Approximate transfer speed: 0.155898488198026 MB/s.
Aumids returned for this package:
   1777df60-649d-42fd-ba63-e0aaf5ccd379_zjr0dfhgjwvde!App
Project associated with aumid '1777df60-649d-42fd-ba63-e0aaf5ccd379_zjr0dfhgjwvde!App'
Selected debugger address '10.124.133.56'.
Launch request successful.
Example of iterative deployment output (push)
Push deploying 'D:\Direct3DGame1\XboxOne\Layout\Image\Loose' to '10.124.132.249'.
Calculating payload.
Transfer starting for 2 files (740864 bytes).
Transferring 1/2: D:\Direct3DGame1\XboxOne\Layout\Image\Loose\appdata.bin (262144 bytes)
Transferring 2/2: D:\Direct3DGame1\XboxOne\Layout\Image\Loose\Direct3DGame1.exe (478720 bytes)

Package Full Name: '1777df60-649d-42fd-ba63-e0aaf5ccd379_1.0.0.0_x64__zjr0dfhgjwvde'
740864 bytes in 2 files over 3.039 seconds.
Approximate transfer speed: 0.232491927854557 MB/s.
Aumids returned for this package:
   1777df60-649d-42fd-ba63-e0aaf5ccd379_zjr0dfhgjwvde!App
Project associated with aumid '1777df60-649d-42fd-ba63-e0aaf5ccd379_zjr0dfhgjwvde!App'
Selected debugger address '10.124.133.56'.
Launch request successful.
Appendix
Definitions
- Cooking refers to taking a given source file (such as an Adobe Photoshop .psd) and processing it with other tooling layers to arrive at game content or assets (for example, slicing and dicing the .psd file layers to arrive at multiple DDS files).
- Split asset development refers to the practice of keeping binaries and content in separate locations, merging them together on demand into the final game folder structure only when they are deployed on the dev kit.
- Monolithic asset development refers to the practice of keeping all game assets (binaries and content) within a single folder location on the dev PC. This folder structure typically represents the game’s final folder structure.
- Iteration or iterative development refers to the cycle of making a change to the game code on the dev PC and seeing the change reflected in the game on the console.
- Push deployment is the process by which the files necessary for the game to run are copied to a package located on the dev kit.
- Run from PC Deployment (RfPC) is the method of creating a network share that the console can map as a local drive for running games. This effectively allows you to “deploy” a game without moving content to the console.
- Dev PC is the Windows 7 or Windows 8 computer on which the individual developer, artist, designer, or other studio personnel perform their coding and editing work.
- Dev kit is the Xbox One console that is attached to the dev PC through the network.
Package full name (PFN) and application user model identifier (AUMID)
The package full name changes when you change one of the parameters that feeds it. Because the only thing likely to change in the PFN is the version number, it is possible to predict these changes from build to build. See the list that follows the example for a brief description of the different parts of the PFN.
The data in green is what you will see when you issue xbapp.exe list from the XDK command prompt as well as the return value from xbapp.exe deploy.
|Package Full Name (PFN or packagefullname) --------------------|
|A-----------------------------------|B------|C-|D|E------------|
 49b10ef7-00fc-4648-81ad-c45646b1c3ee_1.0.0.0_x64__zjr0dfhgjwvde
      49b10ef7-00fc-4648-81ad-c45646b1c3ee_zjr0dfhgjwvde!App
     |A-----------------------------------|E------------|F--|
     |Application User Model Identifier (AUMID) ------------|
Most of this data comes from the Package.appxmanifest file in this element.
[Begin Snip]
  <Identity Name="49b10ef7-00fc-4648-81ad-c45646b1c3ee"
            Publisher="CN=Publisher"
            Version="1.0.0.0" />
  <Applications>
    <Application Id="App" ...>
[End Snip]
A = Identity element, Name attribute.
B = Identity element, Version attribute.
C = Architecture.
D = Culture (this value is always neutral, as indicated by the double underscore).
E = Hash of the data in the Identity element, Publisher attribute.
F = Application element, Id attribute.
References
- “Symbolic Links,” msdn.microsoft.com
- Documentation for network registration
- Documentation for XbCred credentials manager
- Documentation for Run from PC setup