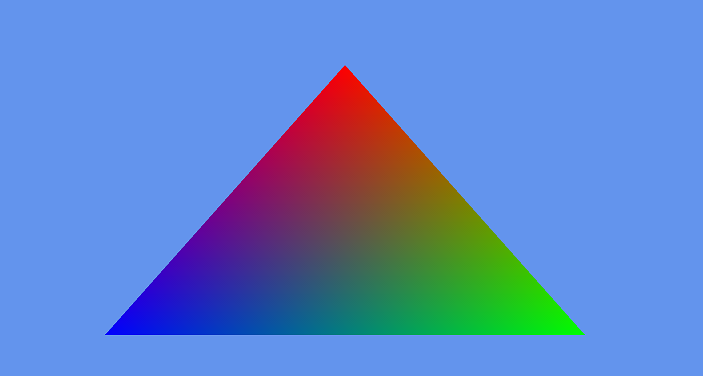
Simple Triangle
The following sections provide a tutorial on how to create a program to render a 2D triangle on the Xbox One dev kit:
The tutorial shows how to create the project, add appropriate pixel and vertex shaders, initialize Direct3D 11, initialize a 2D object, and render the 2D object to the screen.
- Creating a project
- Adding pixel and vertex shaders
- Adding declarations for the triangle
- Initializing triangle data
- Rendering the triangle
- Building and deploying
Creating a project
First, create a new project for Xbox One by using a template supplied with the XDK.
To create a new project
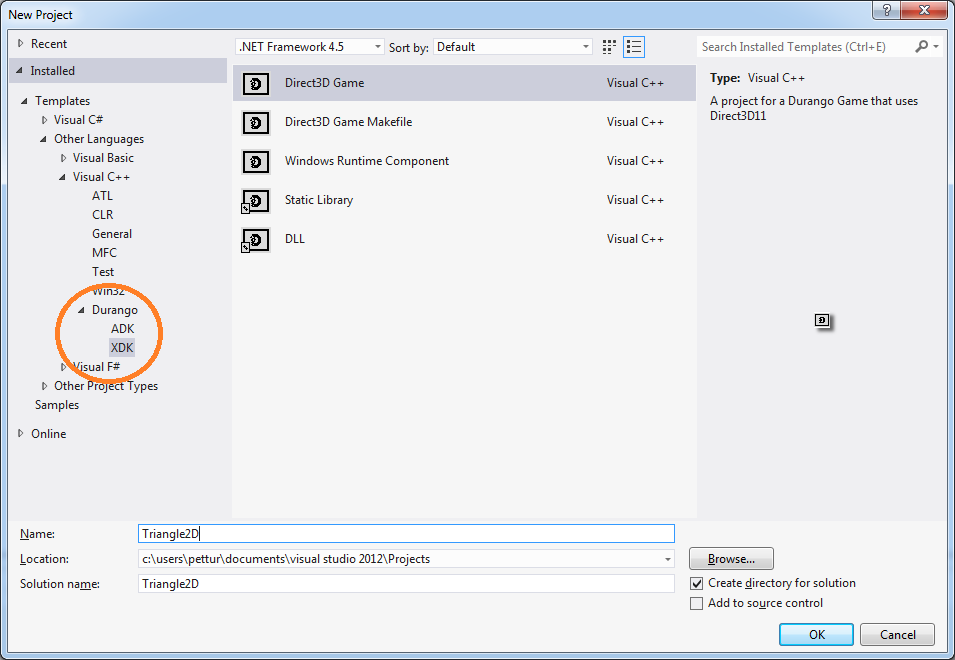
- On your development PC create a new Visual C++ project using the Xbox One / XDK platform and Direct3D Game template.
Do not use spaces or other non-alphanumeric characters in the project name. Enter Triangle2D.
Adding pixel and vertex shaders
Next, add source code for the pixel shader and the vertex shader, as follows.
To add source code for a pixel shader
- Select the project in Solution Explorer.
- On the Project menu, click Add New Item.
- Select HLSL in the tree, and then select Pixel Shader File (.hlsl).
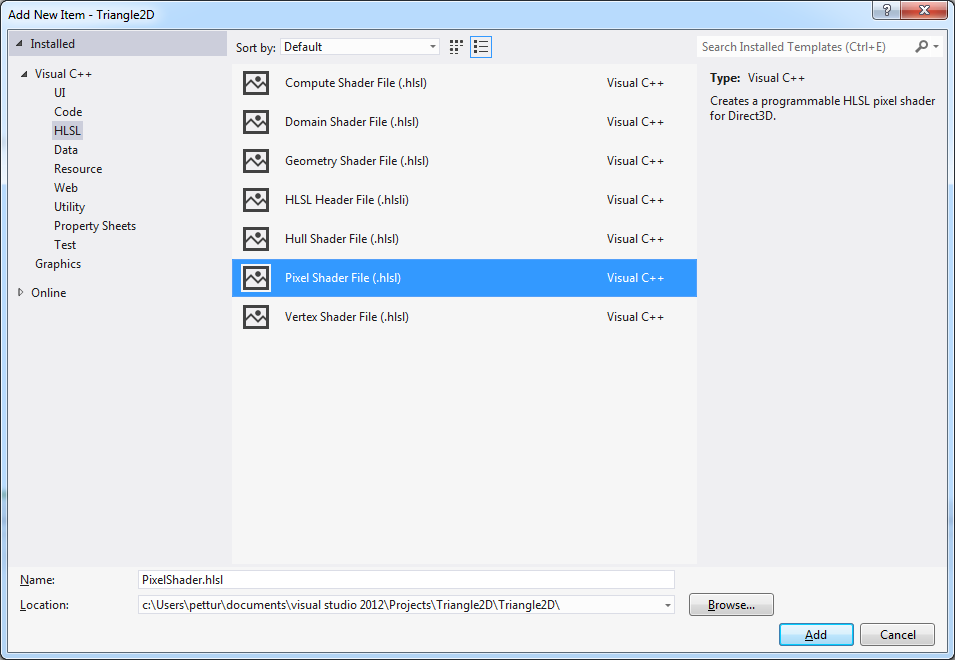
- Click Add.
- Select and delete the default code for the pixel shader, and replace it with the following.
 Tip To select a code listing from documentation in order to copy it, triple-click the first line of code, or click the Copy button if it is available.
C++
struct Interpolants { float4 position : SV_POSITION0; float4 color : COLOR0; }; struct Pixel { float4 color : SV_TARGET0; }; Pixel main( Interpolants In ) { Pixel Out; Out.color = In.color; return Out; } - Save the pixel shader file.
- Right-click PixelShader.hlsl in Solution Explorer and choose Properties from the context menu.
- For Configuration, select All Configurations, and then select HLSL Compiler\All Options in the tree control.
- Set Header File Name to PixelShader.h.
- Set Header Variable Name to g_ps_main.
- Clear the value for Object File Name.
- Set Shader Model to Shader Model 5 (/5_0).
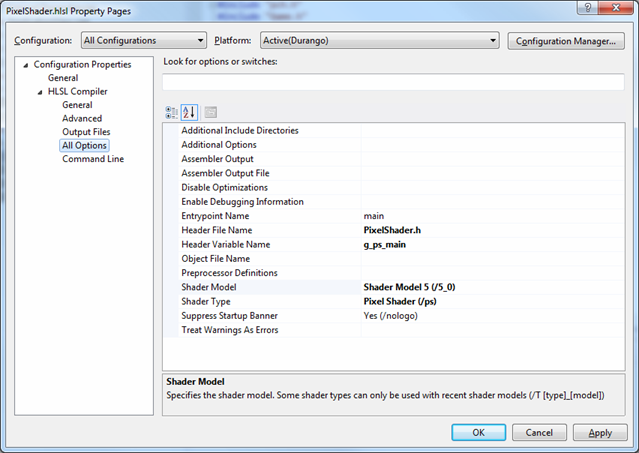
- Verify your changes, and then click OK.
To add source code for a vertex shader
- Select the project in Solution Explorer.
- On the Project menu, click Add New Item.
- Select HLSL in the Add New Item dialog box, and select Vertex Shader File (.hlsl).
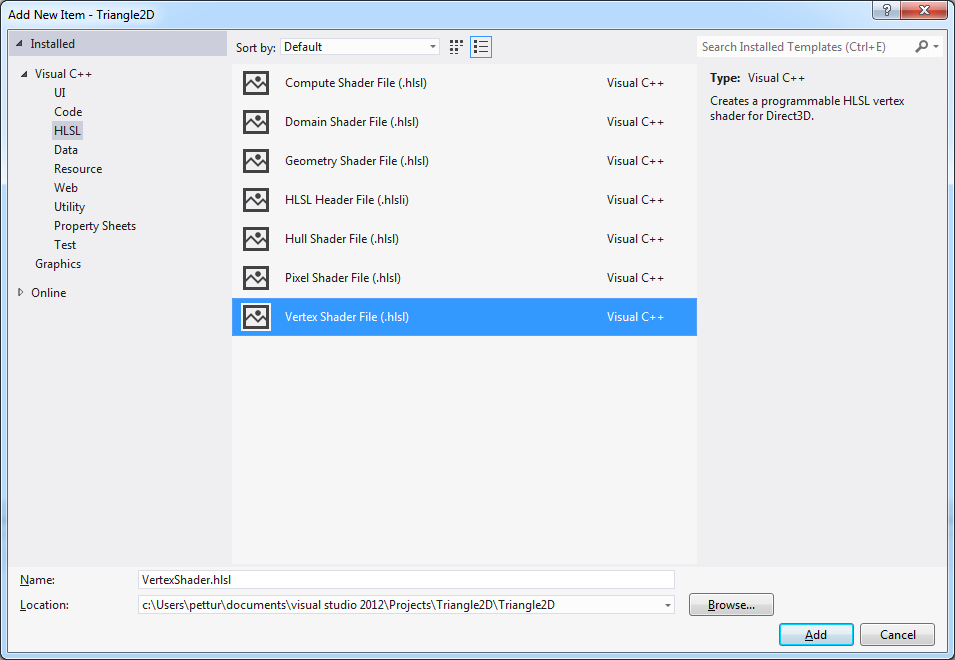
- Click Add.
-
Select and delete the default code for the vertex shader, and replace it with the following:
C++
struct Vertex { float4 position : POSITION0; float4 color : COLOR0; }; struct Interpolants { float4 position : SV_POSITION0; float4 color : COLOR0; }; Interpolants main( Vertex In ) { return In; } - Save the vertex shader file.
- Right-click VertexShader.hlsl in Solution Explorer and choose Properties from the context menu.
- Select All Configurations for Configurations, and then select HLSL Compiler\All Options in the tree control.
- Set Header File Name to VertexShader.h.
- Set Header Variable Name to g_vs_main.
- Clear the value for Object File Name.
- Set Shader Model to Shader Model 5 (/5_0).
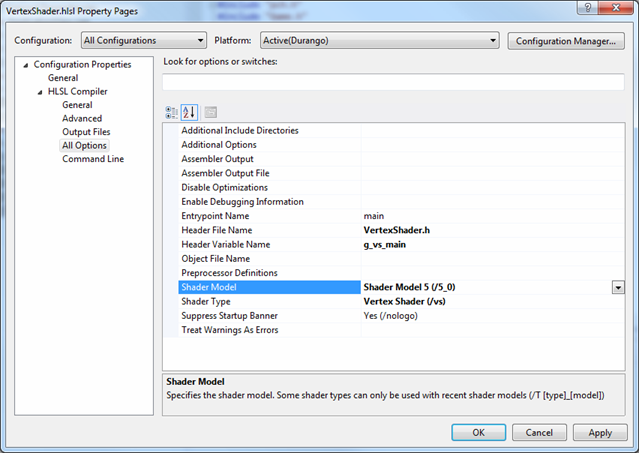
- Verify your changes, and then click OK.
-
Add the following
includestatements to game.cpp:C++
#include "PixelShader.h"
#include "VertexShader.h"
Adding declarations for the triangle
Next, add declarations to the header file to draw a triangle, as follows.
To add declarations to the header file to draw a triangle
- Open Game.h in the source editor.
-
Add the following declarations to the private section of the Game class.
C++
//
// Declarations for drawing a triangle
//
struct s_Vertex
{
   float vPostion[4];
   float vColor[4];
};

Microsoft::WRL::ComPtr<ID3D11InputLayout>         m_InputLayout;
Microsoft::WRL::ComPtr<ID3D11Buffer>              m_VertexBuffer;
Microsoft::WRL::ComPtr<ID3D11VertexShader>        m_VertexShader;
Microsoft::WRL::ComPtr<ID3D11PixelShader>         m_PixelShader;
Shown here for reference, the following code lists the whole class declaration.
C++
ref class Game sealed
{
public:

    Game();

    // Initialization and management
    void Initialize(Windows::UI::Core::CoreWindow^ window);

    // Basic game loop
    void Tick();
    void Update(float totalTime, float elapsedTime);
    void Render();

    // Rendering helpers
    void Clear();
    void Present();

private:

    void CreateDevice();
    void CreateResources();

    // Core Application state
    Platform::Agile<Windows::UI::Core::CoreWindow>   m_window;
    Windows::Foundation::Rect      m_windowBounds;

    // Direct3D Objects
    D3D_FEATURE_LEVEL       m_featureLevel;
    Microsoft::WRL::ComPtr<ID3D11Device1>     m_d3dDevice;
    Microsoft::WRL::ComPtr<ID3D11DeviceContext1>  m_d3dContext;

    // Rendering resources
    Microsoft::WRL::ComPtr<IDXGISwapChain1>m_swapChain;
    Microsoft::WRL::ComPtr<ID3D11RenderTargetView> m_renderTargetView;
    Microsoft::WRL::ComPtr<ID3D11DepthStencilView> m_depthStencilView;
    Microsoft::WRL::ComPtr<ID3D11Texture2D>m_depthStencil;

    // Game state
    INT64   m_frame;
    BasicTimer^     m_timer;

    //
    // Declarations for drawing a triangle
    //
    struct s_Vertex
    {
       float vPostion[4];
       float vColor[4];
    };

    Microsoft::WRL::ComPtr<ID3D11InputLayout>  m_InputLayout;
    Microsoft::WRL::ComPtr<ID3D11Buffer>       m_VertexBuffer;
    Microsoft::WRL::ComPtr<ID3D11VertexShader> m_VertexShader;
    Microsoft::WRL::ComPtr<ID3D11PixelShader>  m_PixelShader;
};
Initializing triangle data
Next, initialize triangle data by adding source code to Game.cpp, as follows.
To add triangle data to Game.cpp
- Open Game.cpp.
- Locate the definition for the function CreateResources.
- Add the following code at the end of
CreateResources():Tip To select a code listing from documentation in order to copy it, triple-click the first line of code, or click the Copy button if it is available.C++
//
// The compiled shader bytecodes are contained in constant buffers,
// g_vs_main and g_ps_main defined in the auto-generated header files.
//
DX::ThrowIfFailed( m_d3dDevice->CreateVertexShader( g_vs_main,
                                                    sizeof( g_vs_main ),
                                                    NULL,
                                                    m_VertexShader.GetAddressOf() )
                 );

DX::ThrowIfFailed( m_d3dDevice->CreatePixelShader( g_ps_main,
                                                   sizeof( g_ps_main ),
                                                   NULL,
                                                   m_PixelShader.GetAddressOf() )
                 );

//
// Create input layout (must match declaration of s_Vertex)
//
const D3D11_INPUT_ELEMENT_DESC InputElementDesc[] =
{
  {
    "POSITION",                     // LPCSTR SemanticName;
    0,                              // UINT SemanticIndex;
    DXGI_FORMAT_R32G32B32A32_FLOAT, // DXGI_FORMAT Format;
    0,                              // UINT InputSlot;
    0,                              // UINT AlignedByteOffset;
    D3D11_INPUT_PER_VERTEX_DATA,    // InputSlotClass;
    0,                              // UINT InstanceDataStepRate;
  },
  {
    "COLOR",                        // LPCSTR SemanticName;
    0,                              // UINT SemanticIndex;
    DXGI_FORMAT_R32G32B32A32_FLOAT, // DXGI_FORMAT Format;
    0,                              // UINT InputSlot;
    D3D11_APPEND_ALIGNED_ELEMENT,   // UINT AlignedByteOffset;
    D3D11_INPUT_PER_VERTEX_DATA,    // InputSlotClass;
    0,                              // UINT InstanceDataStepRate;
  },
};

DX::ThrowIfFailed( m_d3dDevice->CreateInputLayout( InputElementDesc,
                                                   _countof( InputElementDesc ),
                                                   g_vs_main,
                                                   sizeof( g_vs_main ),
                                                   m_InputLayout.GetAddressOf() )
                 );

//
// Create vertex buffer containing a single triangle
//
s_Vertex VertexData[3] =
{
  {
    {  0.0f,  0.5f,  0.5f,  1.0f },
    {  1.0f,  0.0f,  0.0f,  1.0f },
  },
  {
    {  0.5f, -0.5f,  0.5f,  1.0f },
    {  0.0f,  1.0f,  0.0f,  1.0f },
  },
  {
    { -0.5f, -0.5f,  0.5f,  1.0f },
    {  0.0f,  0.0f,  1.0f,  1.0f },
  },
};

D3D11_SUBRESOURCE_DATA InitialData =
{
  VertexData,         // const void *pSysMem;
  0,                  // UINT SysMemPitch;
  0,                  // UINT SysMemSlicePitch;
};

D3D11_BUFFER_DESC BufferDesc =
{
  sizeof( VertexData ),           // UINT ByteWidth;
  D3D11_USAGE_IMMUTABLE,          // D3D11_USAGE Usage;
  D3D11_BIND_VERTEX_BUFFER,       // UINT BindFlags;
  0,                              // UINT CPUAccessFlags;
  0,                              // UINT MiscFlags;
  sizeof( VertexData[0] ),        // UINT StructureByteStride;
};

DX::ThrowIfFailed( m_d3dDevice->CreateBuffer( &BufferDesc,
                                              &InitialData,
                                              m_VertexBuffer.GetAddressOf() )
                 );
Rendering the triangle
Next, add source code to Game.cpp that will render the triangle.
To add source code to render the triangle
- Locate the definition of the method Game::Render, in Game.cpp.
Look for the following comment:// TODO: Add your rendering code here -
Replace the comment with the following code:
C++
// Set input assembler state
m_d3dContext->IASetInputLayout( m_InputLayout.Get() );
UINT Strides[1] = { sizeof( s_Vertex ), };
UINT Offsets[1] = { 0, };
m_d3dContext->IASetPrimitiveTopology( D3D11_PRIMITIVE_TOPOLOGY_TRIANGLELIST );
m_d3dContext->IASetVertexBuffers( 0, 1, m_VertexBuffer.GetAddressOf(), Strides, Offsets );

// Set shaders
m_d3dContext->VSSetShader( m_VertexShader.Get(), NULL, 0 );
//m_d3dContext->GSSetShader( NULL, NULL, 0 );
m_d3dContext->PSSetShader( m_PixelShader.Get(), NULL, 0 );

// Draw triangle
m_d3dContext->Draw( 3, 0 );
Building and deploying
If you’ve completed the preceding steps in this tutorial, you can now build and deploy your first app to the dev kit.
To build and deploy your app
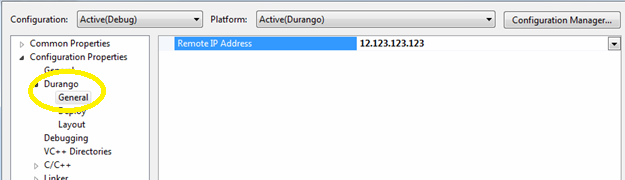
- Use Connect (xbconnect.exe) to set the default remote console, or set the IP address of the console in the project properties. The IP address to use is the one labeled Tools IP in the Developer Settings screen on the dev kit.
- On the Build menu, click Build Solution.
Wait for building to finish. - On the Build menu, click Deploy Solution.
- Navigate to the My games & apps page then select Games on the left side of the screen of the dev kit using the Xbox controller, and then select Triangle2D on the right side of the screen.
It takes a short time for the app to both deploy and run.