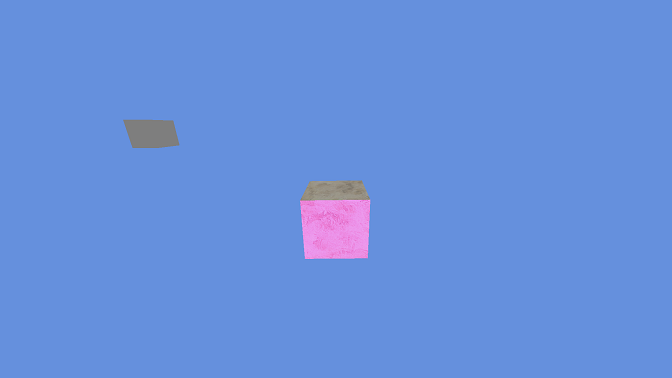
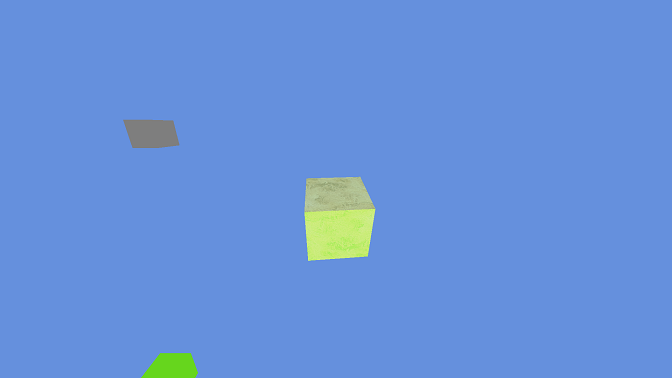
Tutorial: Rendering a Lit and Textured Object
The following sections provide a tutorial on how to create a program to render lighting onto a rotating textured 3D cube on the Xbox One dev kit.
The tutorial demonstrates how to create a new project, add pixel and vertex shaders, and render lighting and texturing onto a 3D model.
- Creating a project
- Adding DDSTextureLoader header and source files
- Adding pixel and vertex shaders
- Adding declarations for the 3D cube
- Initializing the 3D cube and matrices
- Rendering the 3D cube and lights
- Deploy a Texture File to the Xbox One
- Building and deploying
Creating a project
First, create a new project for Xbox One by using a template supplied with the XDK.
Create a new project:
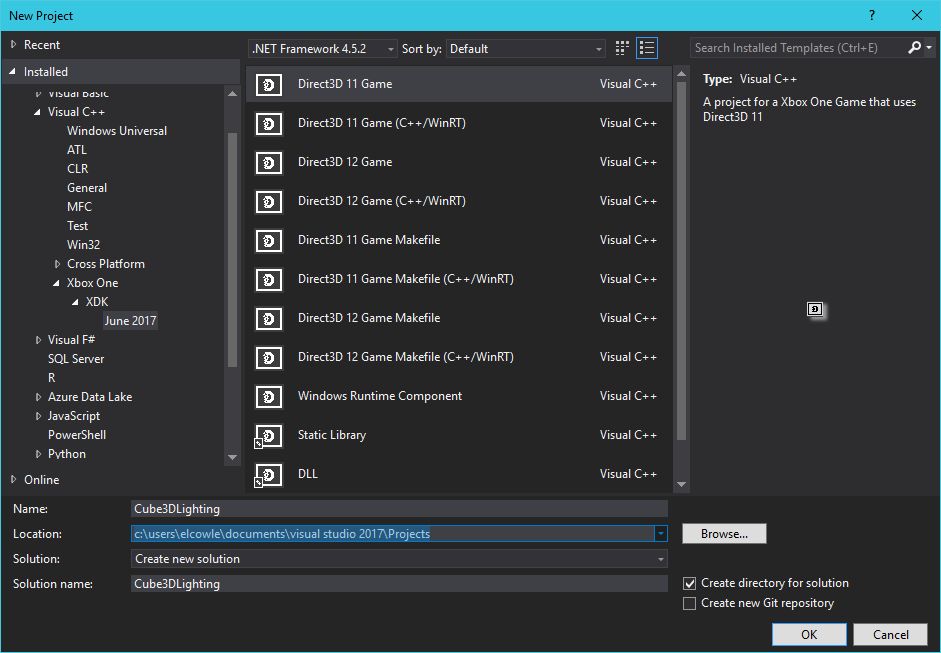
- On your development PC, in Visual Studio 2017, open the New Project window by selecting File > New > Project… Under Installed > Templates > Visual C++ > Xbox One > XDK > <Your XDK version>, select the Direct3D 11 Game template.
Do not use spaces or other non-alphanumeric characters in the project name. Enter Cube3DLighting.
Adding DDSTextureLoader header and source files
This sample requires additional header and code files be added to the project.
To locate and reference texture loading source code
- Locate the files DDSTextureLoader.cpp and DDSTextureLoader.h. They are not included as part of the dev kit, but can be found at several locations; refer to DDS Texture Loader.
- Copy the files from where you have downloaded them to the project directory for this sample (into the same folder as Game.h and Game.cpp).
- In the Project menu of Visual Studio, select Add Existing Item… and add DDSTextureLoader.cpp to your project.
Adding pixel and vertex shaders
Next, add source code for the two pixel shaders and one vertex shader.
Add source code for a pixel shader
- Select the project in the Solution Explorer.
- On the Project menu, click Add New Item…
- Select HLSL in the tree, and then select Pixel Shader File (.hlsl).
- Click Add.
- Replace the default code for the pixel shader with the following:
//************************************************************************************** // PixelShader.hlsl //************************************************************************************** //-------------------------------------------------------------------------------------- // Buffer Variables //-------------------------------------------------------------------------------------- Texture2D txDiffuse : register( t0 ); SamplerState samLinear : register( s0 ); cbuffer cbChangesEveryFrame_PS : register( b0 ) { float4 vMeshColor; float4 vLightDir[2]; float4 vLightColor[2]; float4 vOutputColor; }; //-------------------------------------------------------------------------------------- // Input Struct //-------------------------------------------------------------------------------------- struct PS_INPUT { float4 Pos : SV_POSITION; float2 Tex : TEXCOORD0; float3 Norm : TEXCOORD1; }; //-------------------------------------------------------------------------------------- // Pixel Shader - render a lit and textured object //-------------------------------------------------------------------------------------- float4 main( PS_INPUT input) : SV_Target { // Apply texture values float4 finalColor = txDiffuse.Sample( samLinear, input.Tex ) * vMeshColor; // Apply NdotL lighting for 2 lights, and add value to texture value for(int i=0; i<2; i++) { finalColor += saturate( dot( (float3)vLightDir[i],input.Norm) * vLightColor[i] ); } finalColor.a = 1.0f; return finalColor; } - Save the pixel shader file.
- Right-click PixelShader.hlsl in the Solution Explorer and choose Properties from the context menu.
- For Configuration, select All Configurations, and then select HLSL Compiler > All Options in the tree control.
- Set Header File Name to PixelShader.h.
- Set Header Variable Name to g_ps_main.
- Clear the value for Object File Name.
- Set Shader Model to Shader Model 5.0 (/5_0).
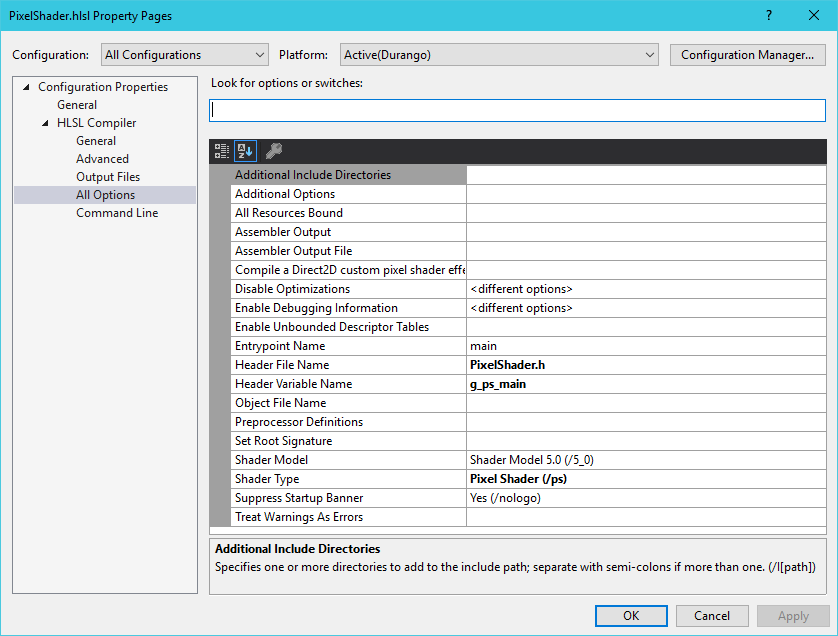
- Verify your changes, and then click OK.
Add source code for the second pixel shader
- Select the project in Solution Explorer.
- On the Project menu, click Add New Item…
- Select HLSL in the tree, and then select Pixel Shader File (.hlsl).
- Click Add.
- Replace the default code for the pixel shader with the following:
//************************************************************************************** // PixelShader1.hlsl //************************************************************************************** //-------------------------------------------------------------------------------------- // Constant Buffer //-------------------------------------------------------------------------------------- cbuffer cbChangesEveryFrame_PS : register( b0 ) { float4 vMeshColor; float4 vLightDir[2]; float4 vLightColor[2]; float4 vOutputColor; }; //-------------------------------------------------------------------------------------- // Input Struct //-------------------------------------------------------------------------------------- struct PS_INPUT { float4 Pos : SV_POSITION; float2 Tex : TEXCOORD0; float3 Norm : TEXCOORD1; }; //-------------------------------------------------------------------------------------- // PSSolid - render a solid color //-------------------------------------------------------------------------------------- float4 PSSolid( PS_INPUT input) : SV_Target { return vOutputColor; } - Save the pixel shader file.
- Right-click PixelShader1.hlsl in the Solution Explorer and choose Properties from the context menu.
- For Configuration, select All Configurations, and then select HLSL Compiler > All Options in the tree control.
- Change the Entrypoint name from main to PSSolid.
- Set Header File Name to PixelShader1.h.
- Set Header Variable Name to g_ps_main1.
- Clear the value for Object File Name.
- Set Shader Model to Shader Model 5.0 (/5_0).
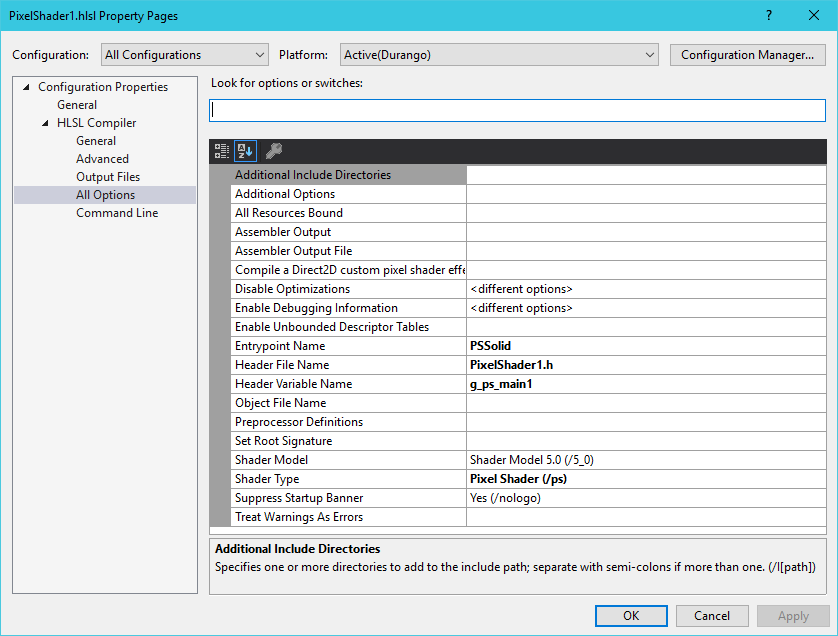
- Verify your changes, and then click OK.
Add source code for a vertex shader
- Select the project in the Solution Explorer.
- On the Project menu, click Add New Item…
- Select HLSL in the Add New Item dialog box, and select Vertex Shader File (.hlsl).
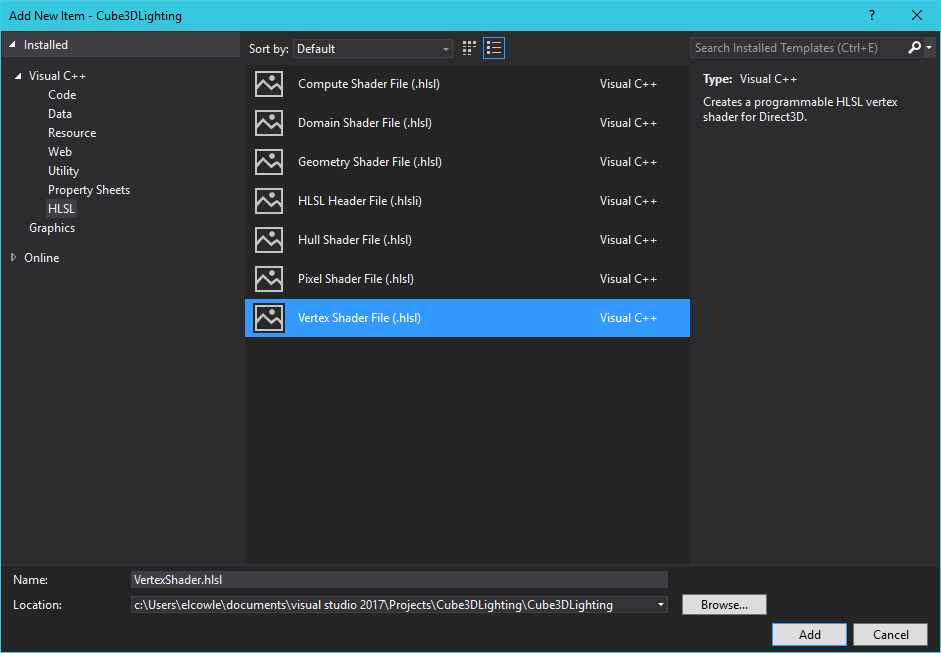
- Click Add.
- Replace the default code for the vertex shader code with the following code.
//************************************************************************************** // VertexShader.hlsl //************************************************************************************** //-------------------------------------------------------------------------------------- // Constant Buffer Definitions //-------------------------------------------------------------------------------------- cbuffer cbNeverChanges : register( b0 ) { matrix View; }; cbuffer cbChangeOnResize : register( b1 ) { matrix Projection; }; cbuffer cbChangesEveryFrame_VS : register( b2 ) { matrix World; }; //-------------------------------------------------------------------------------------- // Input and Output Structs //-------------------------------------------------------------------------------------- struct VS_INPUT { float4 Pos : POSITION; float2 Tex : TEXCOORD0; float3 Norm : NORMAL; }; struct PS_INPUT { float4 Pos : SV_POSITION; float2 Tex : TEXCOORD0; float3 Norm : TEXCOORD1; }; //-------------------------------------------------------------------------------------- // Vertex Shader - apply model - world - viewport - projection transformations //-------------------------------------------------------------------------------------- PS_INPUT main( VS_INPUT input ) { PS_INPUT output = (PS_INPUT)0; // Apply world, view, and projection transformations to the vertex position output.Pos = mul( input.Pos, World ); output.Pos = mul( output.Pos, View ); output.Pos = mul( output.Pos, Projection ); // Copy texture coordinates output.Tex = input.Tex; // Apply world transformation to normal vector output.Norm = mul( float4( input.Norm, 0.0f ), World ).xyz; return output; } - Save the vertex shader file.
- Right-click VertexShader.hlsl in the Solution Explorer and choose Properties from the context menu.
- Select All Configurations for Configurations, and then select HLSL Compiler > All Options in the tree control.
- Set Header File Name to VertexShader.h.
- Set Header Variable Name to g_vs_main.
- Clear the value for Object File Name.
- Set Shader Model to Shader Model 5.0 (/5_0).
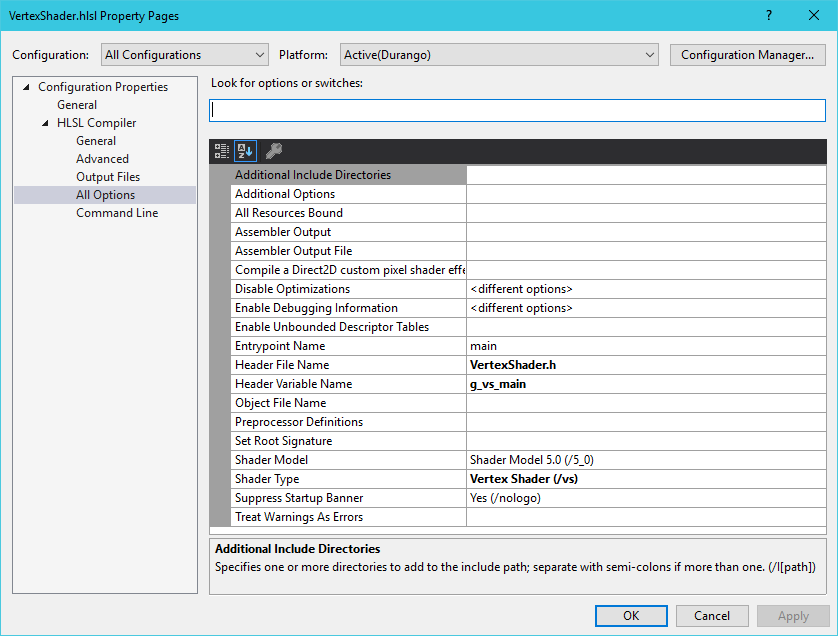
- Verify your changes, and then click OK.
Adding declarations for the 3D cube
Open Game.h in the editor.
Add declarations to the header file to draw a 3D cube
-
Add the following
include,usingandstructstatements to Game.h, after the #include “StepTimer.h” statement. You may need to build the project to get rid of compiler warnings (Build > Build Solution).C++
#include <directxcolors.h> #include "DDSTextureLoader.h" #include "PixelShader.h" #include "PixelShader1.h" #include "VertexShader.h" using namespace DirectX; //-------------------------------------------------------------------------------------- // Structures //-------------------------------------------------------------------------------------- struct SimpleVertex { XMFLOAT3 Pos; XMFLOAT2 Tex; XMFLOAT3 Normal; }; struct CBNeverChanges { XMMATRIX mView; }; struct CBChangeOnResize { XMMATRIX mProjection; }; struct CBChangesEveryFrame_VS { XMMATRIX mWorld; }; struct CBChangesEveryFrame_PS { XMFLOAT4 vMeshColor; XMFLOAT4 vLightDir[2]; XMFLOAT4 vLightColor[2]; XMFLOAT4 vOutputColor; }; -
Add the following declarations to the end of the private section of the
Gameclass.C++
// Declarations for drawing a lit, textured 3D cube Microsoft::WRL::ComPtr<ID3D11InputLayout> m_InputLayout; Microsoft::WRL::ComPtr<ID3D11Buffer> m_VertexBuffer; Microsoft::WRL::ComPtr<ID3D11Buffer> m_IndexBuffer; Microsoft::WRL::ComPtr<ID3D11Buffer> m_CBNeverChanges; Microsoft::WRL::ComPtr<ID3D11Buffer> m_CBChangeOnResize; Microsoft::WRL::ComPtr<ID3D11Buffer> m_CBChangesEveryFrame_VS; Microsoft::WRL::ComPtr<ID3D11Buffer> m_CBChangesEveryFrame_PS; Microsoft::WRL::ComPtr<ID3D11VertexShader> m_VertexShader; Microsoft::WRL::ComPtr<ID3D11PixelShader> m_PixelShader; Microsoft::WRL::ComPtr<ID3D11PixelShader> m_PixelShaderSolid; Microsoft::WRL::ComPtr<ID3D11SamplerState> m_SamplerLinear; Microsoft::WRL::ComPtr<ID3D11ShaderResourceView> m_TextureRV; XMMATRIX g_World; XMMATRIX g_View; XMMATRIX g_Projection; XMFLOAT4 g_vMeshColor; -
Save Game.h.
Initializing the 3D cube and matrices
Next, initialize 3D cube data by adding source code to Game.cpp.
To add 3D cube data to Game.cpp
- Open Game.cpp.
- Locate the definition for the function CreateResources.
-
Add the following code at the end of the function:
C++
// The compiled shader bytecodes are contained in constant buffers,
// g_vs_main, g_ps_main and g_ps_main1 defined in the auto-generated header files
DX::ThrowIfFailed( m_d3dDevice->CreateVertexShader( g_vs_main,
  sizeof( g_vs_main ),
  NULL,
  m_VertexShader.GetAddressOf() )
);

DX::ThrowIfFailed( m_d3dDevice->CreatePixelShader( g_ps_main,
  sizeof( g_ps_main ),
  NULL,
  m_PixelShader.GetAddressOf() )
);

// Create the second pixel shader. Object is rendered as a single solid color.
DX::ThrowIfFailed( m_d3dDevice->CreatePixelShader( g_ps_main1,
  sizeof( g_ps_main1 ),
  NULL,
  m_PixelShaderSolid.GetAddressOf() )
);


// Create input layout (must match declaration of SimpleVertex)
const D3D11_INPUT_ELEMENT_DESC InputElementDesc[] =
{
  { "POSITION", 0, DXGI_FORMAT_R32G32B32_FLOAT, 0, 0, D3D11_INPUT_PER_VERTEX_DATA, 0 },
  { "TEXCOORD", 0, DXGI_FORMAT_R32G32_FLOAT, 0, 12, D3D11_INPUT_PER_VERTEX_DATA, 0 },
  { "NORMAL", 0, DXGI_FORMAT_R32G32B32_FLOAT, 0, 20, D3D11_INPUT_PER_VERTEX_DATA, 0 },
};
DX::ThrowIfFailed( m_d3dDevice->CreateInputLayout( InputElementDesc,
  _countof( InputElementDesc ),
  g_vs_main,
  sizeof( g_vs_main ),
  m_InputLayout.GetAddressOf() )
);

// Set the input layout
m_d3dContext->IASetInputLayout( m_InputLayout.Get() );

// Create vertex buffer
SimpleVertex vertices[] =
{
  { XMFLOAT3( -1.0f, 1.0f, -1.0f ), XMFLOAT2( 1.0f, 0.0f ), XMFLOAT3( 0.0f, 1.0f, 0.0f ) },
  { XMFLOAT3( 1.0f, 1.0f, -1.0f ), XMFLOAT2( 0.0f, 0.0f ), XMFLOAT3( 0.0f, 1.0f, 0.0f ) },
  { XMFLOAT3( 1.0f, 1.0f, 1.0f ), XMFLOAT2( 0.0f, 1.0f ), XMFLOAT3( 0.0f, 1.0f, 0.0f ) },
  { XMFLOAT3( -1.0f, 1.0f, 1.0f ), XMFLOAT2( 1.0f, 1.0f ), XMFLOAT3( 0.0f, 1.0f, 0.0f ) },

  { XMFLOAT3( -1.0f, -1.0f, -1.0f ), XMFLOAT2( 0.0f, 0.0f ), XMFLOAT3( 0.0f, -1.0f, 0.0f ) },
  { XMFLOAT3( 1.0f, -1.0f, -1.0f ), XMFLOAT2( 1.0f, 0.0f ), XMFLOAT3( 0.0f, -1.0f, 0.0f ) },
  { XMFLOAT3( 1.0f, -1.0f, 1.0f ), XMFLOAT2( 1.0f, 1.0f ), XMFLOAT3( 0.0f, -1.0f, 0.0f ) },
  { XMFLOAT3( -1.0f, -1.0f, 1.0f ), XMFLOAT2( 0.0f, 1.0f ), XMFLOAT3( 0.0f, -1.0f, 0.0f ) },

  { XMFLOAT3( -1.0f, -1.0f, 1.0f ), XMFLOAT2( 0.0f, 1.0f ), XMFLOAT3( -1.0f, 0.0f, 0.0f ) },
  { XMFLOAT3( -1.0f, -1.0f, -1.0f ), XMFLOAT2( 1.0f, 1.0f ), XMFLOAT3( -1.0f, 0.0f, 0.0f ) },
  { XMFLOAT3( -1.0f, 1.0f, -1.0f ), XMFLOAT2( 1.0f, 0.0f ), XMFLOAT3( -1.0f, 0.0f, 0.0f ) },
  { XMFLOAT3( -1.0f, 1.0f, 1.0f ), XMFLOAT2( 0.0f, 0.0f ), XMFLOAT3( -1.0f, 0.0f, 0.0f ) },

  { XMFLOAT3( 1.0f, -1.0f, 1.0f ), XMFLOAT2( 1.0f, 1.0f ), XMFLOAT3( 1.0f, 0.0f, 0.0f ) },
  { XMFLOAT3( 1.0f, -1.0f, -1.0f ), XMFLOAT2( 0.0f, 1.0f ), XMFLOAT3( 1.0f, 0.0f, 0.0f ) },
  { XMFLOAT3( 1.0f, 1.0f, -1.0f ), XMFLOAT2( 0.0f, 0.0f ), XMFLOAT3( 1.0f, 0.0f, 0.0f ) },
  { XMFLOAT3( 1.0f, 1.0f, 1.0f ), XMFLOAT2( 1.0f, 0.0f ), XMFLOAT3( 1.0f, 0.0f, 0.0f ) },

  { XMFLOAT3( -1.0f, -1.0f, -1.0f ), XMFLOAT2( 0.0f, 1.0f ), XMFLOAT3( 0.0f, 0.0f, -1.0f ) },
  { XMFLOAT3( 1.0f, -1.0f, -1.0f ), XMFLOAT2( 1.0f, 1.0f ), XMFLOAT3( 0.0f, 0.0f, -1.0f ) },
  { XMFLOAT3( 1.0f, 1.0f, -1.0f ), XMFLOAT2( 1.0f, 0.0f ), XMFLOAT3( 0.0f, 0.0f, -1.0f ) },
  { XMFLOAT3( -1.0f, 1.0f, -1.0f ), XMFLOAT2( 0.0f, 0.0f ), XMFLOAT3( 0.0f, 0.0f, -1.0f ) },

  { XMFLOAT3( -1.0f, -1.0f, 1.0f ), XMFLOAT2( 1.0f, 1.0f ), XMFLOAT3( 0.0f, 0.0f, 1.0f ) },
  { XMFLOAT3( 1.0f, -1.0f, 1.0f ), XMFLOAT2( 0.0f, 1.0f ), XMFLOAT3( 0.0f, 0.0f, 1.0f ) },
  { XMFLOAT3( 1.0f, 1.0f, 1.0f ), XMFLOAT2( 0.0f, 0.0f ), XMFLOAT3( 0.0f, 0.0f, 1.0f ) },
  { XMFLOAT3( -1.0f, 1.0f, 1.0f ), XMFLOAT2( 1.0f, 0.0f ), XMFLOAT3( 0.0f, 0.0f, 1.0f ) },
};
D3D11_BUFFER_DESC bd;
ZeroMemory( &bd, sizeof(bd) );
bd.Usage = D3D11_USAGE_DEFAULT;
bd.ByteWidth = sizeof( SimpleVertex ) * 24;
bd.BindFlags = D3D11_BIND_VERTEX_BUFFER;
bd.CPUAccessFlags = 0;
D3D11_SUBRESOURCE_DATA InitData;
ZeroMemory( &InitData, sizeof(InitData) );
InitData.pSysMem = vertices;
DX::ThrowIfFailed(m_d3dDevice->CreateBuffer( &bd, &InitData, m_VertexBuffer.GetAddressOf() ));

// Set vertex buffer
UINT stride = sizeof( SimpleVertex );
UINT offset = 0;
m_d3dContext->IASetVertexBuffers( 0, 1, m_VertexBuffer.GetAddressOf(), &stride, &offset );

// Create index buffer
WORD indices[] =
{
  3,1,0,
  2,1,3,

  6,4,5,
  7,4,6,

  11,9,8,
  10,9,11,

  14,12,13,
  15,12,14,

  19,17,16,
  18,17,19,

  22,20,21,
  23,20,22
};

bd.Usage = D3D11_USAGE_DEFAULT;
bd.ByteWidth = sizeof( WORD ) * 36;        // 36 vertices needed for 12 triangles in a triangle list
bd.BindFlags = D3D11_BIND_INDEX_BUFFER;
bd.CPUAccessFlags = 0;
InitData.pSysMem = indices;
DX::ThrowIfFailed(m_d3dDevice->CreateBuffer( &bd, &InitData, m_IndexBuffer.GetAddressOf() ));

// Set index buffer
m_d3dContext->IASetIndexBuffer( m_IndexBuffer.Get(), DXGI_FORMAT_R16_UINT, 0 );

// Set primitive topology
m_d3dContext->IASetPrimitiveTopology( D3D11_PRIMITIVE_TOPOLOGY_TRIANGLELIST );

// Create the constant buffers
bd.Usage = D3D11_USAGE_DEFAULT;
bd.ByteWidth = sizeof(CBNeverChanges);
bd.BindFlags = D3D11_BIND_CONSTANT_BUFFER;
bd.CPUAccessFlags = 0;
DX::ThrowIfFailed(m_d3dDevice->CreateBuffer( &bd, nullptr, m_CBNeverChanges.GetAddressOf() ));

bd.ByteWidth = sizeof(CBChangeOnResize);
DX::ThrowIfFailed(m_d3dDevice->CreateBuffer( &bd, nullptr, m_CBChangeOnResize.GetAddressOf() ));

bd.ByteWidth = sizeof(CBChangesEveryFrame_VS);
DX::ThrowIfFailed(m_d3dDevice->CreateBuffer( &bd, nullptr, m_CBChangesEveryFrame_VS.GetAddressOf() ));

bd.ByteWidth = sizeof(CBChangesEveryFrame_PS);
DX::ThrowIfFailed(m_d3dDevice->CreateBuffer( &bd, nullptr, m_CBChangesEveryFrame_PS.GetAddressOf() ));


// Load the Texture
DX::ThrowIfFailed(CreateDDSTextureFromFile( m_d3dDevice.Get(), m_d3dContext.Get(), L"seafloor.dds", nullptr, m_TextureRV.GetAddressOf() ));

// Create the sample state
D3D11_SAMPLER_DESC sampDesc;
ZeroMemory( &sampDesc, sizeof(sampDesc) );
sampDesc.Filter = D3D11_FILTER_MIN_MAG_MIP_LINEAR;
sampDesc.AddressU = D3D11_TEXTURE_ADDRESS_WRAP;
sampDesc.AddressV = D3D11_TEXTURE_ADDRESS_WRAP;
sampDesc.AddressW = D3D11_TEXTURE_ADDRESS_WRAP;
sampDesc.ComparisonFunc = D3D11_COMPARISON_NEVER;
sampDesc.MinLOD = 0;
sampDesc.MaxLOD = D3D11_FLOAT32_MAX;
DX::ThrowIfFailed( m_d3dDevice->CreateSamplerState( &sampDesc, m_SamplerLinear.GetAddressOf() ));


// Initialize the texture color
g_vMeshColor.x = 0.4f;
g_vMeshColor.y = 0.4f;
g_vMeshColor.z = 0.4f;
g_vMeshColor.w = 1.0f;

// Initialize the world matrices
g_World = XMMatrixIdentity();

// Initialize the view matrix
XMVECTOR Eye = XMVectorSet( 0.0f, 3.0f, -6.0f, 0.0f );
XMVECTOR At = XMVectorSet( 0.0f, 1.0f, 0.0f, 0.0f );
XMVECTOR Up = XMVectorSet( 0.0f, 1.0f, 0.0f, 0.0f );
g_View = XMMatrixLookAtLH( Eye, At, Up );
CBNeverChanges cbNeverChanges;
cbNeverChanges.mView = XMMatrixTranspose( g_View );
m_d3dContext->UpdateSubresource( m_CBNeverChanges.Get(), 0, nullptr, &cbNeverChanges, 0, 0 );

// Initialize the projection matrix
g_Projection = XMMatrixPerspectiveFovLH( XM_PIDIV2, 1920 / (FLOAT)1080, 0.1f, 100.0f );

CBChangeOnResize cbChangesOnResize;
cbChangesOnResize.mProjection = XMMatrixTranspose( g_Projection );
m_d3dContext->UpdateSubresource( m_CBChangeOnResize.Get(), 0, nullptr, &cbChangesOnResize, 0, 0 );
Rendering the 3D cube and lights
Next, add source code to Game.cpp that will render the 3D cube.
To add source code to render the 3D cube
- Locate the definition of the method Game::Render in Game.cpp.
Look for the following comment:// TODO: Add your rendering code here -
Replace the comment with the following code:
C++
// Animate the cube
static float t = 0.0f;
static ULONGLONG timeStart = 0;
ULONGLONG timeCur = GetTickCount64();
if( timeStart == 0 )
  timeStart = timeCur;
t = ( timeCur - timeStart ) / 1000.0f;
g_World = XMMatrixRotationRollPitchYaw(t, t/2.0f, 0.0f);

//Update the spotlight color
XMFLOAT4 RotLightColor;
RotLightColor.x = ( sinf( t * 1.0f ) + 1.0f ) * 0.5f;
RotLightColor.y = ( cosf( t * 3.0f ) + 1.0f ) * 0.5f;
RotLightColor.z = ( sinf( t * 5.0f ) + 1.0f ) * 0.5f;
RotLightColor.w = 1.0f;


// Setup our lighting parameters
XMFLOAT4 vLightDirs[2] =
{
  XMFLOAT4( -0.577f, 0.577f, -0.577f, 1.0f ),
  XMFLOAT4( 0.0f, 0.0f, -1.0f, 1.0f ),
};
XMFLOAT4 vLightColors[2] =
{
  XMFLOAT4( 0.5f, 0.5f, 0.5f, 1.0f ),
  RotLightColor,                      //The second light gradually changes colors
};
// Rotate the second light around the origin
XMMATRIX mRotate = XMMatrixRotationY( -2.0f * t );
XMVECTOR vLightDir = XMLoadFloat4( &vLightDirs[1] );
vLightDir = XMVector3Transform( vLightDir, mRotate );
XMStoreFloat4( &vLightDirs[1], vLightDir );

// Update variables that change once per frame
CBChangesEveryFrame_VS cbVS;
cbVS.mWorld = XMMatrixTranspose( g_World );
m_d3dContext->UpdateSubresource( m_CBChangesEveryFrame_VS.Get(), 0, nullptr, &cbVS, 0, 0 );

CBChangesEveryFrame_PS cbPS;
cbPS.vMeshColor = g_vMeshColor;
cbPS.vLightDir[0] = vLightDirs[0];
cbPS.vLightDir[1] = vLightDirs[1];
cbPS.vLightColor[0] = vLightColors[0];
cbPS.vLightColor[1] = vLightColors[1];
cbPS.vOutputColor = XMFLOAT4(0, 0, 0, 0);
m_d3dContext->UpdateSubresource( m_CBChangesEveryFrame_PS.Get(), 0, nullptr, &cbPS, 0, 0 );

// Render the cube
m_d3dContext->VSSetShader( m_VertexShader.Get(), nullptr, 0 );
m_d3dContext->VSSetConstantBuffers( 0, 1, m_CBNeverChanges.GetAddressOf() );
m_d3dContext->VSSetConstantBuffers( 1, 1, m_CBChangeOnResize.GetAddressOf() );
m_d3dContext->VSSetConstantBuffers( 2, 1, m_CBChangesEveryFrame_VS.GetAddressOf() );
m_d3dContext->PSSetShader( m_PixelShader.Get(), nullptr, 0 );
m_d3dContext->PSSetConstantBuffers( 0, 1, m_CBChangesEveryFrame_PS.GetAddressOf() );
m_d3dContext->PSSetShaderResources( 0, 1, m_TextureRV.GetAddressOf() );
m_d3dContext->PSSetSamplers( 0, 1, m_SamplerLinear.GetAddressOf() );
m_d3dContext->DrawIndexed( 36, 0, 0 );

// Render light sources as colored cubes
for( int m = 0; m < 2; m++ )
{
  XMMATRIX mLight = XMMatrixTranslationFromVector( 5.0f * XMLoadFloat4( &vLightDirs[m] ) );
  XMMATRIX mLightScale = XMMatrixScaling( 0.2f, 0.2f, 0.2f );
  mLight = mLightScale * mLight;

  // Update the world variable to reflect the current light
  cbVS.mWorld = XMMatrixTranspose( mLight );
  m_d3dContext->UpdateSubresource(  m_CBChangesEveryFrame_VS.Get(), 0, nullptr, &cbVS, 0, 0 );

  cbPS.vOutputColor = vLightColors[m];
  m_d3dContext->UpdateSubresource(  m_CBChangesEveryFrame_PS.Get(), 0, nullptr, &cbPS, 0, 0 );

  m_d3dContext->PSSetShader( m_PixelShaderSolid.Get(), nullptr, 0 );    //PixelShaderSolid does not take textures or lighting into account. renders cubes of a solid color
  m_d3dContext->DrawIndexed( 36, 0, 0 );
}
Deploy a Texture File to the Xbox One
In order to have a texture rendered to the surfaces of the cube, a texture file (a .dds file) should be copied to the dev kit.
To deploy a texture file
- Locate the .dds file you would like to use as a texture. This can be any .dds file that you have that is in a format supported by the XDK. If the format is not supported, you will get the runtime error: HRESULT: ERROR_NOT_SUPPORTED. The tutorial loads a file called seafloor.dds, which can be located by downloading the Windows DirectX tutorials from Direct3D Tutorial Win32 Sample.
-
If your .dds file is not called seafloor.dds then either rename it, or change the following line in your CreateResources method to match the name of the .dds file you are using.
C++
DX::ThrowIfFailed(CreateDDSTextureFromFile( m_d3dDevice.Get(), L"seafloor.dds", nullptr, m_TextureRV.GetAddressOf() )); Note This line in your project will fail if the .dds file is not in a supported format.
 - Whenever a project is deployed to the Xbox One, the contents of the folder <Your project>\Durango\Layout\Image\Loose are copied to a folder on the dev kit that an app can access without any path being entered. So copy your texture to the <Your project>\Durango\Layout\Image\Loose folder (a subfolder of your Visual Studio project) on your development PC.
- When you select Deploy Solution in the next section, you will notice in the Output pane of Visual Studio that the texture file is copied over.
Building and deploying
If you’ve completed the preceding steps in this tutorial, you can now build and deploy your app to the dev kit.
To build and deploy your app
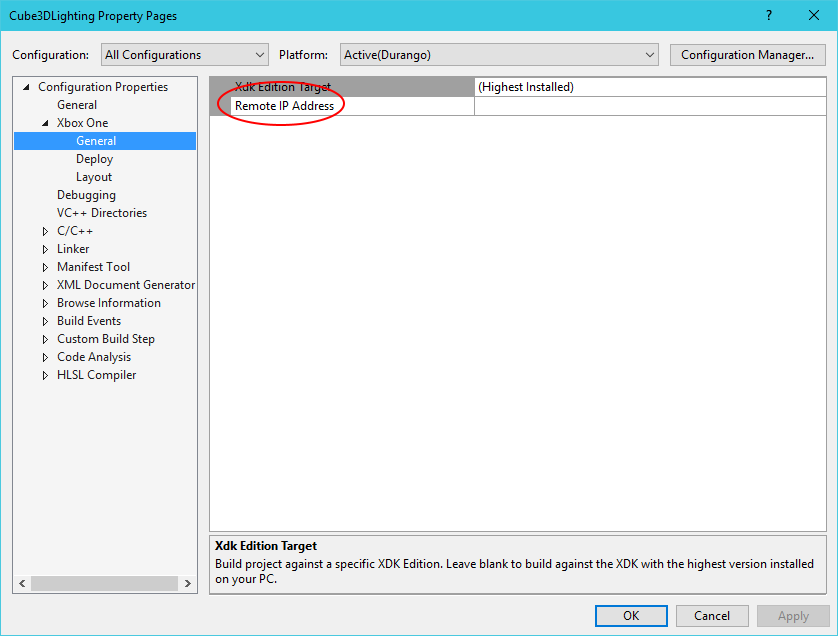
- Use Connect (xbconnect.exe) to set the default remote console, or set the IP address of the console in the project properties.
- On the Build menu, click Build Solution.
Wait for building to finish. - On the Build menu, click Deploy Solution.
- On the dev console, navigate to the My games & apps page, select Games, and select Cube3DLighting.
Note The gray box in the top left shows the static light source, and a second box rotates around the central cube, broadcasting a gradually changing color.