Creating and Using Downloadable Content on Xbox One
Updated May 8, 2015
Introduction
Downloadable content (DLC) has become the standard for extending the life of an existing title and keeping users engaged with the title by adding new content such as map packs and extended storylines.
DLC also gives you a way to provide hidden beta testing, unlock pre-order incentives, provide access to additional on-disc content, and enable limited editions. DLC APIs can even be used for non-DLC scenarios, such as detecting whether a title’s hub app or other related titles are installed.
Generally speaking, the title-facing life cycle of DLC includes the following steps:
- First, the title developer/publisher:
- Enables the title to load and use DLC.
- Creates the files for the DLC.
- Submits the DLC to the Xbox Store.
- Makes DLC available for users to purchase (either through an in-game store or through the Xbox Store).
- In the next phase, the following actions occur:
- Title enumerates what DLC is installed locally to the console and checks licenses.
- Title mounts the DLC and loads all associated assets from the package.
- Title monitors DLC for changes in license state due to users signing in/out and re-checks all license states after resuming from a suspended state.
- Finally, developers and publishers can also:
- Ship later titles that use DLC from earlier titles.
- Ship hub apps and related titles that use the DLC.
We recommend that you refer to the Downloadable Content XDK code sample in conjunction with reading this white paper. The sample, which is available for download from XGD, demonstrates how to implement, enumerate, and load DLC within your Xbox One title.
Concepts and terms
Conceptually, you can think of DLC as a collection of files that can be added to your title after it has shipped. DLC also serves as a convenient vehicle for licensing and separate monetization. It can be used to increase the value of your base title in multiple ways—its flexibility is its strength.
Some uses include:
- Enabling users to start with standard editions of your title and then upgrade to the limited edition version later.
- Selling add-ons (such as new levels, new maps, or new gear) after your title has been released.
- Unlocking hidden experiences (such as giving users special powers only if they purchase the DLC).
The following list includes terms that will be used throughout this white paper.
Table 1. Terminology list.
| Terminology | Definition |
|---|---|
| Base title | The title without the DLC. |
| Parent title | The base title to which your DLC is associated. Each DLC item has exactly one parent set with the AllowedProductId field in the DLC's manifest file. DLC can be associated to and loaded by other titles. |
| Durable DLC | Downloadable content that includes a package downloaded and installed to the user's console. This DLC type can only be purchased once by the user. |
| Content package | Another term for a DLC package that is installed to the user's console. |
| Exclusive app DLC | DLC built to be mounted by an exclusive app. |
| Mounting | Loading a DLC package so it can be accessed; logically, this is like plugging in a USB hard drive or mounting a virtual hard drive. |
| Mapping file | The XML file defines how your package is broken up into sections at download and update time. Also known as the chunks file. |
| License | A license is a digital file that is downloaded and installed onto the console when a DLC package is installed. A license can be verified for offline scenarios and is checked when mounting a package or by using the CheckLicense method on a package. |
Making DLC packages
The tools for creating and installing DLC at development time are command-line based. There are currently no GUI-based tools for creating layouts.
DLC is a lot like a title in many ways. In fact, it is so similar that it’s easier to describe how the two differ rather than how they are the same. Like titles, DLC creation revolves around three things:
- Product ID and files to include
- An AppXManifest
- Mapping file
Gather product ID and files
Before you get started with making your DLC package, make sure that you have the following information available: the parent title’s product ID and the content (files) for the DLC package.
- Your parent title’s product ID is a GUID that you can obtain in one of the following ways:
- Deploying title via F5: It will be 00000000-0000-0000-0000-000000000000
- Side-loading parent title packaged with makepkg.exe
- Without a /ProductID flag: it will be 00000000-0000-0000-0000-000000000000
- With a /ProductID flag: the value supplied to /ProductID
- Installing the parent title from the Xbox Store: use the official product ID obtained from your Developer Account Manager (DAM) or directly from the Xbox Developer Portal (XDP), if you have access.
 Note Be sure to match the AllowedProductID field in the DLC AppXManifest with the product ID of the parent title. During development, the parent title might be using the zero product ID. Before submitting DLC to the Xbox Store, be sure to update the AppXManifest entry with the real product ID of the parent title. You should perform final testing with your title by using its real product ID.
 - The files that you want in your DLC. It’s very helpful to verify that these files work with your title before trying to build the DLC so that you can focus on only one problem at a time.
Note Unlike Xbox 360, where the size limit of content packages was 2 GB, Xbox One supports much larger packages. Talk with your DAM if your package will be large. You should still follow packaging best practices. For DLCs used solely for licensing (empty packages), see Clever uses of DLC APIs.
Now that you have the product ID and DLC files, the next step is to build the XML that defines the DLC package.
Create AppXManifest file
The Downloadable Content code sample, available for download on XGD, includes an example of a full AppXManifest.xml file. Using that as a starting point will save you a great deal of trouble.
Following is a line-by-line example:
    <?xml version="1.0" encoding="utf-8"?>
    <Package xmlns=http://schemas.microsoft.com/appx/2010/manifest          xmlns:mx=http://schemas.microsoft.com/appx/2013/xbox/manifest          IgnorableNamespaces="mx">
This is your namespace declaration. It should be exactly like this for all DLCs and titles. If your title does not have the mx: namespace, consult the white paper Updates to the Application Manifest, available for download on XGD.
    <Identity Name="MyDLCPackageName"
             Publisher="CN=MyGamePublisher"
             Version="1.0.0.0" />
These fields generate the package name and are later exposed as metadata on your packages.
Example package name:
MyDLCPackageName_1.0.0.0_neutral__s9y1p3hwd5qda (Name/Version/Publisher Hash)
        <Properties>
            <DisplayName>MyDLCDisplayName</DisplayName>
            <PublisherDisplayName>Microsoft Corporation</PublisherDisplayName>
            <Logo>storeLogo.png</Logo>
            <Description>My DLC Description</Description>
            <mx:ContentPackage>true</mx:ContentPackage>
        </Properties>
These strings represent the DLC item in collection scenarios.
The presence of <mx:ContentPackage>true</mx:ContentPackage> declares that this is a DLC package and not a launchable title. (Note that DLC does not contain a Game OS.)
      <Prerequisites>
          <OSMinVersion>6.2</OSMinVersion>
          <OSMaxVersionTested>6.2</OSMaxVersionTested>
          <mx:ApplicationEnvironment>title</mx:ApplicationEnvironment>
          <mx:OSName>era</mx:OSName>
      </Prerequisites>
OSMinVersion and OSMaxVersionTested behave as they do for applications. The ApplicationEnvironment and OSName lines dictate what kind of DLC you are building.
        <mx:ApplicationEnvironment>title</mx:ApplicationEnvironment>
        <mx:OSName>era</mx:OSName>
Having both of these lines will generate an exclusive app (Game OS) DLC. Conversely, if both lines are absent, you will generate a shared app DLC.
      <Extensions>
          <mx:PackageExtension Category="xbox.contentpackage">
              <mx:ContentPackage>
                  <mx:AllowedProduct Id="00000000-0000-0000-0000-000000000000" />
This is the most important line in the manifest. It dictates what the DLC’s parent product (parent title) is. Set this to the GUID you gathered previously.
            <mx:ContentPackageVisualElements
                    DisplayName="MyDLCDisplayName"
                    Logo="storeLogo.png"
                    SmallLogo="SmallStoreLogo.png"
                    WideLogo="WideStoreLogo.png"
                    Description="My DLC Description"
                    ForegroundText="light"
                    BackgroundColor="#222222" />
            </mx:ContentPackage>
         </mx:PackageExtension>
       </Extensions>
     </Package>
The fields shown in the preceding sample are used for collection display, as well as being exposed to your app through enumeration. It is important for you to ensure that they are accurate and that the strings are localizable.
Notable manifest callouts
- The file that you create needs to be named AppXManifest.xml and placed at the root of the loose directory containing your files.
- DLC does not have an Application node or any of the subnodes under Application.
- The most common error when integrating DLC into your title is to have an incorrect AllowedProduct specified. This causes enumeration to return an empty list.
- The ContentPackageVisualElements node is used to display the package’s information in the user’s collection. Be sure to localize these strings. (For more information, see the Localizing Application Manifest Resources topic in the XDK documentation.
Shared app (app) DLC versus exclusive app (title) DLC
Hub apps (shared apps) can enumerate a related title’s DLC packages. Shared apps’ usage of DLC has some notable caveats, but if you build DLC for your title, your hub app will be able to see it. For more information, see Related products and Limitations. For now, you should always build exclusive app (title) DLC.
Create mapping file (chunks)
Creating the mapping file for DLC is mostly the same as creating one for the main title package. It does not need to be in any specific location for use with makepkg. The following best practices—which apply to creating the mapping file for the base title—are also applicable to DLC:
- File names containing wildcard characters should be used only during development. Explicitly listing out the files that you need in the package will allow you to better manage what you might want to update or add in the future.
- Keep chunks small, limiting updates to only what must be updated.
- Put files that are likely to need frequent updates in their own chunk(s), and minimize chunk size.
In addition to these best practices, take note of the following, which is unique to DLC:
- We recommend that you place the launch marker at the end of your DLC package. This ensures that you do not have to deal with partially installed DLC in your title.
For more information about creating content update packages, see the XDK topic Designing Title Package Layouts for Updates: Best Practices and Guidelines.
Using makepkg.exe to make your package
First, open your Xbox One XDK or ADK command window.
A typical command line for creating a DLC package will look like this:
makepkg.exe pack /lt /f mapfile.xml /d "./contentdir" /pd "./outdir"
- /f – the mapfile to use
- /d – the content directory where the AppXManifest lives; in the root of your loose folder
- /pd – the output directory
Of particular note is /lt. This parameter creates licensed packages that can be side-loaded during development, essentially allowing you to test as if the package were already licensed to the console. When packaging for submission through XDP, use /l to create submission (red-signed) DLC.
Deploy a DLC package
To deploy a DLC package, you will use xbapp, the same as deploying a full title’s package.
xbapp install <path to package>
After the package is installed, you can see what DLC is on your console at any time with xbapp listdlc. To remove DLC, use xbapp uninstall, with the package name output by xbapp listdlc. To get a quick look at how your DLC appears to the user when you’ve side-loaded it, go to collection—it will show all DLC installed on the console.
Integrating DLC within your title
The following is the recommended flow for title code to manage DLC and access the content within the packages:
- Monitor the InstallCompleted event for new DLC
- Enumerate locally installed DLC
- Check access rights to a package using CheckLicense
- Load content within a package using Mount and Unmount
- Monitor for license changing events
Monitor the InstallCompleted event for new DLC
The system will notify the title when related DLC packages are installed. The recommended procedure is to register for these events before you enumerate DLC to prevent race conditions. If content is installed between calling Enumerate and registering for the event, it will go unnoticed by the title. We provide two different events for alerting the app to installation:
- A simple event, with no additional context provided:
Deployment::DownloadableContentPackageManager::DownloadableContentPackageInstallCompletedThe DownloadableContentPackageInstallCompleted event will be fired when content has finished installing, once for the package family and once for the package (this will happen twice for every DLC item).
- A more detailed event, raised with contextual metadata:
Deployment::DownloadableContentPackageManager::DownloadableContentPackageInstallCompletedWithDetailsThe DownloadableContentPackageInstallCompletedWithDetails event is fired when content has been downloaded to the launch marker, and again when it is fully installed. It is also fired for both the package family and the DLC item, resulting in four events per package family installation. This event also carries additional metadata: the Content ID and package name of the DLC installed.
Enumerate locally installed DLC
To enumerate DLC on the development console (dev kit), you need to create an instance of DownloadableContentPackageManager and call the FindPackages method. This uses information stored in the console’s registry and will return quickly without the need for an asynchronous call.
          Xbox::Management::Deployment::IDownloadableContentPackageManager^
          packageMgr = ref new DownloadableContentPackageManager();
IVectorView< IDownloadableContentPackage ^> ^ installedPackages = packageMgr->FindPackages( InstalledPackagesFilter:: AllDownloadableContentOnly );
This shows you all currently installed DLC packages associated to your title. You should preserve the returned IDownloadableContentPackage objects because:
- If you allow them to go out of scope, mounted packages will be unmounted; any open file handles to them become invalid.
- If you enumerate multiple times, each enumeration will create a new object for the package that does not have the state and values of the mounted object from a previous enumeration. Attempting to mount these new package objects will fail.
Re-enumeration
To write safe code and follow best practices, you should preserve the results of enumeration and use subsequent enumerations to add to it or remove from it. You can easily compare new packages to those already in your known set by using the DLC’s product ID and then updating the list as needed.
Now you have a collection of IDownloadableContentPackages and you have ensured that they are kept in scope.
Package metadata
The returned content packages contain several key pieces of metadata for your title to use in driving experiences:
- The ProductId property of each piece of DLC
- The metadata contained in the ContentPackageVisualElements node from the AppXManifest
- The version of the DLC package (from the AppXManifest)
Try to craft experiences that let you drive UI from this metadata. For example, your title should not need to use the Mount method to render a gallery or long list view, because Mount can be an expensive operation.
Check access rights to a package using CheckLicense
You can check to see whether the title has a license to DLC content before mounting by using the CheckLicense method on the package object. Checking the license state of the DLC package is a lightweight operation and should be used before attempting to mount the DLC to reduce wasted time attempting to mount unlicensed DLC. There is no limit on how many packages can be checked simultaneously.
License checking can also be used to gate access to content in the base title without having to mount the DLC. If a title has content that is viewable by all players but only usable by those who own the DLC (such as bonus skins or gear), the base title can include the actual assets and use license checks to unlock the items for users who own the DLC. This approach allows experiences to be unlocked without ever having to mount the DLC itself.
Load content within a package using Mount and Unmount
After locating the DLC for your title, you can the mount the package for use by the title. Mounting a package is achieved by calling the Mount method on the IDownloadableContentPackage returned from FindPackages.
Platform::String^ mountPoint = package->Mount( );
The Mount method will return the path to where the package was mounted and can be used to create absolute file paths to the DLC within the package. Unmounting is done through the same object’s Unmount method.
package->Unmount();
There is a hard system constraint on the number of simultaneous mounts across the Xbox One systems. Although there is no hard limit on the number of DLC packages that can be mounted simultaneously, best practices suggest that no more than 30 concurrent DLC packages be mounted for an exclusive app at a single time. Your title might be able to mount more than that, but any extra room is dependent on a number of things that can happen at the system level.
It is not safe to rely on having more than 30 packages mounted at a given time, and trying to mount a package if there is not an available slot on the console will fail. Attempting to mount more might also decrease performance.
Try to use no more than four to five mounts simultaneously in your title. Use the metadata on the enumeration results to avoid mounting where possible, and page in/out your mounted packages as needed.
When a title is resuming from a Suspend event, it can safely assume that all packages that were mounted before the Suspend event are still mounted and can be accessed normally. If a mounted package is uninstalled while the title is running (active, constrained, or suspended) the Xbox system will terminate the title normally following the Process Lifetime Management standards before the uninstall is completed. The title would then go through a full restart rather than a Resume in this case.
Monitor for license changing events
License loss
Licenses can become invalid for a number of reasons, but predominantly due to owner sign-out. When a mounted DLC item becomes unlicensed, the title will receive a LicenseTerminated event from the package in question.
When a title successfully mounts a DLC package, it should immediately begin listening for the LicenseTerminated event.
The package will not be automatically unmounted when this event is triggered. The title can determine when it is appropriate to unmount the content or allow the currently signed-in users to continue to access the content.
License acquisition
License acquisition can occur through a number of paths, and there is no one event that titles should listen for. There are a few key points that a title should consider:
- User sign-in events: the newly signed-in user might have entitlements to additional content.
- Package Install events: new content has been installed.
- Title Resume/Focus returned to title: a user may have set the console as his or her home console, been granted licenses to content, or simply bought things from the Xbox Store.
XDP ingestion
After everything is working for your DLC, you are ready to get it ingested and use the Xbox Store. Your DAM will help get the DLC package ingested and configured.
DLC configured in the Xbox Store should relate to the title (or titles) it applies to. As a result, your title can use one of the many Marketplace APIs to sell DLC from within your application, or it can send the user to the Xbox Store to purchase DLC there.
When a new piece of DLC is purchased in your application:
- The Purchase API will return a receipt, including the Content ID of the sold product.
- The DLC APIs will fire installation events with that Content ID.
- The package will be mountable and usable.
After these steps are complete, you can sell DLC to the user, put it on the console, enumerate, mount, and use it successfully within your sandbox.
Unlicensed DLC or purchased DLC that isn’t installed
Calling the Inventory service will return an accurate representation of what the user is currently entitled to, whereas Enumerate and CheckLicense represent content that is already installed on the system and authorized to mount. Note that Inventory is a service call, while Enumerate and CheckLicense both work offline.
The combination of Inventory and Enumerate and/or CheckLicense can be used to detect a number of cases:
- Content is in Inventory but not in Enumerate. In such an instance, the user is entitled to the content but it is not downloaded.
- You can show the user the purchase details page (ShowDetailsAsync) to re-download the content.
- Content is in Enumerate but not in Inventory, and CheckLicense fails. In this instance, the content might have gotten on the console through some means that is no longer applicable (for example, by a user who has since signed out).
- You should treat this instance as if the user didn’t own the content, and send the user to the Xbox Store or your in-game purchase flow, as appropriate for your UI. Treat this case as identical to the not installed at all case.
Related products
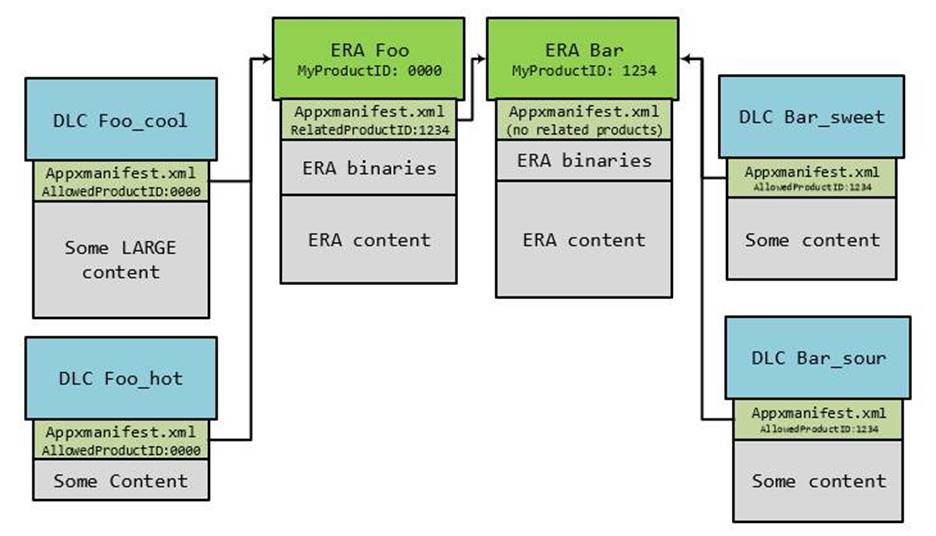
A DLC package has only one parent title as defined with the AllowedProductID in the manifest, but it can be accessible to other titles and apps, such as hub apps, sequels in the franchise, and so on. This is made possible through related products. The following code describes the related product setup to allow related products to enumerate and load the package on a console. To set the DLC product to show up in the inventory and marketplace results from another title, add the new title to the DLC’s Related Products list in XDP.
In your title’s AppXManifest (not the DLC’s), include the following (or add it to your existing xbox.store node):
    <Extensions>
      <mx:PackageExtension Category="xbox.store">
        <mx:XboxStore>
          <mx:RelatedProducts>
            <mx:RelatedProduct Id="00000000-0000-0000-0000-000000000000" />
Replace the GUID (bold) with the product ID of the related title.
            </mx:RelatedProducts>
          </mx:XboxStore>
        </mx:PackageExtension>
      </Extensions>
| Your title manifest should look like this | Not this |
|---|---|
<Package>
      <App>
        <Extensions>
        </Extensions>
      </App>
      <Extensions>
        <mx:PackageExtension>
          <Related Product/>
          </mx:PackageExtension>
      </Extensions>
    </Package>
|
<Package>
      <App>
        <Extensions>
          <mx:PackageExtension>
            <Related Product/>
          </ mx:PackageExtension >
        </Extensions>
      </App>
    </Package>
|
Your title now has access to the related app’s DLC and can see whether the related app is installed.
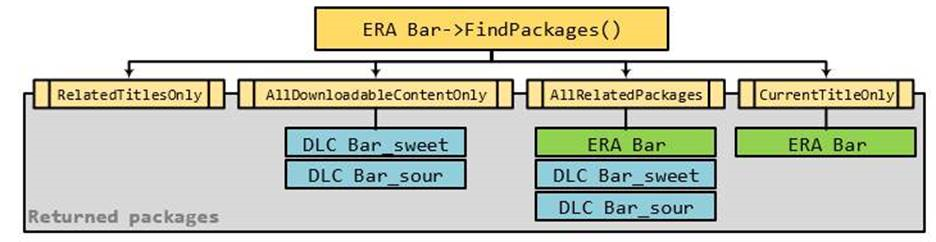
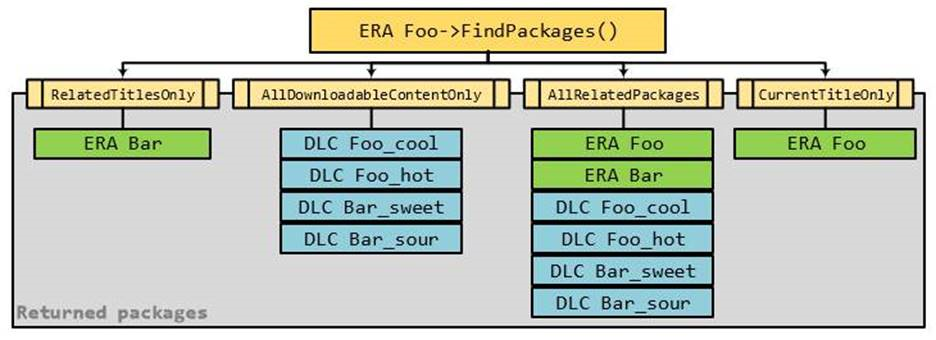
To use this package extension, four flags can be passed to FindPackages:
- RelatedTitlesOnly: will return only title packages related to the current title through its AppXManifest and the title itself. This allows you to determine whether related apps (such as hub apps or other titles in the franchise) are installed.
- AllDownloadableContentOnly: will return only DLC packages for this title and all related titles.
- AllRelatedPackages: will return all DLC and title packages that are related to this title.
- CurrentTitleOnly: will return only this title package.
Figure 1. These diagrams show two exclusive apps with DLC and their relationships. Foo is related to Bar (but Bar is not related to Foo) and the expected results of each flag being passed to FindPackages are shown.
Clever uses of DLC APIs
Related titles
To determine whether your hub app is installed from your main title (or vice versa), add them to each other’s AppXManifest files as related titles. The DLC Enumerate APIs (FindPackages) will locate any related title and its DLC that is currently on the console.
Note that related apps will raise package installation events as they install. You can use this to monitor the installation progress of your companion applications or peer titles.
Licensing only
The CheckLicense method can be used to grant access to content in the base title without having to mount the DLC. If a title has content that is viewable by all players but only usable by those who own the DLC (such as bonus skins or gear), the base game can include the assets and use license checks to unlock the items for players who own the DLC. This approach allows unlocking experiences without requiring the title to mount the DLC.
You still need to create a DLC package to do this. Consider the following example to see how adding new content to your title in this way might look:
- You create a fighting game in which users are able to add new fighters in the form of DLC.
- Each new fighter will be pushed to the users through a free, mandatory content update (CU) for the base game. This allows all users to see the new fighters but not to access them.
Note Be sure to follow the normal CU guidelines for layouts, and chunk the files to keep download sizes as small as possible.
- After the mandatory download date for that CU has passed, create a durable DLC package and set up an offer for that DLC so that the offer has some paid value.
- At this point, all users can see the new fighters. However, only those users who purchase the offer and who possess the license (using CheckLicense on the DLC package) can actually use them.
- The title contains code that says “Is the durable DLC (FindPackages) present? If so, does the user own it (CheckLicense)?” If the answer to both questions is yes, let the user access the new fighter (Super Awesome Fighter Dude, for example). Otherwise, offer to sell it to the user or to let the user re-download it.
Hidden unlockables
You can use hidden DLC products in the Xbox Store to unlock secret experiences in your titles (for instance, as giveaways at events, or for premium content). To do this, ship DLC as normal, but mark the product as hidden in the Xbox Store. You can then give 5x5 or QR codes to those players who you want to use the hidden DLC.
Updating DLC packages
Introduced in the November 2014 XDK, you can now update DLC packages on a user’s console. DLC content updates are created and distributed the same way as content updates for title packages. Additionally, the November 2014 XDK introduced APIs to allow a title to check for a pending update, start the update download, and monitor the download of a target package. For testing these scenarios, the xbapp tool was updated to support the hosting of mandatory and optional content updates for games and DLC during development.
When planning for updates to your DLC packages, you can choose one of the following user experience flows for how players will be notified and be able to download DLC updates:
- Have the Xbox system handle all DLC updates and user flow
- Implement your title to check for updates and download them on behalf of the user
In both cases, if a user has their console set to automatically download updates, the DLC content updates will also be downloaded and installed without any additional action on the user’s behalf. Automatic updates are set under Settings -> System -> Power & startup, selecting Instant-on, and then selecting the Automatically download updates and purchases check box.
System-managed DLC content updates
If your title does not manage DLC content updates, the system will handle updates and notifications to the users for you. The advantage to this method is that no additional development is required to support DLC content updates within your title. The disadvantage is that when an update is available, it is possible that your title will be terminated so that the DLC content update can be downloaded and applied.
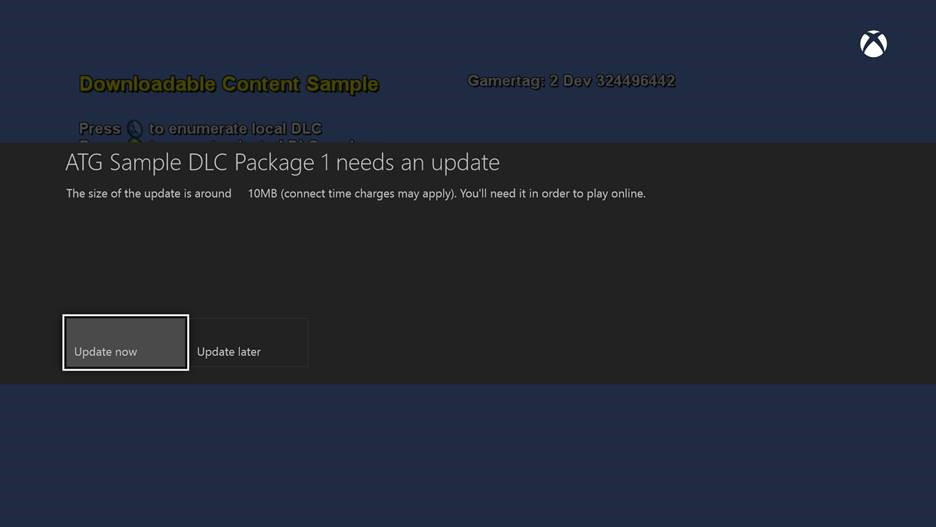
When your title attempts to mount a package, the system will mount the installed package for your title but will also check to see if that package has an updated version available. If there is a mandatory update for the package, the system displays UI to the user notifying them of the required update and download size. If the user confirms that they want the updated package, the update process for the package is started and the game is terminated to ensure the package is not currently mounted. After the title is terminated, the user can immediately start up the title again, but the package being updated will not be returned in enumeration results by using FindPackages() until the update is complete.
Additionally if your title has more than one DLC package needing an update, the user could possibly have to start up the game, accept the update prompt, and see the game terminated for each individual package’s update. This could lead to a frustrating user experience and is why we recommend that titles planning for frequent DLC updates implement title-specific code to handle the update process for the user.
Title-managed DLC content updates
Alternatively, your title can manage DLC updates and the user experience within your title by using the following logic and APIs:
- Before mounting a package, check if the package has an update available with PackageTransferManager::CheckForUpdateAsync.
- Based on the result value IsUpdateAvailable being TRUE, present the user with the update notification by calling PackageTransferManager::RequestUpdatePackageAsync.
- (Optional) Depending on the value of IsUpdateMandatory, you could allow the user to decline the update and still mount the package for in-game use. However, if the package is set to mandatory, mounting the package would follow the system managed flow outlined above. Therefore, it is better to inform the user that they will not be able to use that DLC package until it is updated and not to mount a package if it has a mandatory update pending.
- To monitor the progress of the download, use PackageTransferWatcher::CreateForDownloadableContentPackage and subscribe to the events of the PackageTransferWatcher class such as TransferCompleted and ProgressChanged.
Figure 2. Sample DLC Package.
Following is an example code block that checks for a package’s update and then prompts the user to update if there is one:
      using namespace Windows::Xbox::Management;
      auto checkTask = create_task(Deployment::PackageTransferManager::CheckForUpdateAsync(package));
      auto ptm = Deployment::PackageTransferManager::Current;
      checkTask.then ( [=] ( Deployment::CheckForUpdateResult^ updateResult ) {
        // If there is an update, request that the update is applied
        if( updateResult->IsUpdateAvailable || updateResult->IsUpdateMandatory ) {
          // prompt the user to accept DLC package update and add it to the update queue
          auto updateTask = create_task( ptm->RequestUpdatePackageAsync( package ) );

          updateTask.then ( [=] ( Deployment::RequestUpdatePackageResult^ requestResult ) {
            // Failure Result 0x800704C7(ERROR_CANCEL) == user cancelled update.
            if( SUCCEEDED(requestResult->Result.Value) ) {
              auto packageWatcher = PackageTransferWatcher::CreateForDownloadableContentPackage(package);
            }
            else {
              // If the update is mandatory, notify the user they must take the update
            }
          });
        }
      });
Alternatively, you can use these same APIs to check if there is an optional update to your title. Note that if there is a mandatory update to your title, the system will prevent the game from launching until the update is applied. If the user accepts to apply an optional update to the title, it will be terminated so that the update can be downloaded and applied.
      using namespace Windows::Xbox::Management;
      auto checkTask = create_task(Deployment::PackageTransferManager::CheckForUpdateAsync(package));
      auto ptm = Deployment::PackageTransferManager::Current;
      checkTask.then ( [=] ( Deployment::CheckForUpdateResult^ updateResult ) {
        // If there is an update, request that the update is applied
        if( updateResult->IsUpdateAvailable || updateResult->IsUpdateMandatory ) {
          // prompt the user to accept title content update and add it to the update queue
          auto updateTask = create_task( ptm->RequestUpdateCurrentPackageAsync() );
          updateTask.then ( [=] ( Deployment::RequestUpdatePackageResult^ requestResult ) {
            // Failure Result 0x800704C7(ERROR_CANCEL) == user cancelled update.
            if( SUCCEEDED(requestResult->Result.Value) ) {
                // Title will be suspended immediately
              }
            else {
              // If the update is mandatory, notify the user they must take the update
            }
           });
          }
        });
Testing DLC content updates in your dev sandbox
Testing a content update flow for your title or DLC does not require you to ingest a new build or package through XDP to the Marketplace in your development sandbox. The xbapp.exe tool now supports the following commands to mark a test package as an update for your console:
- xbapp update /a <path or uri to package> - Sets the package as an optional update
- xbapp update /m <path or uri to package> - Sets the package as a mandatory update
After building your updated package, install the previous version to your dev console (or download it from your sandbox’s marketplace) and then use the appropriate update to have your console presented with the updated package as if it were fully ingested into the marketplace.
Debugging
The following list contains some common things to check for if you encounter problems while testing your DLC package:
- Does the sample work? If not, something is likely odd with your dev kit. Try reflashing.
- Are you sure your product IDs are all set properly? Most issues are product ID mismatches.
- Are you running the latest flash on your devkit?
- Have you verified that your dev kit’s flash is the same or newer than the XDK installed on your PC?
- Did the makepkg output contain errors? It warns for some common mistakes.
- Are you sure your development console is in a good state? Using xbapp listdlc and list will show you what’s actually on the console.
- If you run into licensing issues with Xbox Store content, have you ensured that it’s fully propagated? This can take up to 12–24 hours. If it is propagated, check with your DAM.
Final validation
Before submitting your DLC to Certification, do the following:
- If your parent title had an all-zero GUID, rebuild both the title and the DLC to use the real product ID of the parent.
- Get the right product ID for your title from your DAM (or XDP, if available).
- Build your title by using makepkg with the /ProductId flag set to stamp in the product ID.
- Change the AllowedProduct property in the DLC manifest to match the base title, and then repackage that as well.
- Run your final test pass.
The last step before submitting your package to Certification is to repackage your content by using makepkg with /l set rather than /lt. This is called red-signing. Consult with your DAM for guidance about the latest Certification policies.
Additional considerations
Sending users to purchase an incomplete download or DLC that’s updating
If your title sends the user to buy a DLC item that is still installing or is unavailable due to updates, the purchase details page must show the progress of the DLC’s installation and must notify the user with a system toast when the installation is finished.
Limitations
DLC has some hard limits this year, particularly for shared apps; these are covered in the following sections.
Shared app DLC support
It is possible for a shared app to:
- See all related DLC on the system.
- Call CheckLicense on any installed piece of DLC.
- Get notifications when new DLC comes on the console.
- Get notifications when a chunk of DLC becomes unlicensed.
- Upsell new DLC to the user.
DLC packages cannot be mounted within a shared app. The ability for a shared app to mount and load content from a DLC package is deferred to a later release.
Mount count limits
There’s a hard system limit on the total count of simultaneously mounted packages (apps, titles, and DLC). This is why guidance on mounting and unmounting when a package is not in use is included in this white paper. There are no plans at this time to expand this limit.
Multi-chunk DLC and disc-loaded DLC
Currently DLC is not supported when the launch marker is not at the end of the chunk list. This means the entire DLC package must be installed to be usable.
Download chunk reordering
A title currently cannot reorder download chunks flexibly across the title and DLC (for example, it can’t ask for a chunk of the DLC before a chunk of the title). However, users can move DLC (or any other item) to the top of the queue at any time.