Picture in Picture
The following sections describe how to render a Picture in Picture window using the Xbox One dev kit:
What is Picture in Picture
A picture in picture (also known as PiP) window is displayed onscreen inset into the main view. These windows enable you to simultaneously display multiple video sources onscreen. Picture in picture windows are useful both as a development tool and as an in-game asset.
Common reasons to use picture in picture windows:
- View a scene simultaneously from multiple perspectives
- Simple implementation of splitscreen gameplay
- Debug windows: display main scene normally, PiP window displays scene in wireframe, depth buffer, etc.
- In-game applications like a map or chat window
Picture in picture windows display the scene from the perspective of the light source. The top display is rendered normally, the lower display shows a depth buffer.
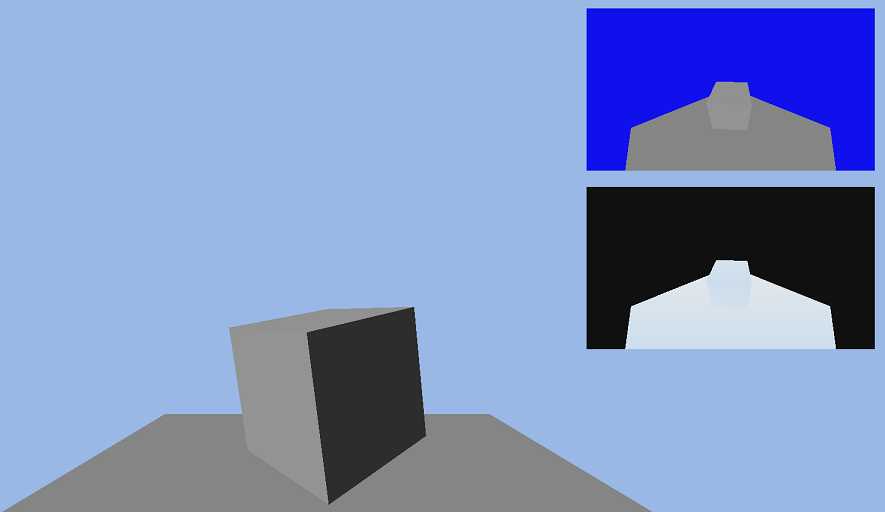
Basic Concept
PiP windows are essentially a texture displayed directly onscreen using simple vertex and pixel shaders. Use render-to-texture techniques to render the desired scene onto a texture, then display that texture on top of the main scene.
For a detailed description of render to texture techniques, please view the Render to Texture tutorial
Initialization
PiP vertex struct
The picture in picture window will use custom vertex and pixel shaders that use a simple vertex struct. The vertex positions are stored directly in screen space, no need for world, view, or perspective matrices.
C++
struct PiP_Vertex         // Vertices used to display HUD objects directly onscreen
{
  float vPostion[4];
  float vTex[2];
};
Creating and Initializing a PiP window
The vertices are stored directly in screen space, so the vertex shader does not need to apply world, view, and projection matrix transformations. The default X/Y screen boundaries for direct x are -1.0f and 1.0f. The point (-1.0,-1.0) maps to the bottom left corner of the screen, (1.0,1.0) maps to the upper right corner. Set the z value to a positive number that is greater than the near plane to ensure the vetices appear onscreen. The texture coordinates define what portions of the Render Texture will be displayed.
Create a vertex buffer for your PiP window.
C++
// Create vertex buffer for a PiP window occupying the top-left quadrant of the screen
PiP_Vertex VertexData[4] =
{
  {   // Top Left
    { -1.0f,  1.0f,  0.5f,  1.0f },
    {  0.0f,  0.0f },
  },
  {   // Top Right
    {  0.0f,  1.0f,  0.5f,  1.0f },
    {  1.0f,  0.0f },
  },
  {   // Bottom Left
    { -1.0f,  0.0f,  0.5f,  1.0f },
    {  0.0f,  1.0f },
  },
  {   // Bottom Right
    {  0.0f,  0.0f,  0.5f,  1.0f },
    {  1.0f,  1.0f },
  },
};
Rendering the PiP windows
Once the picture in picture window has been initialized, we are ready to use it. Make sure to update the Render texture every frame before displaying it onscreen. After any render textures and the main scene have been drawn to, you are ready to display the picture in picture windows.
To draw the picture in picture windows, simply set the appropriate vertex shaders, pixel shaders, and buffers, then call Draw() or DrawIndexed().
The Vertex Shader:
The PiP vertices are stored directly in screen space, so the vertex shader does not need to perform any translations or transformations. The vertices are passed directly to the pixel shader without modification.
C++
VS_Output main( Vertex Input )
{
  // The vertex shader does not modify any data. The vertices are passed to the pixel shader untouched.
  return Input;
}
The Pixel Shader:
The pixel shader for your PiP windows will need a Texture2D register and a SamplerState register for the Render Texture.
C++
// PiP Texture Variables
Texture2D txDiffuse : register( t0 );
SamplerState samLinear : register( s0 );
The pixel shader is also very simple. Draw the textures directly onscreen.
C++
Pixel main( VS_Output In )
{
  Pixel Out;

  Out.color = txDiffuse.Sample( samLinear, In.tex );
  return Out;
}