Your Xbox One Title, XSTS Tokens, and Web Services
By: Ferdinand Schober, Advanced Technology Group
Last Updated: July 22, 2019
Abstract
This white paper provides an overview of how to implement your own web service and how to make use of claims from Xbox Live. The paper covers best practices for token usage and connection behavior for both Xbox Live and your own web services.
This document was updated in July 2019 to incorporate instructions to the Partner Center portal and the latest data related to XSTS tokens and format.
Introduction
On Xbox One, all Xbox services are available as RESTful web service APIs. These services include session management, matchmaking, and cloud storage. Authentication and authorization for these services require a valid Xbox Secure Token Service (XSTS) token and signature.
In addition to these services, you can also implement and support custom web services that provide functionality specific to your title. For these custom services, you can specify custom access tokens, and you can make use of claims and user identity that Xbox Live provides.
Xbox Live RESTful web services
To expose Xbox services at a faster pace, and to allow titles to use these services without a dependency on specific recovery releases, Xbox services are released as RESTful endpoints. Any authorized platform can access these endpoints as long as a RESTful connection is possible and an XSTS token is presented. This section describes how your title can use these services on an Xbox One console or Windows PC.
Token retrieval for HTTPS endpoints is gated by the network security authorization list (NSAL). This per-title list specifies the correct XSTS token to retrieve in order to access an endpoint from your title. You cannot access endpoints that are not contained in this list.
Initial setup
Xbox services are automatically recognized on the Xbox One development kit and the services require no NSAL configuration. These facts apply to all endpoints for all *.xboxlive.com subdomains.
Token retrieval and connection flow
To use any Xbox services endpoint, an XSTS authentication token and message signature must be present. Include this token in the Authentication header of all requests. Without the token and signature, communication with the service will be rejected.
Each RESTful request to Xbox services must include an Authorization header that includes the token version and XSTS token payload. For detailed information about the structure of the Authorization header, see Understanding Security Tokens for Xbox One.
To manually obtain an XSTS token and signature use the GetTokenAndSignatureAsync API. If your title is an Xbox One ERA using the XDK, we recommend using the automatic XSTS token insertion feature. When using the IXMLHttpRequest2 class the XSTS tokens is automatically inserted into the request flow if an “xbl-authz-actor-10” header is present with the value of the user’s XboxUserHash value.
Token expiration and refresh
An XSTS token is valid only for a specific time frame. The default expiration time for an XSTS token is 4 hours, and each token contains a timestamp that is verified by the server. On Xbox One, if the title is using automatic token insertion as outlined above, the API automatically inserts a valid, non-expired token and signature into the HTTPS request.
If a title retrieves the token manually or uses other approved communication channels (secure WebSockets or secure UDP), the GetTokenAndSignatureAsync API should be used for each new authentication/sign-in request. GetTokenAndSignatureAsync handles token expiration and caching, and the API ensures that the title always receives a valid token. A title must not cache tokens otherwise.
When an invalid or expired token is presented to an Xbox services endpoint, a 401 error is returned.
Xbox Service APIs
For all calls to Xbox Live services, titles are strongly encouraged to use the Xbox Service APIs (XSAPI) bundled with XDK releases. These APIs in the Microsoft::Xbox::Services namespace handle HTTP requests and return available service data through objects directly to your title.
The Microsoft::Xbox::Services APIs implement the recommended connection and caching behavior for Xbox services, and the APIs handle all XSTS token and signature requirements.
For further information on these APIs refer to the Xbox Live SDK documentation in the XDK and the GitHub XSAPI project page.
Custom web services
In addition to Xbox services, XSTS tokens can also be used by title-specific, custom web services for authentication and authorization. Custom web services allow you to use user and device claims that are contained in the XSTS token.
Enabling access to a custom endpoint requires additional setup steps compared to Xbox services. For security purposes, a custom web service must use HTTPS. If the service requires authentication or authorization, you must also use a partner XSTS token.
A partner XSTS token holds a set of claims that are defined specifically for the target service and that you can use for authentication and authorization. Some examples of claims that involve a partner XSTS token include the Gamertag, player privileges, age group, and Pairwise ID (PWID) unique for the player under that title’s publisher.
Although the partner XSTS token is opaque to a client, Xbox Live constructs the token so that it is readable by a custom web service. An Xbox One XSTS token is a JSON Web Token (JWT) that contains a set of claims. The token can be protected by asymmetric encryption using a public and private key along with a digital signature for integrity validation, or the token can be protected using a symmetric shared key for encryption.
Some of the information exposed in claims is also available through other APIs, but the benefit of using claims is authority. XSTS token claims are issued by Xbox Live - not the game client - and custom web services can verify the issuing authority and token integrity. Therefore, the token is more resistant to tampering than client-side APIs.
Initial setup
To use custom web services, you must first set up these services with Xbox Live and the title. This setup process is divided into three steps:
- Create a Web Service and Relying Party definition that defines the encryption type and claims the XSTS token will use. This Relying Party and the generated XSTS tokens from it can then be used across multiple endpoints.
- Create an endpoint definition within your title’s NSAL that specifies the target endpoint and which Relying Party / XSTS token definition should be used for that endpoint.
- Publish the network security authorization list (NSAL) to your sandbox
Defining your Web Service, Relying Party and XSTS token claims
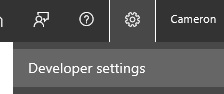
- In Partner Center, Select the Settings Icon in the upper right and then Developer Settings:
- Select Xbox Live->Web services
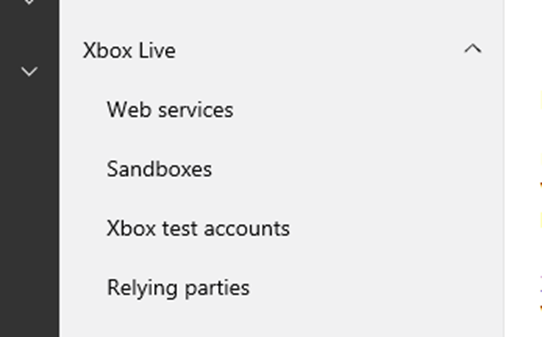
- Select New Web Service
- Select the Business Partner definition that will be tied to your web service and Relying Party (normally this will be “Default Publisher” unless your publisher was migrated previously from the Xbox Developer Portal)
- Give your Web Service an identifying name and select any access types this service should have
- Click Save
- Navigate to Xbox Live -> Relying Parties under Developer Settings
- On the Relying parties page, select New relying party
- Provide an Audience URI
[!NOTE] The Audience URI must be in the form of a host URI, but the name can be different from the URI of the actual service. For example, myservice.com could be Audience URI of the Relying Party, but the service endpoint is actually https://game.myservice.com/action/.
- Select the encryption and JWT type you want your tokens to use and follow the steps to generate a shared key (symmetric encryption) or upload the public cert key (asymmetric encryption).
[!NOTE] We recommend using the option Asymmetric encryption – JWE RFC 7516. Although the symmetric shared key is easy to use for setup, the asymmetric option provides more security to your tokens and service. We do not recommend using the JWE Draft 7 (legacy) option unless your services are using this older token format from the Xbox Development Portal (XDP).
- Enter how long (in hours) you want your token’s lifetime to be (recommended 4 hours)
- Add the User Pairwise ID claim to the token (this will be the unique ID you will have for each user in your database)
- Add any other claims that your service will need within the XSTS tokens
- Click Save
Defining the service endpoint in your title’s NSAL
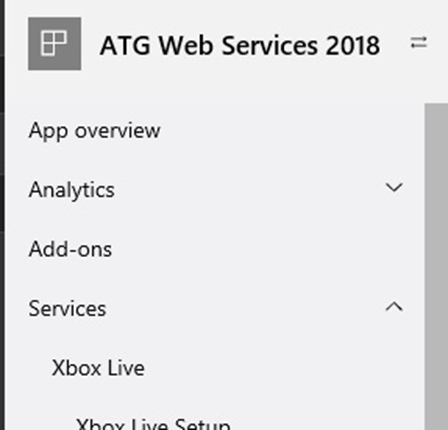
- Go to your title’s overview page in Partner Center and select Services-> Xbox Live
- Check the tab towards the top of the page for the sandbox you will be testing in.
- Expand the Services list in the panel on the left again and you will now see the option for Xbox Live single sign-on, click on that.
- Click New endpoint.
- Enter the HTTPS URL endpoint of the service your title will be calling.
- Select the Relying Party from the drop-down that you previously configured above.
- Click Save.
- Go back to the Xbox Live Gameplay Settings page.
- Select the tab of the Sandbox you want your updated NSAL published to.
- Click Publish in the right corner.

Relying Party Certificates
If you chose to use Asymmetric encryption in your XSTS tokens, you will need to generate a self-signed certificate to generate a public and private key. The steps below show how to generate this certificate. Even if the certificate expires, since it is private between your service and Microsoft, XSTS tokens are still valid so your Relying Party cert should never need to be updated unless you want to change it.
Creating a self-signed Relying Party certificate
- On your computer, open the Developer Command Prompt for Visual Studio.
-
Run the following command, replacing the example name (Contoso) with your own:
makecert -sv RP_Private_Key.pvk -n "CN=Contoso Relying Party" RP_Cert.cer -b 01/01/2018 -e 12/31/2199 -sky exchange -ss My -a sha256 -len 2048 -r –pe - When prompted, enter a password for the private key.
-
Run the following command, replacing the password at the end for your own:
PVK2PFX –pvk RP_Private_Key.pvk –spc RP_Cert.cer –pfx RP_Full_Cert.pfx -po {password you used above} - When prompted, enter the password you set for the private key in step 3.
- Use the RP_Cert.cer file to set up your token definition setup in XDP.
- Hold on to the RP_Full_Cert.pfx file as we will upload it to the key vault shortly.
- When importing the full certificate, make sure you select the Mark this key as exportable option so that you can export it to other servers if needed.
If you ever need to re-export the public key .cer for this certificate, select the Base-64 encoded X.509 (.CER) option in the Certificate Export Wizard.
SSL Certificates
Self-signed certificates used for SSL communication will not be trusted by default and the HTTPS connection will fail unless the self-signed cert is added to your Web Service Endpoint definition in the Xbox Live single sign-on list for your title. This is done through the Service Certificate Chain field. However, we recommend avoiding self-signed certificates and instead obtaining a trusted SSL cert from a trusted certificate authority (CA) for better compatibility across devices.
For a list of recognized CAs, see https://aka.ms/trustcertpartners. Also you can obtain a free trusted SSL certificate from organizations such as https://letsencrypt.org.
Handling partner XSTS tokens on the server
If you have set up a partner XSTS token and intend to use the claims contained in it, your service must be able to decrypt and parse the token to extract necessary information for service logic decisions. For a more in-depth explanation of this see the article Understanding Security Tokens for Xbox and the provided token handling code in the XSTS Server Sample.
The recommended approach for this is the use of an existing JWT parsing library to handle token management automatically. Open source libraries that provides this functionality across many programming languages can be found on JWT.io.
Authentication and authorization
After a token has been verified and claims are available at the service level, you can use this information for service-level authentication and authorization. Information contained in a partner XSTS token should always be considered authoritative, and you do not need to replicate this information through other parts of the request.
For example, you should always present the user’s ID through an XSTS token claim. Do not include the user’s ID (especially the XUID) in the request URL or in other custom headers.
To identify a user for authentication purposes, /user/PWID claim. This claim exposes the Pairwise ID (PWID) of a user which is the unique identifier of the user’s underlying Microsoft account for all titles under the publisher of the title. The Pairwise ID is valid across all Microsoft platforms, and you should use it for all future services.
Although you should retrieve the Gamertag from the token claims, never use the Gamertag as a unique identifier for a user. This is because the Gamertag can change and should only be used for temporary display or caching purposes.
For authorization purposes, you can obtain the Xbox Live privileges of a user through the /user/privileges claim. These privileges are identical to the privileges exposed on Xbox Live, and you must verify the privileges if they could affect the user’s access to the service. If a user does not have sufficient access rights, a service should provide the appropriate HTTP error code.
After you complete authentication and authorization, you can use additional claims to retrieve more information.
Custom services and sandboxes
XSTS tokens for custom services are accessible across all development sandboxes. In this way, custom services are easily accessible across different sandboxes for your title. Because the services are accessible across different sandboxes, a custom service should segment requests for the sandbox that each title is running in. Otherwise, the custom services may merge different sandboxes and title data. The sandbox where an XSTS token was generated can be identified by the “sbx” claim.
Summary
This paper provided an overview of how to use XSTS tokens to access custom, title-specific services and Xbox services, and included the following:
-
*Title code should always use the automatic XSTS token insertion for HTTP requests through the IXMLHttpRequest2 APIs (or GetTokenAndSignatureAsync API for UWP).
-
All calls to Xbox Live Services require the use of an XSTS token, and custom web services require the same pattern. Custom web services can handle parsing of XSTS tokens by using an existing or custom JWT parsing library. See the XSTS Server Sample for a fully functional code example.
References
- “Representational State Transfer (REST)”, Architectural Styles and the Design of Network-based Software Architectures, Roy Thomas Fielding, 2000.
- IXMLHttpRequest2 on MSDN
Appendix
Manual XSTS token retrieval
It is not necessary for a title to manually retrieve XSTS tokens for web service access by using the IXMLHttpRequest2 APIs. Services can also be accessed by using WebSockets or UDP. For these scenarios, a title can manually retrieve the XSTS token and insert it into the authentication flow.
To retrieve the XSTS token for these flows, an endpoint configuration that uses an XSTS token is required. The title then requests the XSTS token for this endpoint by using the Windows::Xbox::System::User::GetTokenAndSignatureAsync API through the following flow:
-
Call GetTokenAndSignatureAsync on the current user, and include the URL of the service and (if applicable) headers or message body in the API call.
This API call retrieves the XSTS token for the Xbox services endpoint, and the call generates a message signature for the message and pre-defined headers.
Note The message signature is required for Xbox Live services but is optional for custom service authentication.
- Retrieve the XSTS token and signature through GetTokenAndSignatureResult from the asynchronous result.
- Send the XSTS token as appropriate through WebSockets or UDP to the service/server.
GetTokenAndSignatureResult returns an encrypted XSTS token. You should handle the returned token as opaque data, and use it only in conjunction with XMLHttpRequest2. Do not write token data to disc or cache the data.