Game and App Help Technical Overview and Best Practices
This topic provides an overview of how to create context-aware Help content for apps on Xbox One. It explains the options available for creating Help manuals, includes information about contextual Help, contains links to documentation covering ingestion through the Xbox Developer Portal (XDP), and suggests best practices for creating content that displays well in various console views and on mobile devices through Xbox SmartGlass.
The white paper from which this topic was derived includes samples for both a simple Help manual and a full-featured Help system. To obtain the samples, download Game and App Help Technical Overview and Best Practices, available on XGD.
Note The term “app” refers to any application running on the console, including games.
In this topic:
- Introduction
- QuickStart guide to creating your manual
- How Help works
- Content
- Using the sample manuals
- Creating custom manuals
- Preparing for release
- Conclusion
Introduction
While users may be delighted by your Xbox One app, there will inevitably be times when questions or points of confusion arise-no matter how intuitive your user experience might be. Fortunately, Xbox One has a built-in method for resolving these issues without requiring users to flip through paper manuals, sift through search results online, or call customer support.
Help on Xbox One is delivered over the web, it is relevant to a user’s current app, and it can be contextual with extreme granularity—down to individual menu items or locations in an app. All apps are required to submit Help content, which is described in XR-021, “Help and Support Information.” The XR—found on Xbox Requirements—lists the minimum Help-content requirements for apps.
Users can access Help on the console through voice (“Xbox Help!”), gesture, and controller. Help should also appear in your context menus. Help will display primarily in snapped mode, taking up part of the screen next to your app. If a user activates Help on the console while your app is in snapped mode, Help will open in fill mode, so it does not change what your app is displaying.
Help can also be accessed on Xbox SmartGlass from the Now Playing area, which pertains to whatever is currently running on the console, and from details pages, which pertain to the game or app that the user is exploring (irrespective of what might be running on the console). Xbox SmartGlass supports a wide variety of devices and screen sizes, including phones and tablets running Windows 8, Windows Phone, iOS, and Android.
QuickStart guide to creating your manual
Help content for Xbox One games and apps exists in the form of HTML5 manuals that are associated with title IDs and locales. Publishers can choose between two methods of presenting Help content:
- A simple Help manual that directs users to a Help website.
- A full-featured on-console Help manual.
The next two sections provide an overview of these options.
Simple Help manual
The simple Help manual is appropriate for scenarios in which the game or app publisher stores all Help content on a web server and wants to point users to its Help website for assistance. In such cases, the app Help manual submitted to Xbox Developer Portal (XDP) would be based on the Simple_help_Manual.zip example enclosed with the white paper for this topic.
The contents of the app Help manual includes, at a minimum, the publisher logo and a URL where the user can review online Help documentation. It is not possible to deep link directly to the support website from the manual. If possible, provide a short URL that the user can enter easily in Internet Explorer for Xbox One or other web browser.
Full-featured Help manual
The full-featured Help manual provides help and assistance within the manual itself, although it can also refer to an external website for additional help if required. To ease the process of creating a full-featured Help manual, a sample manual has been provided in the Full-Featured_Help_Manual.zip file accompanying this white paper. You can choose to:
- Use the sample as is—just drop in your content.
- Modify the sample—after inserting your content, style it to match your app (recommended).
- Build something new—starting with the sample or from scratch, create something as unique as your app.
To learn more about the sample Help manual, see Using the sample manual.
To learn more about building a new manual, see Creating custom manuals.
How Help works
This section provides additional information about how the Help app on the console and the Help companion app on Xbox SmartGlass-enabled devices display Help content and tie into your app.
Manual structure
Manuals are intended to be static, self-contained entities that can function without dependencies on files or services hosted on external domains. The purpose of this design is to promote the long-term availability and reliability of manuals (see External calls for more information). Therefore, all resources that a manual needs should be present in the manual directory, and all links inside manuals should be relative. The exceptions are a few JavaScript and CSS files hosted on start.ui.xboxlive.com, and these are referenced in the sample manual with comments explaining each one. Please note that it is not possible to launch external links from within the App Help application. Users must manually enter any URLs listed in the Help manual into the web browser.
Manuals can contain subdirectories for organization. However, make sure that no paths exceed 1500 characters to stay below the maximum URL length once the manual is in its final location on a CDN.
Note that file types within manuals are limited to standard HTML, JavaScript, CSS, images, fonts, and RESJSON.
The main entry point into a manual is the Index.html page. Help will always load Index.html first, so this page must contain the appropriate content or redirect to it. The sample manual includes all of its content in Index.html. A table of contents should appear if no contextual bookmark is supplied (see Contextual Help for more on this).
We recommend that any separate pages contain a link to the table of contents or other parent menu to avoid any dead ends in the user experience. Similarly, if the entire manual is contained in a single Index.html file, as it is in the sample, every article should contain a link to the table of contents or other parent menu.
Strings can now be included in a separate RESJSON file, as seen in the sample manual. See Localization for more information.
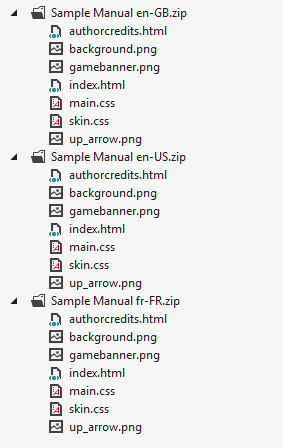
Submit localized versions of manuals individually, with one .zip folder containing a complete manual for one language or locale directly in the root of the .zip file. Index.html should not be buried in a subfolder. Refer to the XDP documentation online for additional information:
- Games: Xbox Developer Portal
Determining locale
Help will use the locale of the console when accessed on Xbox One, and it will use the locale of the device when accessed through Xbox SmartGlass. Thus, if it is available, the language of Help content will match that of the rest of the content on screen.
Figure 1. Manual directory structure. Each manual should be self-contained inside a .zip folder corresponding to a particular locale. Note that Index.html sits directly inside each .zip folder and not inside a subfolder.
Contextual Help
One of the goals of Help on Xbox One is to deliver Help content that is contextual, that is, corresponding to the user’s current location within an app. To achieve this goal, two things must be true: the app must communicate the user’s location to the Xbox data platform, and the manual must be constructed in such a way that the values in CurrentHelpTopic, representing a user’s location within an app, map to the appropriate Help topics within the manual.
To find out where a user is inside your app, Help will use the Xbox data platform—looking specifically at the CurrentHelpTopic statistic. Therefore, you’ll need to define an event in your app’s service configuration in XDP to populate the CurrentHelpTopic statistic. For example, create an event named SetHelpContext with a field name of HelpTopic. Set the statistic rule such that the value of the CurrentHelpTopic statistic is populated by the HelpContext value from the SetHelpContext event. For more information on how to create events and statistics, as well as the XCE Provider library you use to fire events, please refer to “Workflow for Implementing Xbox Common Events” in the Xbox Live SDK documentation:
When a user launches Help, the Xbox data platform supplies the value of the CurrentHelpTopic statistic to the App Help application snapped next to your app, which you can use to direct the user to the most relevant Help topic. Help will load your manual’s Index.html page with a bookmark consisting of the value of the CurrentHelpTopic statistic So, your Help manual should use HTML bookmarks or named anchors to navigate to, or deep-link internally in, the Index.html file to specific content.
If your entire manual is contained in a single Index.html file, it is easy to default to a table of contents at the top of the manual in case CurrentHelpTopic cannot be found or doesn’t correspond to any articles. Using anchors also allows for very simple JavaScript-free navigation.
The sample manual’s content is contained entirely in the Index.html file and uses bookmarks such as “article1234”. This means that context-aware help would work if the sample were paired with an app that set the CurrentHelpTopic statistic to “article1234” through the SetHelpContext custom event with its HelpTopic field tied to populate the CurrentHelpTopic statistic.
Alternatively, you can break manuals up into many files containing content outside of Index.html, which requires JavaScript redirects—described later in Client-side redirection—to make proper use of context.
Offline Help
Help on Xbox One is not currently available offline.
Integrating with your app
Note that Help should appear as an item in your app’s main menu and/or context menu. See the ADK or XDK documentation for information on activating the Help app. After your app is configured to launch Help, ensure that selecting “Help” in the menu does indeed launch the Help app. No extra work is needed to enable Help in Xbox SmartGlass.
Content
The content in your Help manual can be as rich and thorough as you would like. The “Help and Support Information” XR has been updated to allow for the simple app Help manual. However, the next few sections detail recommended content for a full-featured app Help manual.
Recommended content
As specified in XR-021, “Help and Support Information,” you can submit either a simplified Help file or a full-featured Help file that contains:
- Introduction to the app—for example, Description, Overview, Getting Started.
- Contact information, which should include one or more of the following: website URL, phone number, and/or email address.
- If applicable, information about creating, linking, and deactivating external accounts.
- If applicable, content describing basic controls, including the controller map, voice commands, and Kinect gestures).
Additional recommended content
In addition, we recommend that your full-featured manual include:
- Descriptions of any settings.
- Information about online play.
- App-specific error messages, along with corrective steps.
- Background story for games.
Using the sample manuals
The Full-Featured_Help_Manual.zip sample file, in the white paper from which this topic was derived, includes all of the recommended sections and provides some convenient features, including:
- Support for console snapped and fill resolutions as well as Xbox SmartGlass phone and tablet resolutions.
- Support for all input modes—controller, voice, gesture, and touch.
- Automated pagination—insert your content and the manual will automatically break it into pages (depending on screen size) and display a page counter with Next and Previous buttons as needed.
- Easy skinability—designed for simple modifications to change the visual style.
- Controller button icons—includes styles for button icons as found on the Xbox One controller.
- Separate strings—text content removed from HTML for easy localization.
The following topics cover the information you need to turn the full-featured sample manual into your own.
Creating menus
The full-featured sample manual supports two main types of pages: menus and articles. All manuals should start with a main menu or table of contents. The sample demonstrates this and uses “TOC” as its named anchor—this should be left intact to allow other pages to link up to the table of contents. Note that you can create additional menus or submenus that users can link to from the table of contents.
Due to legibility requirements and screen real-estate limitations, a maximum of six items can be displayed on a given menu. We don’t recommend trying to exceed this limit. Instead, we recommend that you rearrange your content using submenus to ensure that no individual menu contains more than six items.
Creating articles
Article pages are the main part of your manual—where the actual Help content resides. Article pages should use the structure demonstrated in the sample manual, including the parent link, the pagination controls, and the end mark used to calculate page counts. Your content goes in the middle.
Creating links
The sample uses a few different types of links that should be employed in different scenarios:
- menuLink: use a menuLink to link from a menu down to a submenu.
- contentLink: use a contentLink to link down to an article.
- backLink: use a backLink to link up a level (with the back-arrow icon) from an article or menu to its parent.
Note that hyperlinks to external websites are not supported in Xbox One Help content. See External hyperlinks for more information.
Applying skins
While you are free to leave the visual style of the sample as is, we encourage you to modify the style of your manual to match the style of your app. The Skin.css file is a place where you can modify many of the visual elements of the manual.
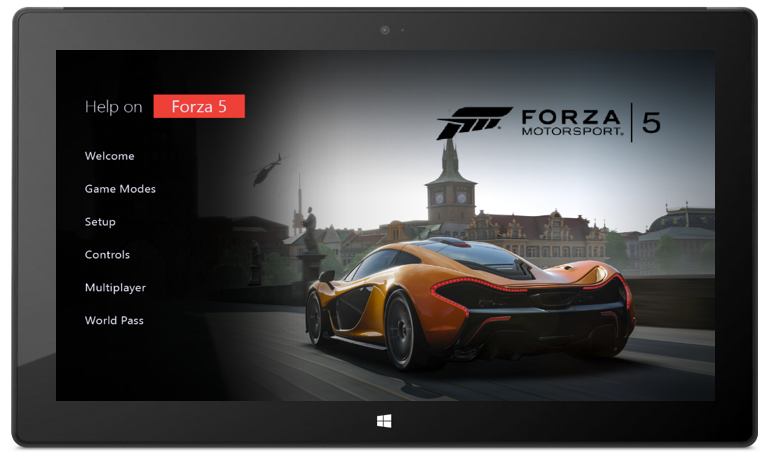
With a few small changes, the sample can be transformed from a generic manual to one that blends seamlessly into the branding of your app. The image in Figure 2 shows what the sample manual looks like when styled to match Forza Motorsport 5.
Figure 2. The sample manual’s main menu with a Forza Motorsport 5 style.
Controller button icons
The sample also includes classes for button icons that you can use inline. For example:
Press <span class="buttonAImage_RGB235"></span> to jump.
The classes ending in 235 are lighter images to be used on dark backgrounds. The ones ending in 16 are darker images to be used on light backgrounds.
Localization
Help supports strings contained directly inside HTML files as well as in separate RESJSON files, as demonstrated by the sample manual. We recommend using RESJSON to contain all strings and referencing them in HTML, because this ensures the simplest experience with localizing and maintaining manuals. With this method, it’s possible to have localized versions of a manual that differ only in the contents of the RESJSON file associated with each one.
Note that the Help service looks specifically for a file called Resources.resjson in the root of the manual, alongside Index.html, so it’s important to follow the structure and naming convention laid out in the sample to enable the use of RESJSON for digital localization of your manual.
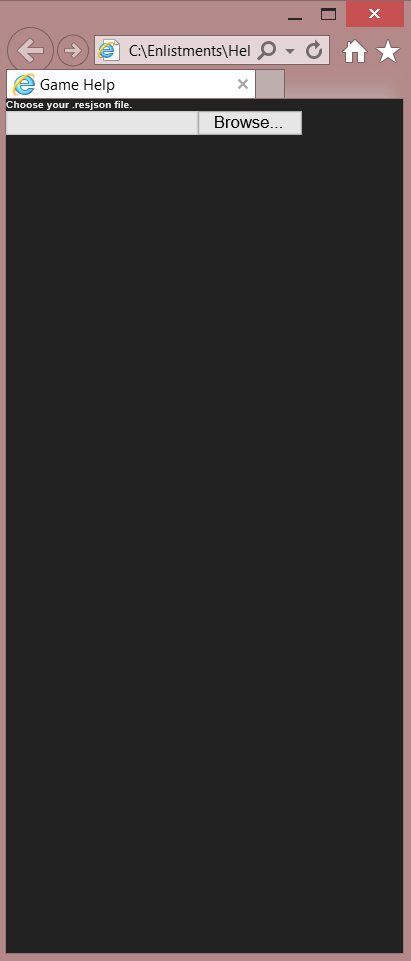
To facilitate development and testing, when launched locally in a web browser, digital manuals ask for a RESJSON file from which to load strings. Simply point it to the desired Resources.resjson file to view the manual with text content.
Figure 3. Loading the RESJSON file
Creating custom manuals
Although starting with the sample manual is the easiest way to create great Help content for Xbox One, you have complete freedom to create something new. This section offers guidance for creating manuals from scratch, and it might also interest developers hoping to heavily modify the sample manual’s functionality.
Help UI flow
When a user activates Help, Help will obtain the value of the CurrentHelpTopic statistic for the user from the Xbox data platform. Help will initially point to the Index.html file and, within that page, scroll to the anchor that matches the CurrentHelpTopic—see Contextual Help.
If there is no matching anchor hash or no CurrentHelpTopic, then Help will show the content that’s in the top of Index.html. For this reason, we recommend that you include a table of contents at the top of Index.html, allowing the user to browse to a relevant topic.
You can also set up automatic redirects to supplemental HTML pages. One way of setting up redirects is to have the page parse the anchor hash and detect anchors corresponding to content on another page. You can then use a client-side redirect through JavaScript to bring the user immediately to the appropriate page.
The following sections show examples of various ways to set up the mapping between CurrentHelpTopic values and Help content in your manual. Note that HTML5 elements and conventions have been used for semantic clarity. The article tag is used in the code example to contain the Help content.
- Standard usage: mapping Help context to articles
- Missing section behavior
- Client-side redirection
- Mapping multiple contexts to one section
Standard usage: mapping Help context to articles
The following scenario is a typical example of displaying contextual Help based on a user’s current place within your app.
A user activates Help inside an app, and the Help app or Xbox SmartGlass companion app makes a call to the Xbox data platform to retrieve, for the given user and title, the CurrentHelpTopic statistic. In this case, say the value is level1. If the locale is en-US, Help locates a URL mapping to the Index.html file within the en-US manual and appends a hash of #level1.
The browser then loads the response from that URL into an <iframe> inside the Help app or Help companion app. When the page loads in the <iframe>, standard browser behavior will cause the page to automatically scroll to the position indicated by the named anchor (level1) in the HTML page.
For example, this URL: http://[help manual location]/en-us/index.html#level1 will scroll to:
  <a  name="level1"></a>
  <article> ...content... </article>
Missing section behavior
The following scenario describes the behavior of Help if no anchors in index.html correspond to the CurrentHelpTopic or if no CurrentHelpTopic is available.
For example, if a user activates Help in the part of an app where either context has not been enabled or the context cannot be mapped to an anchor inside the Index.html page, then either of the following URLs will open the Index.html page at the top:
- http://[help manual location]/en-us/index.html
- http://[help manual location]/en-us/index.html#[unmappable CurrentHelpTopic]
Client-side redirection
The following scenario describes one way of redirecting users from the Index.html page to another Help page.
A user activates Help in a section of your app where you have intended the app context to map to a supplemental Help page rather than to somewhere in the Index.html page. The Index.html page will still be the first page loaded, but you will need to parse the page location and then redirect the user before the page finishes loading.
This scenario would require JavaScript. One way to do this is:
  //A simple mapping between section id and external pages
  var articleArray = [
      {"articleId": "#article7890", "articleLocation": "article7890.html"},
      {"articleId": "#article8765", "articleLocation": "article8765.html"},
      {"articleId": "#article7654", "articleLocation": "article7654.html"}
  ]

  //Get the current hash in the URL, which should contain the section id
  var currentHash = window.location.hash;

  for(i = 0; i < articleArray.length; i++)
  {
      if(articleArray[i].articleId === currentHash)
      {
          //If a match is found, navigate to the specified location
          window.location.href = articleArray[i].articleLocation;
          break;
      }
  }
Given the above JavaScript, this URL: http://[help manual location]/en-us/index.html#article7890 will result in the following actions:
- The Index.html page will load.
- The JavaScript will parse the URL, detecting a hash signifying another page.
- The JavaScript will perform a client-side redirect to send the browser to the article7890.html.
Mapping multiple contexts to one section
Multiple parts of an app can have the same Help topic. One part might have a CurrentHelpTopic of multiplayerMapA. Later, another section of the app covered by the same Help topic might have a CurrentHelpTopic of multiplayerMapB.
If the second topic has an anchor at the same location as the first, the same Help content will be displayed for both parts of the app. Either of the following URLs will load the Index.html page.
- http://[help manual location]/en-us/index.html#multiplayerMapA
- http://[help manual location]/en-us/index.html#multiplayerMapB
After loading the Index.html page, the URLs will scroll to this location:
  <a  name=”multiplayerMapA”></a>
  <a  name=”multiplayerMapB”></a>
  <article> ...content... </article>
Console Help design considerations
On the Xbox One console, Help functionality will be delivered by the Help app, containing an <iframe>. The Help app will display the manual in the <iframe> when the shared Help app is activated. The <iframe> is a fixed width.
Limitations of snapped mode
Because the console displays snapped mode only in the right-hand portion of the screen, there are limitations to the amount and type of content that you can display. Additionally, the snapped area itself has restrictions because of the need to limit elements near the borders of the screen where some televisions can have overscan artifacts that can affect the legibility of content.
In snapped mode, your Help manual will be displayed at a resolution of 480×1080 pixels.
The diagrams that follow delineate the usable space for apps in snapped and fill modes.
Figure 4. This diagram shows the regions that get cut off on certain televisions. Action-safe refers to the area in which you can safely place a control. Title-safe refers to the area in which you can safely place content.
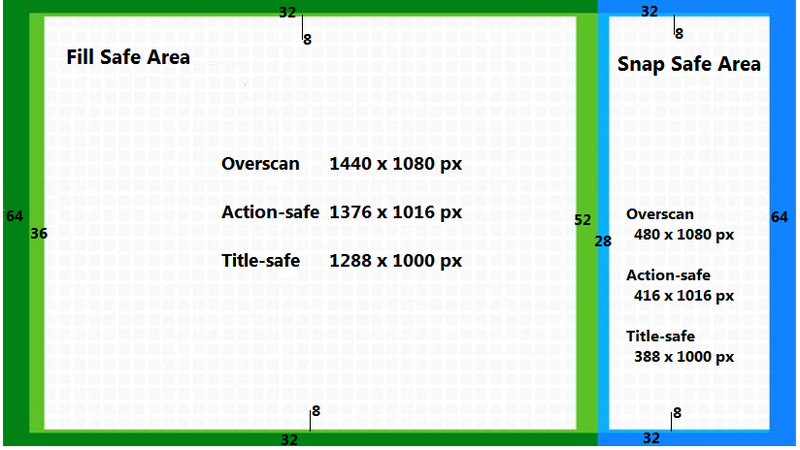
Figure 5. This is an example of text content displayed within the title-safe area in snapped mode, including a three or four word title with control areas on the top and bottom (using Segoe UI Regular at 24px).
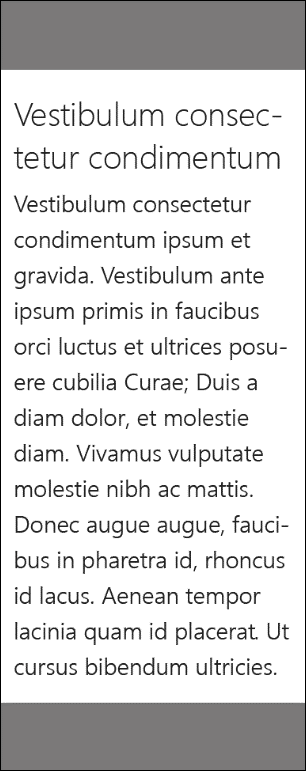
You should be aware of the space limitations shown in Figure 4 and take care to break Help topics into short, easily viewable segments when possible. If a topic cannot be viewed on a single screen, we recommend that you use a left-to-right pagination mechanism.
Limitations of fill mode
Help will open in fill mode if a user activates Help while a snapped app is in focus. Opening in this mode ensures that Help does not cover the app for which the user sought Help.
The limitations of fill mode are similar to those of snapped mode, but the size is different. In fill mode, your manual will be displayed at a resolution of 1440×1080 pixels, allowing the content to span three times what it does in snapped mode. See Figure 4 for the title-safe region in fill mode.
General TV display considerations
Television UI is often referred to as a “10-foot UI” because viewers usually sit some distance away from the screen-a fact that is important to take into account when designing UI elements.
The Xbox console UI standards state that UI elements should be easily readable on a minimum of a 32–inch TV when viewed at a minimum distance of 6 feet. To meet this standard, you might need to use media queries to deal with the special considerations when working with TVs.
Remember to test out the Help manual in a realistic viewing scenario from a distance of 6-10 feet from the screen, and pay special attention to readability, visibility, and spacing.
Here are some general tips:
Font sizes
A good starting point for body text is a minimum font size of 24 pixels.
Controls and buttons
The controls need to be significantly larger for buttons and controls that require user interaction. In general, hit targets need a minimum height of 100 pixels to support gestures.
Spacing
Generally, more white space is necessary between elements than in a typical tablet or desktop UI.
Image scaling issues
Without scaling, as the pixel density of a display device increases, the physical sizes of objects on screen get smaller. When UI would otherwise be too small to touch and when text gets too small to read, Windows scales the system and app UI to a scale percentage:
- 100% when no scaling is applied.
- 140% for 1920×1080 devices that have a minimum dpi of 174.
- 180% for 2560×1440 devices that have a minimum dpi of 240.
For example, the following media queries load different background images for an element depending on the screen dpi:
  /* CSS - Load a remote image depending on the scale percentage */
  @media all and (max-resolution: 134dpi){
      /* Load 100% image when scaled by 100% */
      .imageBackground {
          background-image: url('images/foo_100.png);
      }
  }
  @media all and (min-resolution: 135dpi) {
      /* Load 140% image when scaled by 140% */
      .imageBackground {
          background-image: url('images/foo_140.png);
      }
  }
  @media all and (min-resolution: 174dpi) {
      /* Load 180% image when scaled by 180% */
      .imageBackground {
          background-image: url('images/foo_180.png);
      }
  }
Xbox SmartGlass Help design considerations
To view Help content without sacrificing real estate on the primary viewing screen, users can access Help with Xbox SmartGlass. Because Help can be displayed on Xbox SmartGlass–enabled devices, manuals need to work well on touch screens and display properly in a variety of browsers and screen sizes. Supported devices include:
- Windows Phones
- Windows 8 tablets
- iOS phones and tablets
- Android phones and tablets
If you have ever created an Xbox SmartGlass Companion, then you likely understand the challenges of creating cross-device and cross-browser content with HTML5—all the same best practices also apply to creating help manuals. The most important practices are detailed in the Responsive design best practices section below.
External calls
Manuals are intended to be self-contained, not pulling in content from outside web services through JavaScript. However, calls to external domains are acceptable, provided that a call failure will not break anything that the user would notice.
Please note that absolute hyperlinks to external sites do not work directly from the App Help application. Users must type external links in to the browser manually.
Telemetry
One reason we do not disallow external calls is so that you can instrument your manual if you wish to collect telemetry data on its usage.
jQuery
Another notable exception to the “self-contained” aspect of manuals is for jQuery. If you wish to use jQuery, please use one of the versions hosted here: http://www.asp.net/ajaxlibrary/cdn.ashx#jQuery_Releases_on_the_CDN_0. In the sample manual, we use https://ajax.aspnetcdn.com/ajax/jQuery/jquery-1.9.1.min.js.
External hyperlinks
All hyperlinks in your Help manual, whether relative links to a different part of the manual or absolute links to external websites, will result in new content loading within the Help app on Xbox One or the Help Companion in Xbox SmartGlass. Therefore, do not include hyperlinks to external websites in your manual. Doing so might take the user to a “dead end” where the intended content is no longer viewable or navigable. Instead, to refer the user to an external website—for example, your support site—simply state the address in plain text. Ideally the URL should be short and easy to type in to the user’s web browser of choice.
Responsive design best practices
Use HTML5 conventions and page elements wherever appropriate. For more information on HTML5, see www.w3.org/html. Additionally, CSS3 properties and media queries allow the page to render correctly in the widest possible array of environments and devices. For more information on CSS3, see www.w3.org/css.
Furthermore, you might need to use the techniques described in this section to achieve visually pleasing, consistent results.
- HTML reset
- Dynamic font sizes
- Standard mobile-device resolution
- 16:9 versus 4:3 aspect ratios
- Sticky select problems
- Scrolling behaviors
- CSS gradients
- Font fallbacks
- Text legibility
HTML reset
Browsers apply default formatting rules to HTML elements. Resetting these formatting rules effectively removes the default behaviors, which different browsers implement differently. After removing these rules, you can apply consistent rendering behaviors of your own without having to frequently override the default browser rendering, which is especially helpful when applying adaptive-rendering techniques.
There are many different flavors of reset. Here is a simple CSS example:
  html, body, body div, span, object, iframe, h1, h2, h3, h4,
  h5, h6, p, blockquote, pre, abbr, address, cite, code, del,
  dfn, em, img, ins, kbd, q, samp, small, strong, sub, sup,
  var, b, i, dl, dt, dd, ol, ul, li, fieldset, form, label,
  legend, table, caption, tbody, tfoot, thead, tr, th, td,
  article, aside, figure, footer, header, hgroup, menu, nav,
  section, time, mark, audio, video
  {
      margin: 0;
      padding: 0;
      border: 0;
      outline: 0;
      font-size: 100%;
      vertical-align: baseline;
      background: transparent;
  }
Dynamic font sizes
An often-overlooked problem when trying to adaptively render on multiple devices is scaling fonts. Elements can easily be designed to scale according to their container, but fonts still remain the same size.
To overcome this issue, a good technique is to set a default font size on the body of the page. Typically, if you are using ems, that size would be 64%, meaning that 1 em equals 10px. Each element can then be adjusted accordingly.
When a media query determines that a device’s resolution is smaller than the target resolution, the percent font size on the body can then be adjusted inside the media query. You can even set font sizes of individual elements to ensure that the font shrinks but doesn’t become illegible.
Here is an example of how to dynamically scale font sizes for typical mobile-device resolutions:
  @media screen and (max-width: 320px)
  {
      html
      {
        font-size:45%;
         .areaNavLink, .areaNavLink:visited
         {
           line-height:3;
         }
     }
  }
Standard mobile-device resolution
This media query captures most standard smartphone displays. Note that many displays with much higher actual resolutions still report a 320px-wide resolution.
  @media screen and (max-width: 320px)
  {
      ...rules...
  }
16:9 versus 4:3 aspect ratios
This media query allows you to apply rules to devices that have 4:3 displays and that are in landscape mode, such as an iPad.
Note that most Windows devices, including all Microsoft Surface variants, have a 16:9 ratio.
  @media screen and (max-aspect-ratio:32/20) and (orientation:landscape)
  {
      ...rules...
  }
Sticky select problems
Devices often have default ways of dealing with user-selected text displayed in browsers. When exposing HTML content in native applications, developers often wish to disable text selection to achieve an experience closer to native app content.
You can use the following CSS3 rules to disable or reset those behaviors. You can then leave text selection off or build a custom behavior.
  html, body
  {
      -webkit-tap-highlight-color: rgba(0,0,0,0);
      -webkit-touch-callout: none;
      -webkit-user-select: none;
      -moz-user-select: none;
      -ms-touch-select: none;
      -ms-user-select: none;
       user-select: none;
  }
Scrolling behaviors
Browsers on iOS have implemented CSS3 behaviors for native-style scrolling, which can be useful on some devices. To enable this behavior, you can add the following property to any scrollable element:
    .scrollable
    {
      -webkit-overflow-scrolling: touch;
    }
CSS gradients
There is currently no industry-wide standard on how to implement gradients using CSS. So, use the following three rules to catch all browsers needed to support Xbox SmartGlass:
  @mixin gradient($gradient)
  {
    background: -webkit-linear-gradient($gradient); /* Chrome10+,Safari5.1+ */
    background: -ms-linear-gradient($gradient); /* IE10+ */
    background: linear-gradient($gradient); /* W3C */
  }
Font fallbacks
Various devices have different sets of fonts installed. In case the desired font is missing, use a series of CSS fallback fonts to ensure that the displayed font is as close to the desired font as possible.
The following rule sets up a series of fallbacks that resemble variations of Segoe UI, the font typically used in Xbox system UI.
  html, body
  {
    font-family: "Segoe WP", "Segoe UI", "Helvetica Neue", "Droid Sans", Arial, sans-serif;
  }
Text legibility
Some devices automatically adjust font rendering to allow for higher pixel densities. This adjustment can cause problems when fonts dynamically rescale to smaller sizes.
The following rules ensure that fonts remain legible when browsers adjust font sizes dynamically:
body, html
{
  -webkit-text-size-adjust: 100%;
  text-rendering: optimizeLegibility;
}
Preparing for release
After your manual has been completed, there are several things to do before your title is released. Notably, you must first package your manual and ingest it in preparation for testing it on an Xbox One console and on Xbox SmartGlass-enabled devices.
Packaging your manual
When you are ready for submission, you should have several individual localized copies of your manual. Each group of files comprising a complete, localized copy of your manual should be inserted into a new zip folder. Take care to ensure that Index.html is directly inside the root of the .zip folder rather than nested inside an additional folder within. When you are done, you should have a .zip folder for each language in which your app is available.
Note that the contents of your .zip packages might be identical except for the Resources.resjson file.
XDP submission
Please refer to the online Help for the Xbox Developer Portal on how to upload your Help manual:
Make sure that you republish your catalog to your publisher’s sandbox after uploading a new Help manual.
Testing your manual
We highly recommend that you test your manual on a variety of devices, including an Xbox One console along with several tablets and smartphones. Different web browsers, screen sizes, and input modes can always yield unexpected results.
Although it’s best to test Help end-to-end after ingestion, during development it can be useful to test your manual locally or in your own shared location for quick iteration, because ingestion can take several hours.
Verification on the console
On an Xbox One console pointed to your sandbox, run your app and launch Help. Verify that your content displays properly and that input through controller, voice, and gesture all function as expected. If your app supports snapped mode, be sure to try snapping your app and launching Help to test your manual in fill mode.
Verification on Xbox SmartGlass
Verification should be done both before and after ingestion.
Before ingestion
On tablets and smartphones, an option for testing your manual in Xbox SmartGlass is to use SmartGlass Studio, available from Xbox Game Developer (XGD). To do so, upload your manual to any location you can access. In SmartGlass Studio, enter the URL for Index.html and launch the HTML canvas. This will allow you to view your manual as if it were an Xbox SmartGlass Companion and can be a convenient way to iterate rapidly.
After ingestion
First, you will need to install the Xbox SmartGlass app, enable Developer Mode, and point the app to your sandbox. Then, navigate to your app’s details page or connect to a console running your app and select the Help button to see your manual. Verify that your content displays properly and is navigable through touch. More information on Developer Mode for SmartGlass is available in the Xbox One SmartGlass Companion materials available on XGD.
Quality checklist
Some common items to watch out for include making sure that:
- Content renders properly across various screen sizes.
- Touch input works across your manual.
- Controller input works across your manual.
- Voice input works across your manual.
- Gesture input works across your manual.
- No menu items are cut off.
- Images are not stretched or pixelated.
- Text is legible.
- Text strings display as expected (even after localization).
- If using context-aware functionality, Help topics map properly to app content.
Updates
You can update Help content at any time by ingesting new versions of your localized manuals and ensuring that your app’s catalog metadata is republished. Note that it can take up to a day for the new content to become available to all users.
Conclusion
Context-aware Help is extremely valuable to users, and creating it is simply a matter of understanding the abilities and limitations of displaying content from the “10-foot view” of a television and from companion devices using Xbox SmartGlass, such as tablets or smartphones. Xbox One game and app publishers have the option of creating a simple or full-featured app Help manual for their users. Careful design and coordination between developers and content authors will give users a rich and engaging experience—even when questions arise.