Speeding up Deployment and Iteration Times
We’ve made significant improvements to the speed of deployment and iteration time — deployment, F5 times and PIX capture and analysis times have all improved. Push deployment and PIX capture and analysis are much faster if you use the Xbox Transfer Device (XTD).
To maximize your iteration and deployment speed and to minimize configuration issues with XTD please read this section carefully.
We are listening to your feedback so please let us know what you think by posting feedback on the support forums or by letting us know through your Microsoft DAM.
- Speeding up link times using /debug:fastlink
- Speeding up game start up: ERA Fast Iteration Mode
- Using the Xbox Transfer Device (XTD)
- Example Results using XTD
- XTD Troubleshooting
- PIX: High speed capture and analysis using XTD
- XTD and NIC teaming
- Run from PC: Deploy your game in seconds
Note For a detailed discussion of how to improve your build times on Xbox One see the Improving Iteration Times (Developer Education Materials > All NDA Whitepapers) whitepaper.
Speeding up link times using /debug:fastlink
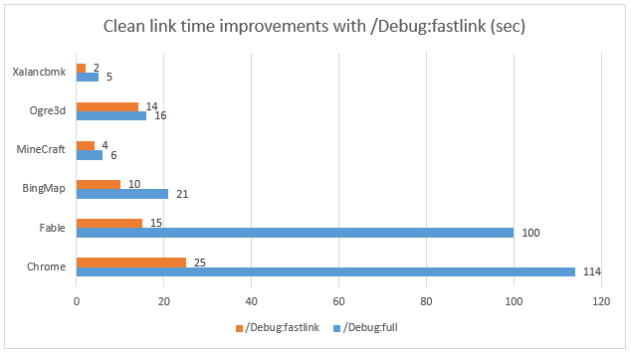
The /debug:fastlink linker option in VS 2015 and VS 2017 can be used to significantly reduce link times during day to day development (it is aimed at reducing link times for individual developers, not build servers). The improvement varies from title to title, and VS 2017 gives better results than VS 2015, but as this VS 2017 chart from the Visual C++ Team Blog shows, the improvement can be dramatic:
To find out more about /debug:fastlink and speeding up incremental builds see:
* [https://blogs.msdn.microsoft.com/vcblog/2016/10/05/faster-c-build-cycle-in-vs-15-with-debugfastlink/](https://blogs.msdn.microsoft.com/vcblog/2016/10/05/faster-c-build-cycle-in-vs-15-with-debugfastlink/) * [https://blogs.msdn.microsoft.com/vcblog/2015/10/16/debugfastlink-for-vs2015-update-1](https://blogs.msdn.microsoft.com/vcblog/2015/10/16/debugfastlink-for-vs2015-update-1) * [https://blogs.msdn.microsoft.com/vcblog/2014/11/12/speeding-up-the-incremental-developer-build-scenario/](https://blogs.msdn.microsoft.com/vcblog/2014/11/12/speeding-up-the-incremental-developer-build-scenario/) * [https://msdn.microsoft.com/en-us/library/xe4t6fc1.aspx](https://msdn.microsoft.com/en-us/library/xe4t6fc1.aspx)
Speeding up game start up: ERA Fast Iteration Mode
When you are making small changes to your game (edit, F5, debug, repeat), the overhead of shutting down and restarting the Title (ERA) OS becomes significant - around 15 seconds. We have added an option that allows you to leave the Title OS running – we shut down your game but not the OS. This significantly reduces start up time after your first F5 – to around 5 seconds. If you combine this option with using XTD for deployment your iteration times will be much better. This fast startup option also speeds up PIX capture and analysis (see PIX High speed capture and analysis using XTD).
You can turn this feature on and off using xbConfig FastIterationMode and using the Enable fast game launch button in Quick actions on the Home page of Dev Home.
xbconfig FastIterationMode=off
This operation cannot be performed when FastIterationMode is enabled. Please use ‘xbconfig fastiterationmode=off’ followed by xbreboot.
When trying to suspend your title from Visual Studio you’ll see an error stating that the application cannot be suspended. An HRESULT of 0x80830011 will be displayed.
To test suspend and resume you’ll need to turn off Fast Iteration Mode using either the FastIterationMode setting in xbConfig or the Enable fast game launch setting in Xbox One Manager.
Using the Xbox Transfer Device (XTD)
In the box with your Xbox One X dev kit you will have received an Xbox Transfer Device (XTD), a small black box with USB 3.0 ports on either side, and two USB 3.0 cables. Using the XTD to connect your Dev PC to your Xbox One X dev kit will dramatically increase the bandwidth available for Push deployment and PIX analysis and capture.
To get the best results from your XTD you should follow these guidelines:
- Make sure that you are using the June 2017 Developer Preview 1 XDK or newer.
- For best results use Windows 10 on you Dev PC. Windows 8 onwards include USB 3.0 support, and so we recommend using Windows 10 for the best performance. Windows 7 is supported but our experience is that 3rd party driver quality on Windows 7 can be variable.
- If you are using Windows 7, make that you have the latest drivers for your USB 3.0 controller installed.
- Make sure that you have a good quality USB controller in your Dev PC. Your data transfer speeds over XTD can vary widely based on the USB controller you use. We suggest you use online reviews to select a highly-rated controller. We recommend using an Intel® USB host controller. We have also had good results to date with ASMedia and Fresco Logic based USB controllers.
- Plug the XTD into one of the USB 3.0 ports on the rear of your XDK. The front USB 3.0 ports share a common USB hub, and this may impact the bandwidth available to XTD if other devices are attached via the front ports.
- Plug the XTD into a USB 3.0 port on your Dev PC, and make sure that the port is not on a controller that is being used for other USB devices. A dedicated USB 3.0 card is the best option.
- Ensure that two white LEDs appear lit on the XTD. If either LED is orange or unlit, then the cable on that end of the device is not functioning correctly. This may be due to incorrect USB port (using a USB 2.0 port, not a USB 3.0 port, for example) or a problem with the driver installed or the controller if it is the PC cable. See “XTD Troubleshooting” below for more info. The one or both white LEDs will flash as data is transferred from either end of the XTD, so that is an easy way to ensure that the XTD is in use during transfers.
- Use a fast SSD drive in your Dev PC and keep your title content on that Dev PC - ensure that your title’s loose file build is on your Dev PC and is on a fast storage device on that Dev PC (preferably an NVME drive or other fast SSD). If title content is not all stored locally, then network transfer speeds will bottleneck the transfer over XTD and increase deployment time.
- XTD cannot be used without an Ethernet connection. Please make sure that you have both an XTD and Ethernet cable plugged into your dev kit.
- Make the Development Drive (NVME SSD) the default drive in your Xbox One X dev kit. This is the default. You can do this using the Developer Storage tool in Settings in Dev Home, in Settings in Xbox Device Portal or using xbconfig DefaultStorageDevice. For example:
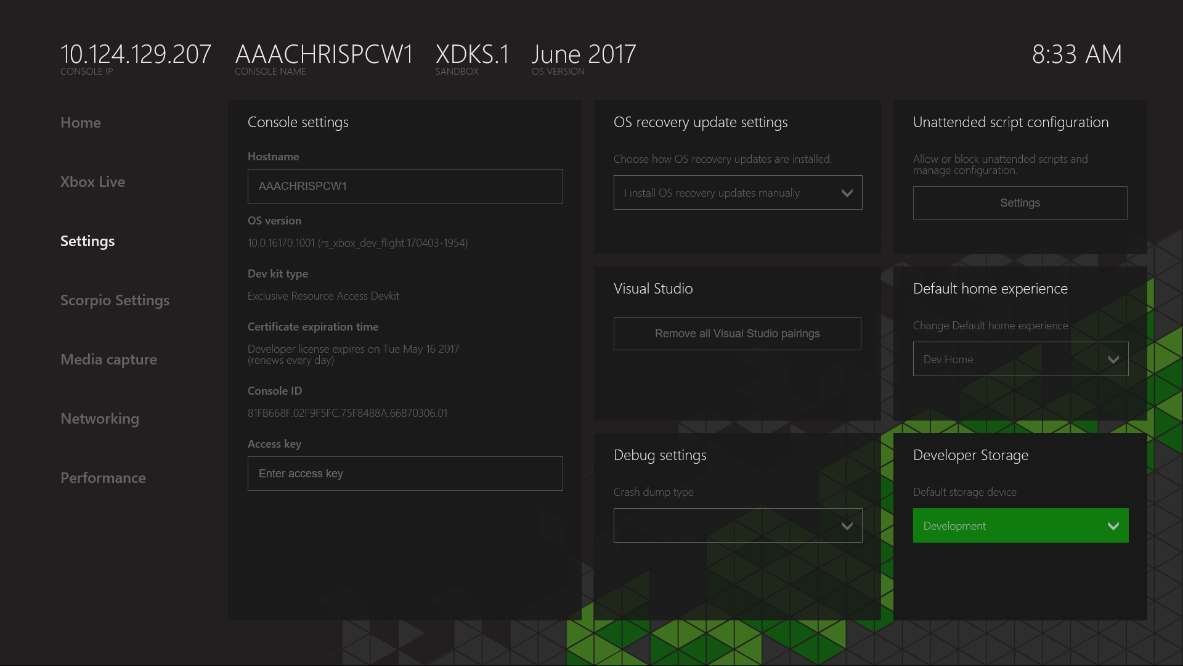
Or via Xbox Device Portal: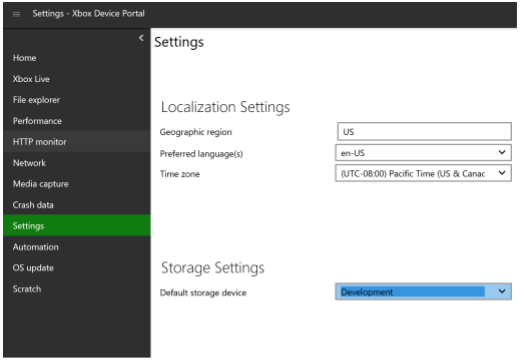
Example Results using XTD
You will get the best results if your title layout is comprised of a smaller number of large files. If your title has larger numbers of small files your will get worse results. This table shows some of our preliminary performance results.
| Title | Files | Folders | Image Size | 1706 XDK using XTD only | 1706 XDK using the NIC only | 1703 XDK using the NIC |
|---|---|---|---|---|---|---|
| Game 1 | 163,977 | 3,281 | 62.7 GB | 76 MB/s | 42 MB/s | 27 MB/s |
| Game 2 | 124 | 31 | 55.8 GB | 317 MB/s | 69 MB/s | 36 MB/s |
| Game 3 | 2,998 | 143 | 58 GB | 295 MB/s | 71 MB/s | 15 MB/s |
| Small Files Test | 42,014 | 1 | 402 MB | 3.4 MB/s | 3.3 MB/s | 2.3 MB/s |
Game 1, Game 2 and Game 3 are real world game loose file layouts.
Small File Test is a test layout of 42,000 small files to illustrate the performance impact of having many small files in your layout.
XTD Troubleshooting
Check the connection speed between your Dev PC and your dev kit using xbconnect /data. Make sure that you run this command twice (the first time you run it, it will typically report lower speeds). XTD speed is reported as “XBTPLink”. For example:
xbconnect /data

Connections at 10.124.220.17, client build 10.0.16176.1000:
  HOST: 10.0.16171.1004 (Durango Host OS) @100.134.19.176
    TCP Send Speed: 94.710   MB/s (512 KB x 512)
    TCP Recv Speed: 109.966  MB/s (512 KB x 512)
    XBTPLink Send Speed: 496.124  MB/s (512 KB x 512)
    XBTPLink Recv Speed: 182.077  MB/s (512 KB x 512)
  SYSTEM: 10.0.16171.1004 (Durango System OS) @100.134.22.119
    TCP Send Speed: 108.521  MB/s (512 KB x 512)
    TCP Recv Speed: 108.475  MB/s (512 KB x 512)
    XBTPLink Send Speed: 468.007  MB/s (512 KB x 512)
    XBTPLink Recv Speed: 212.801  MB/s (512 KB x 512)
  TITLE: Not running.
If you see lower than expected speeds over XBTPLink:
- Make sure that you have followed the guidance above.
- Reset the XTD by disconnecting both cables from the XTD and plugging them back in again.
- If the problem persists, reboot both your Xbox One X dev kit and your Dev PC.
If the XTD is functioning correctly both lights on the device will be white, not orange or unlit.
Once you have tested the speed of the USB connection, and are seeing good results with xbconnect /data, you can test your storage speed. To do this, copy a single large (8GB+) file to the SSD on the Dev PC. Then use the “xbcp” command to copy that file to the Xbox One X dev kit. For example: “xbcp c:\games\testfile.dat xd:". A single large data file like this is a “best case” for XTD transfer and should provide a “high water mark” for transfer speed. If this file transfers significantly more slowly than the “xbconnect /data” transfer rate, then you should examine the storage subsystem in the Dev PC.
PIX: High speed capture and analysis using XTD
You can use XTD to significantly reduce the time it takes to capture and analyze GPU data. If you combine this with ERA Fast Iteration Mode, you will further reduce the time taken by about another 10 seconds.
If you have an XTD plugged in, PIX will use it by default. You can turn this feature on and off using the xbconfig PixFastTransportMode setting:
xbconfig PixFastTransportMode=off
xbconfig PixFastTransportMode=off
xbconfig FastIterationMode=off
XTD and NIC teaming
If you have enabled XTD, PIX and the deployment tools will automatically share the available bandwidth of both the XTD and the ethernet port corresponding to the Tools IP to provide the fastest possible iteration times.
Run from PC: Deploy your game in seconds
All dev kits including Xbox One X dev kits support Run from PC deployment as an alternative to Push deployment. Run from PC deployment significantly improves productivity during title development by removing the need to physically deploy your title to your dev kit – it reduces deployment time to a few seconds.
To use Run from PC, you create a network share on your Dev PC containing the loose file build of your title, register it with the dev kit, and then simply launch your title on your dev kit with no deployment or setup time required. Any changes you make to the files on the network share are immediately visible to the title running on the dev kit.
For more information see: