Visual Gesture Builder: A Data-Driven Solution to Gesture Detection
Introduction
Many successful and innovative titles use gestures as input. These titles span a wide variety of genres, platforms and input technologies, from the touch screen of a smart phone to the full-motion, natural input of devices like the Kinect Sensor. This topic explains how Visual Gesture Builder, a data-driven machine-learning solution for gesture detection, can be used efficiently to detect even the most challenging gestures with very high accuracy. This technology can make developers more productive and raise the quality of Kinect titles in terms of better gesture detection and reduced latency.
For Kinect titles, it is essential to successfully and robustly communicate a player’s intent in a natural way, for this is the very heart of Kinect—“you are the controller.” This brings us to the importance of gesture detection.
In this topic:
- Introduction
- Visual Gesture Builder
- Collecting data
- Tagging data
- Building and analyzing gestures
- Tips and tricks
- Pros and cons
- Conclusion
- References
Gestures
A gesture is an action or a motion that is intended to communicate feelings or intentions. For example, when your dog wags its tail at you, this is a gesture with which your dog communicates that he is happy to see you.
Gesture detection
Gesture detection is a computer’s ability to understand human gestures as input. It has been around since 1963, when the first pen-based input device was designed. Gesture detection is still used in many technologies today, such as touch screens, computer mice, handwriting recognition, and Kinect.
Machine learning
When we say machine learning, we refer to the ability of a computer to automatically learn to recognize complex patterns in data. A computer usually does this by learning from empirical data examples, and the result is that it can classify data that it has not yet observed. There are many different approaches to machine learning, such as weighted networks and neural networks, decision trees, support vector machines (SVM), clustering, Bayesian networks, and boosting. Examples of where machine learning is used are internet search engines, face detection on digital cameras, speech recognition software, stock market analysis, and artificial intelligence (AI) in games.
Traditional gesture detection with Kinect
Gesture detection using data from the Kinect Sensor is not a trivial problem to solve. As an example, look at the following code that could be used to implement the detection of a punch gesture.
  if ( vHandPos.z - vShoulderPos.z > fThreshold1 &&
       fVelocityOfHand > fThreshold2 ||
       fVelocityOfElbow > fThreshold3 &&
       DotProduct( vUpperArm, vLowerArm) > fThreshold4 )
  {
      bDetect = TRUE;
  }
It is a very simple detection that can easily work in an optimal environment, but even this simple piece of code has four thresholds that need to be manually found, fine-tuned and maintained. For detections to work reliably for a wide variety of different players in a wide variety of different play areas, the code becomes much more complex very quickly as more code is added to handle additional complicating factors. Some of these factors are that different skeleton data is produced when wearing different clothes, or when the Kinect Sensor is at different heights and angles, and some joints might be occluded due to objects in the room—for example, by a coffee table. This is evident in the large number of lines of code that must be written to detect gestures in real world examples.
Table 1. The number of lines of code used for gesture detection in real-world examples.
| Detector | Lines of source code |
|---|---|
| Wave | 550 |
| 360 degree turn | 500 |
| Jump and duck | 2000 |
| Crumpling skeleton | 2500 |
| Kinect Sports: Boxing | 950 |
Some of the challenges with the traditional approach of implementing gesture detection by examining data from the Kinect Sensor are:
- It’s a time-consuming engineering task, requiring many lines of code.
- Kinect data is complex—for example, twenty-five 3D joint positions with low precision.
- Determining the best detection thresholds can be difficult.
- Latency is always added, since previous frames of data need to be examined.
Visual Gesture Builder
Visual Gesture Builder (VGB) is a tool that provides a data-driven solution to gesture detection through machine learning. This essentially means that gesture detection is turned into a task of content creation, rather than code writing. It is a task that non-engineers can perform—for example designers, animators, and technical artists. A small gesture database is built using VGB, and using the database has very low run-time costs in terms of memory overhead and CPU processing.
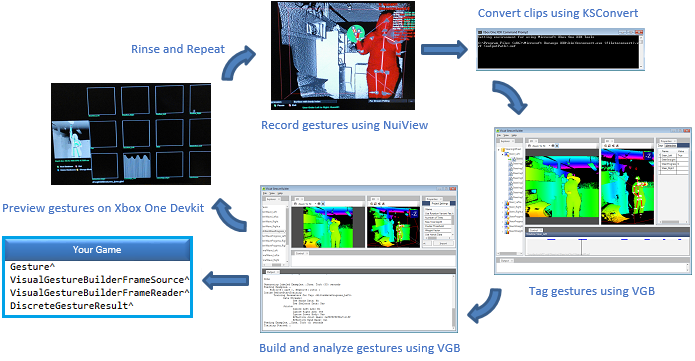
Creating a gesture detector using VGB is very simple. First, because the process is data-driven, you record players while they perform the gestures that you are interested in detecting. Raw recordings can be created by using NUIView, and then they can be converted to processed clips using KSConvert. Next, you give meaning to the data by using VBG to tag or label all of the frames in the recordings that define a gesture.
Once tagging is complete, you can build the gesture detector. VGB uses machine learning to build a database that can be used at run time in your title. A live preview tool, VgbView, enables you to iterate quickly over gestures for fast prototyping. For more information about using VGB during run time, see the API reference for the Microsoft.Kinect Namespace in the Xbox One XDK documentation.
Figure 1. The data-driven process of creating a gesture detector using VGB.
Machine learning technologies
Various machine learning technologies are available in VGB. They are grouped into two categories: discrete indicators and continuous indicators.
A discrete indicator—for example, AdaBoost Trigger—is a binary detector that determines if a player is performing a gesture and the confidence of the system in that gesture. A continuous indicator—for example, RFRProgress—shows the player’s progress while he or she performs a gesture, showing, for example, 50% done with the gesture.
While the majority of your game’s gestures will likely be discrete, continuous gestures can be helpful for combining multiple gestures to form a complex whole, such as mapping three discrete gestures—for example, BackSwing, ForwardSwing, and FollowThrough—to one continuous gesture—GolfSwing.
Figure 2. ”Punch_Right” is a discrete gesture indicating that the player is in the process of performing the gesture. PunchProgress is a continuous indicator, in this frame indicating that this is the last frame of the gesture—that is, 100% done with the gesture.
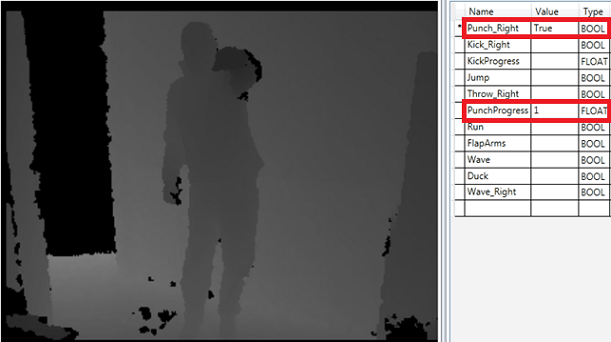
Unless they are disabled, continuous gestures always provide feedback to the game. This signal might be confusing if you don’t have at least one discrete gesture to help interpret it.
Discrete and continuous indicators can be combined in creative ways. One example is to use a discrete gesture to determine context. For example, a playable character in the game is able to walk, run, and jump. A simple approach to using gesture detection to control the character is to use discrete gestures to determine when a person is walking, running, or jumping. The playable character can therefore be controlled using gesture input, but only in a binary way-that is, the player is either walking or not.
Combining this with a continuous indicator can add a whole new level of a person connecting with the playable character, making the person feel that he is the playable character instead of feeling that he is controlling the playable character. Since the discrete gestures can be used to determine context, only the continuous gesture for the currently active context needs to be run. The results of the continuous indicator can be used to blend character animations appropriately so that when a person is walking slowly, the playable character is walking slowly, which provides a more natural feel to the game.
Collecting data
The recommended process of collecting data is to use NuiView to record raw IR data, then convert the files by using KSConvert to the processed Xbox event file (XEF) format—that is, processed IR data, depth data, and skeletal data. You should record members of your target audience—individually—while they play a prototype of your game in different play spaces, under various tilt angles of the Kinect Sensor, and while they are wearing a variety of clothes.
Data to record
We recommended recording raw files via NuiView to take advantage of any future changes made to the depth/skeleton tracking system. If raw recordings are not an option due to storage or length limitations, you must record the following processed NUI streams: Depth, IR, BodyFrame, Opaque Data and Calibration Data. Processed streams can be recorded from NuiView or Kinect Studio, or by using the IKStudioRecording Interface.
Whenever improvements are made to skeletal tracking in the XDK, the same depth data will produce different skeletal data. When you record the Xbox raw format (XRF), you can convert the file by using KSConvert to generate the latest streams—IR, depth, skeleton, opaque, and so on. The newly converted files can then be used in your training set to generate a gesture database that will work with the latest skeleton/depth tracking system.
In many cases, simply looking at depth or skeletal data won’t reveal the intentions of the players; however, by also looking at IR data, players’ intentions can be determined. Since this is a data-driven system, it is essential to tag frames correctly. So, make it easier for the people doing the tagging to interpret the recordings by including IR data.
Target audience
Although you need to include a diverse variety of people for generalization and criteria selection in training, it is important to define your game’s target audience. It could be teenagers, small children, adult males, the whole family, and so on. Make sure that this group of people is well represented when doing data collection—don’t develop a game targeted at small children and mainly use gesture recordings of adults. Try to include people of various body compositions within your training set, too, because they may perform gestures differently due to their heights or weights.
Record players individually
When you record players, record them individually, since people are easily influenced in the way they perform a gesture when they see how others perform the same gesture or when many other people are watching as they perform a gesture. It is best to have recordings of the widest possible range of ways that people perform relevant gestures in their own ways, since wide variety is what your title will encounter in the real world.
What gestures to record
Ideally, you record players while they are playing a prototype of your game, since people perform a gesture differently when asked to perform a gesture versus interacting with an actual game. For example, telling a person to “show me a punch gesture” has a different result than asking “please punch the boxing bag”—people perform differently in these contexts, though the fundamental gesture may be the same.
Also, define the gestures that you want to detect during game play. For example, if it is a boxing game, you probably want to detect punches and blocks. These are defined as positive examples because they are the gestures that you are aiming to detect. However, and most important, you must also think of negative examples. Determine which motions cause problems for detection, such as false positives, and include them as negative examples for training. For example, a throw gesture might look very similar to a punch, since the hand and elbow move forward in both cases, but the two movements are actually slightly different.
In general, including negative examples in training data reduces false positives, and this leads to a better user experience. Therefore, we recommend that you record many more negative examples for your training data than positive examples. It is usually a good practice to treat all remaining gestures for your game as negative examples during training. For example, a kick gesture can be treated as a negative example when training a punch gesture.
If you do not have a prototype to use, try recording a mixture of gesture scenarios. Have the player repeat gestures often and mix their ordering, because the skeleton might behave differently when the player is performing a gesture immediately after another gesture, in contrast to performing the gesture after standing still. For example, if you create gestures for a kick-boxing game, you might make several recordings of the player punching left and right, a set of clips with the player kicking left and right, and a set that includes alternating kicks and punches.
Use a variety of play spaces and sensor tilt angles
Although the algorithms in VGB operate mostly on tilt-corrected skeletal data that is local to the player space, it is important to record players in different play spaces, and with different heights and tilt angles of the Kinect Sensor. The main reason for this variety is that skeletal tracking produces different skeletal data at different tilt angles and sensor heights, because body joints are differently observed by the Kinect Sensor. For example, a joint might be occluded from one angle but not from another. Furniture can also introduce occlusions that can change the result of skeletal tracking. Therefore, we recommend that, for each person recorded, the Kinect Sensor be slightly moved from its previous location.
Try to re-create the user’s play space and position the sensor in a logical location—centered above or below the TV. Record the user at various distances from the sensor. If the gesture can be performed in a sitting position, be sure to include a variety of seating options and postures. If the game supports multiple players, then there is a good chance that the player will not be centered during gameplay, so be sure to record players positioned to the left and right of the sensor as well.
Variety of clothing
Make sure to record people wearing a variety of clothing—for example, skirts, dresses, tank tops, shorts, pants, and wool sweaters. Wearing different types of clothing can produce different skeletal data, even for the same person. Be sure also to record people wearing the clothing that your customers wear, rather than only what you are accustomed to seeing and wearing. For example, if you are a developer in Florida, chances are that you see short-sleeved shirts and sandals all year round, clothes that people in Belgium would consider wearing only during summer. However, if your game will be played by both Floridians and Belgians, your gestures need to work regardless of clothing type.
Testing data versus training data
It is important to understand that the accuracy of the machine-learning algorithm cannot be measured by testing it on the same data that it has been trained with. In other words, do not use training data for testing purposes. For this reason, whenever a gesture project is created in VGB, two projects are created: one for building/training and one for analyzing/testing the gesture. An example of how to apportion data into different sets is to use 66% of data for training and 33% for testing.
How much data is enough?
When you’re creating a gesture prototype, a small set of training clips (10–20) might prove sufficient, but such a gesture would quickly break down if it is released to the real world. How much data is required is not a question that has the same answer for every gesture. For example, one gesture might prove reliable with 100 training clips, but a second gesture could require a thousand. So, rather than asking how much training data is needed, the question should be: “How can I establish that I have enough training data for a gesture?”
To answer this question requires counting false positives and false negatives. An example of a false positive: a player performs gesture B, but gesture A is detected. An example of a false negative: a player performs gesture A, but detection fails to identify that gesture A has been performed. These two errors represent two different values that need to be interpreted separately—the one is not the inverse of the other. Building and analyzing gestures, later in this paper, explains in detail how to build a gesture, and then how to test or analyze it. The results of this analysis provide the count of errors from false positives and false negatives.
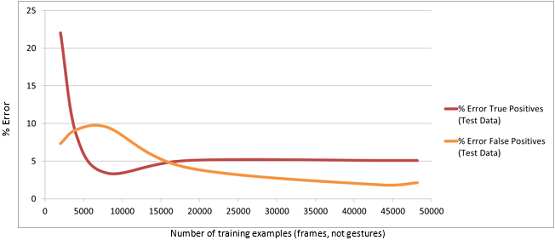
To understand whether you have enough data, you need to track how the values for false positives and false negatives change as you add new training data. In the graph in Figure 3, you can see that with very few training examples, the error rates are high, but as you add more training examples, the error rates go down. The interesting part is that, at some point, the error rates simply stay the same, no matter how many more training examples are added. When both values for false positives and false negatives start to flatten out at a low error rate, it is safe to assume that you have enough data in the training set. You can also use other measurements—for example, precision, accuracy, and recall.
Figure 3. Error rate in false positives and false negatives, graphed against the number of training examples, is a good indication of when you have enough training data.
Tagging data
Tagging recorded data is the most time-consuming part of creating a gesture detector with VGB, but it is the most important step. Tagging plays a huge role in the results, since VGB uses a data-driven approach—in other words, “garbage in, garbage out”. The following are a number of best practices to following when tagging data:
- Keep gestures simple
- Avoid over-labeling
- Separate gestures from poses
- Reduce latency
- Be consistent
- Specify Left or Right gestures
- Verify tagging
- Use keyboard shortcuts
Keep gestures simple
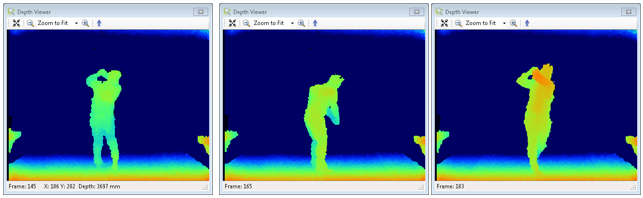
Break complex gestures into smaller sub-gestures and build multiple detectors. For example, a golf swing can be broken up into three gestures: a back swing, a forward swing, and a follow through. Detecting cyclic gestures—like walking, rowing, and waving—is almost always more reliable when detection is divided into two simple gestures. For example, to detect a wave, have one detector for when the hand is moving leftward and another for when the hand is moving rightward.
Figure 4. How a golf swing can be broken up into three simpler gestures. The first image shows a back swing; the middle image shows the forward swing with the golf club making contact with the ball; and the last image shows the player’s follow through.
Avoid over-labeling
Tag all of the frames that make up a gesture, but only tag the core portion of the gesture. Try to find the canonical motions that uniquely represent an action. For example, when you tag a jump gesture, it’s best not to include the frames where the player is getting ready to jump—for example, moving downward. Rather, tag only the frames where the player is starting to move upwards until he reaches the apex of the jump, where his body is no longer moving upward. In general, avoid tagging preparatory or recovery motions.
Separate gestures from poses
Don’t mix and match frames from static poses with dynamic gestures. For example if you want to detect a jump gesture, tag the frames of the player in which he or she is moving upward; don’t include frames in which the player is getting ready to jump and might be in a static pose. On the other hand, if your gesture is a static pose, like glide, tag only the frames where both of the player’s arms are fully extended, not those where the player is moving his or her arms up or down to get into position.
Reduce latency
Latency can be significantly reduced by tagging gestures earlier in a sequence of frames, rather than only tagging when the gesture finishes. Determine the point in the sequence when the player is committed to performing the gesture, and use that frame as the starting point for tagging the gesture. For example, the starting point for a punch gesture could be when the player is leaning forward to punch, but his hand is still close to his shoulder.
Figure 5. An example of how early a punch gesture can be tagged to reduce latency. All these frames include joint information of the player intending to do the punch, and therefore all of the frames are tagged as a punch.

Be consistent
It is important to tag different examples of the same gesture in a consistent manner; that is, the starting points and the end points should be tagged in approximately the same places throughout the recordings. In some cases, it might be hard to understand the player’s intention by looking only at depth or skeletal data, and in such cases, examining the IR data might make tagging much easier.
Specify Left or Right gestures
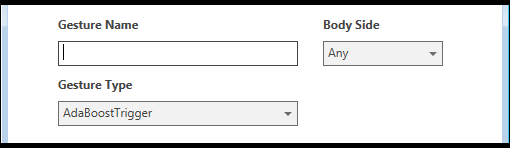
When you create a project, an option called Body Side can be set to the value Left or Right. If the gesture to be detected can be performed on either side of the body or in either direction, we recommend setting a value for Body Side; doing so means that your data and tags can be mirrored, doubling the size of your data set for training.
For example, most people are right-handed. When you record and tag a punch gesture, you will have less training data for left-handed players than for right-handed players. If your project has Body Side set to Right, VGB can use all the training data from right-handed punches as training data for left-handed punches by mirroring the data.
Figure 6. The “Body Side” option, which specifies on which side of the body, or in which direction, a gesture is performed.
Verify tagging
It is crucial to verify that data is tagged correctly. Any gesture that is untagged will be used as a negative example during training. This confuses machine learning, because the machine is shown examples of what the gesture looks like—tagged, positive examples—and then it is shown examples of what the gesture does not look like—untagged, negative examples. It is also possible that a gesture could be marked with the wrong gesture tag. We recommend that a quality assurance (QA) team approve tagged data before it is added to a training set.
VGB can be used to automatically find errors in tagging. The following procedure can find errors where gestures were not tagged or where gestures were tagged with a wrong label.
- Add all tagged recordings to the build project
- Add all tagged recordings to the analysis project
- Build the gesture
- Analyze the gesture
- Visually inspect the analysis for
- Frames that were detected but not tagged
- Frames that were not detected but tagged
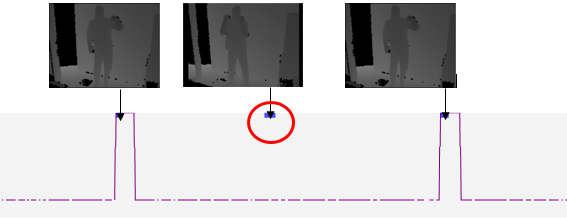
Since, for this type of verification only, training and testing are done using the same data, we expect the detector to be near 100% correct during analysis. Having any frames where the tags do not match the results of the detector is a strong indication of incorrect tagging. For example, analysis detects a Punch_Left gesture between frames 100-110, but these frames are tagged as a Punch_Right or not tagged at all. Visually inspecting the recording will reveal if the detector or the tag was wrong.
Figure 7. An example of using VGB to verify correct tagging. The analysis indicates that the detector detected two gestures, indicated by the two purple peaks. But three gestures were tagged, indicated by the horizontal blue lines. Visual inspection of what the player actually did indicates that the detector is actually correct, and the tag in the middle is incorrect.
Use keyboard shortcuts
Since tagging is a time-consuming process, make sure that taggers know about the keyboard shortcuts. Using these shortcuts could significantly reduce tagging time. For a list of the shortcuts, see Visual Gesture Builder Timeline, in this Xbox One XDK documentation.
Building and analyzing gestures
After tagging data, you can build either a solution or just one gesture project. During the building process, the appropriate machine-learning algorithm processes the tagged data. This creates a gesture database which can be loaded into your game at run time.
The log files contain some interesting information. For example, from the log file in Figure 8, you can see that the angle velocity between the spine, shoulder center, and left shoulder is actually a good indicator for a right punch. If you looked only at the top classifier, you can interpret this as:
  if ( AngleVelocity( Spine, ShoulderCenter, ShoulderLeft ) > 0.5f )
  {
  	bRightPunchDetected = TRUE;
  }
Therefore, in the case of the AdaBoostTrigger, you can actually do knowledge extraction from the log files to implement your own gesture detection.
Figure 8. A portion of the log file from an AdaBoostTrigger project that indicates the top 10 weak classifiers defining a particular gesture.

To test how well the detector fares, you can test it at run time by using Live Preview in VGB (available on the File menu), which runs the detector in VgbView on the Xbox One development kit and is very useful for fast prototyping.
Another way of testing is to use the analysis project, which runs the detector on the PC. The biggest advantage of using the analysis project is that you can compare the results of multiple builds; for example, you can determine if adding more training data really improved the detector.
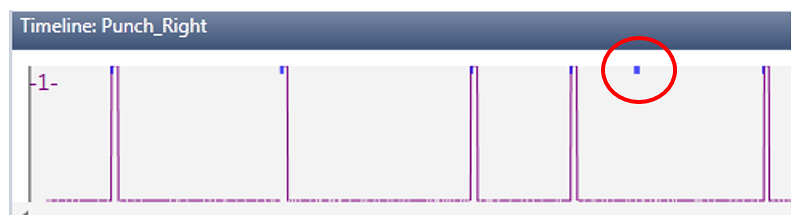
Figure 9. An example of the analysis of a gesture where five tagged gestures (blue lines) are correctly detected (purple peaks) and one is not.
For more information about the analysis project in VGB, see Visual Gesture Builder Analysis Project, in the Xbox One XDK documentation.
Tips and tricks
Efficient tagging
To tag efficiently, make sure you know all of the keyboard shortcuts for VGB. The shortcuts that you’ll probably use most often are those in the following table.
| Key stroke or combination | Action |
|---|---|
| Shift + Left ArrowShift + Right Arrow | Selects a range of frames to tag. |
| Enter | Sets the default maximum value. |
| Delete | Deletes the selected range or a single frame. |
| Ctrl + Left ArrowCtrl + Right Arrow | Moves the cursor to the previous or next frame. |
| Page Up/Page Down | Selects the previous/next attribute in the Tags grid as the active attribute. |
Some shortcut keys can also be combined. For example, by pressing Shift + Ctrl + Left Arrow/Right Arrow, you can quickly select multiple frames between tagged gestures; Shift selects the frames and Ctrl jumps to the next/previous tagged gesture.
If you have a discrete detector (AdaBoostTrigger) and continuous detector (RFRProgress) for the same gesture, this is the most efficient tagging process:
- Tag all the frames for the discrete gesture. This will determine the start and end frames.
- Press the Home key to move the cursor to the first frame in the clip.
- For each instance of the gesture, do the following:
- Press CTRL + RIGHT to jump quickly to the beginning of the gesture.
- Press PAGE UP/PAGE DOWN to select the continuous tag for this gesture.
- Press SPACEBAR to assign a value of 0.0 progress to the beginning of the gesture.
- Press PAGE UP/PAGE DOWN to select the discrete tag for this gesture.
- Press CTRL + RIGHT ARROW to quickly jump to the end of the gesture.
- Press PAGE UP/PAGE DOWN to select the continuous tag for this gesture.
- Press ENTER to assign a value of 1.0 progress to the end of the gesture.
Since the tags are created in XML files, you could easily write your own tools to automate this or a similar process.
Use training settings
When used correctly, training settings can greatly improve the reliability and robustness of gesture detection. During the process of gesture creation, several training options are available in the creation dialog.
Figure 10. Basic “Training Settings” that are available when you create a new gesture project.
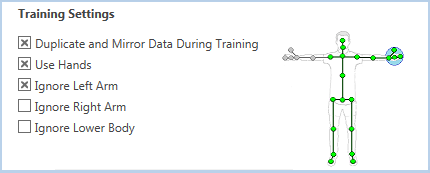
Think about your gesture carefully. Which parts of the body are integral to the gesture? Which body parts would be better to ignore? By ignoring a body area, you provide the player with more flexibility and make your gesture more robust. For example, if your gesture depends mainly on the upper body, then selecting Ignore Lower Body will allow that gesture to be detected when the user is standing, seated, crouched, or when their legs are occluded by furniture, and so on.
If you are confused about which training settings to use, try creating your gesture by using the Gesture Wizard, available in the Create New Project dialog, located on the File menu. This tool provides a step-by-step guide to help you learn more about the basic training properties and when to use them. You can modify existing settings in the gesture’s property panel after creation.
Reduce training time
Depending on how much training data you have and the type of hardware your training computer has, training times for AdaBoost Trigger can potentially be long. There are, however, a few easy things you can do to reduce training times.
Training a gesture database can be shared across multiple machines by having each machine build individual gesture projects with the command-line option -build. Once all projects are complete, they can be combined into a single database by using the command-line option -join.
AdaBoost Trigger has a project setting, Accuracy Level, that you can specify when configuring a project. This project setting controls the accuracy threshold that must be reached as a result of machine learning. Therefore, it affects how long training will take by stopping the search for weak classifiers when a certain error metric has been reached. For more information about Accuracy Level, see AdaBoostTrigger Machine Learning in the Xbox One XDK documentation.
You can also exclude from training meaningless data—for example, a player standing idle for a long time—by marking all training frames as TRUE or FALSE. VGB clip files that have discrete gestures tagged only with TRUE values assume that all non-tagged frames are FALSE during training. However, if a clip file contains TRUE and FALSE values, all frames not tagged will be excluded during training.
Another way to reduce training time and run-time cost is to mirror a gesture—for example, a right-handed golf swing could be used as a left-handed golf swing by mirroring the data. The HorizontalMirror property of VisualGestureBuilderFrameSource can be used to mirror the skeletal input data at run time. Essentially, you halve your training time by using this functionality, because you only have to train for one side, and at run time, you can use the same database for both sides or directions.
Command-line options
Since VGB turns the problem of writing gesture detectors into content building, you might want to build gestures overnight, on a daily basis, with other content. Options for building and analyzing gestures, joining or splitting gesture databases, and listing the contents of a database are available from the command line. These options can be used from the command prompt or in batch files and scripts; for more information see VGB Command Line Options, in this XDK documentation.
Pros and cons
Visual Gesture Builder provides many benefits, but using it also has some costs. Consider the following pros and cons in assessing VGB for your project.
Pros
- Gesture detection is created and handled as content, rather than being a time-consuming engineering task.
- Gestures can be quickly prototyped and evaluated before any code is written.
- Non-engineers can create gestures—for example, designers, animators, technical artists and testers. No knowledge of machine learning, skeletal tracking, or programming is required.
- High accuracy for detecting gestures can be achieved, even in cases where skeletal data is very noisy, such as sideways poses.
- By tagging data appropriately, perceived latency can be made very low.
- The run-time costs to CPU and memory are low—on magnitudes of microseconds and kilobytes.
- The database size is independent of the amount of training data.
- There are very few thresholds to tweak and maintain.
- Live Preview (VgbView) enables fast iteration times for easy prototyping and testing.
- VGB provides a free, automatic test framework for gestures; that is, no extra engineering work must be done to test gestures, as in the traditional implementation of gesture detectors.
- A simple API is provided by the XDK.
- As tracking in the XDK improves, you can convert your clip files to work with the latest advances in depth and skeleton.
Cons
- Tagging data is time-consuming—but at least it’s not an engineering task, and therefore, you can outsource tagging.
- You require a powerful PC for training, but most studios already have a powerful PC for building other types of content.
- You require lots of disk space for storing raw (XRF) and processed (XEF) recordings, but luckily, hard disk drives are becoming cheaper.
Conclusion
Using traditional methods to create gesture detectors for Kinect is not a trivial task to do robustly. Visual Gesture Builder makes this a simple task, enabling developers to be more productive and raising the quality of Kinect games, with better gesture detection and reduced latency. Since tagging plays a huge role in obtaining good results, it is worth investing in a quality assurance team to approve data before adding the data to a training set.
References
Presentations
The following presentations are available from Download Center:
- Innovative Solutions to Gesture Detection — Claude Marais and David Quinn, Game Developer Conference 2012.
- Gesture Detection using Machine Learning — Claude Marais, Gamefest 2011.
- Building Great Gesture Detection — Claude Marais, Game Developer Conference 2011.
- Xbox Studio Deep Dive: Designing, Debugging and Testing Your Kinect Title — Claude Marais, Game Developer Conference 2011.
Xbox One XDK
The Xbox One XDK includes detailed documentation about VGB’s interface and associated machine learning technologies. The following samples and tutorials are also available:
- Sample: Simple NUI Gesture from Samples on XGD.
- Tutorial: Building a Gesture Detector, in this XDK documentation.