Set up Service Configuration for a Title (end to end)
Service configuration for an Xbox One title is the collection of all of the configuration data provided by the developer of the title.
This topic provides an overview of the data that is included in a title’s service configuration by using the Xbox Developer Portal (XDP), and also instructions on how to set up service configuration for a title.
Sections in this topic:
- Access service configuration
- Create an event
- Create a stat rule for an event
- Create a Hero Stat
- Enable a statistic for real-time activity (RTA)
- Configure Contextual Search
- Create an achievement
- Create a reward for an achievement
- Create a rule to unlock an achievement
- Create a multiplayer session template
- Create a matchmaking hopper for a multiplayer session template
- Add an optional rule to a matchmaking hopper
- Create a tournament definition
- Create a leaderboard
- Create a Rich Presence string
- Create a Game DVR string
- Create a set
- Configure Storage
- Configure the Network Security Authorization List
- Configure Access Policies
- Configure Localized Strings
- Configure community managers
- Compare product instance data for one or more sandboxes
- Publish the service configuration
- Additional notes
Access service configuration
To access the service configuration for a product instance
- Expand the left-hand menu for the product instance and click Service Configuration.
Create an event
To create a new event
- On the Service Configuration Tasks page, click Events & Stat Rules.
- On the Events & Stat Rules page, if the Add New Event dialog box is not already displayed, click New under Events to display it.
- In the dialog box, specify the values that you want for the fields described in the following list.
- Base Event - Select the base event from the drop-down list on which you want to build your new event.
The base event that you select will control the default fields with which your new event is prepopulated.
You can add any other fields that you want, but the default fields can’t be removed. - Event Name - Enter a name that characterizes the event, and that you will easily remember and recognize.
The event name isn’t required to match the name of the base event that you selected for the new event.
Event Names aren’t displayed to the gamer. They are internal to the code and game studio only.
For requirements about event names, provider names, and field names, see the “Xbox Data Platform: Event Design Best Practices” topic under “Xbox Live and Online Services” in the Xbox One XDK documentation.
Event names must be unique within a provider namespace. That is, a single provider can’t have two conflicting event names. - Description - Enter a brief description of the event.
This text is not visible to the gamer, and entering a description is optional. - Event Fields - The fields in this list represent the data that will be captured in connection with the new event.
To add an event field, click Add Event Field, specify the Field Name, the Data Type, and optionally a Set Name, and then click Add Event Field to add the field and close the dialog box. Note You can only specify a Set Name if the publisher has specified it and the set has already been created. If so, select it from the drop-down combo box.
The new event field is displayed in the list, with controls for editing and deleting the event field and also for moving the field up and down in the list.
Note You can’t move an added event field up into (or above) the list of default, prepopulated event fields.
- Base Event - Select the base event from the drop-down list on which you want to build your new event.
- When you have all of the fields and values for your new event the way that you want them, click Add Event to create the event and close the dialog box.
Your new event is now listed on the Events & Stat Rules page.
Create a stat rule for an event
To create a new statistic rule
- On the Service Configuration Tasks page, click Events & Stat Rules.
- On the Events & Stat Rules page, under Events, click the event for which you want to create a new statistic rule.
Important Ensure that the event that you clicked is selected (highlighted) before you continue.
- Under Stat Rules, click New.
- In the Add Stat Rule dialog box, specify the values that you want for the fields described in the following list.
- Stat Rule Name - Enter a name that characterizes the statistic rule, and that you will easily remember and recognize.
Names of statistic rules are composed of a root name; optionally followed by one or more fields separated by the dot character. For the naming requirements of statistic rule names, see the “Configuring User Statistics Rules” topic under “Xbox Live and Online Services” in the Xbox One XDK documentation. - Open read access to any title - Check this box to make the statistic rule public and available to web clients such as SmartGlass.
- Fields added to the stat rule name - Click the first field for this event in the drop-down list, then click Add Event Field to add it to the list. This is optional.
To add more fields, again click a field in the list and then click Add Event Field.
You can delete a field by clicking on the trash can icon next to its name, and move a field up or down by clicking on the up and down arrows. - Operator - Select one of the following operators:
- Sum - Increment the statistic-instance value by the value entered in the Parameter field here.
- Min - Of the statistic-instance value and the value entered in the Parameter field here, use the lower.
- Max - Of the statistic-instance value and the value entered in the Parameter field here, use the higher.
- Replace - Replace the statistic-instance value with the value entered in the Parameter field here.
Note We recommend that you do not use the Replace operator for statistics driving achievements, because events are not processed in order. This fact might cause the achievement to never unlock, so use the SUM operator instead. - Sum - Increment the statistic-instance value by the value entered in the Parameter field here.
- Parameter - Specify the value to be used in the operator selected in the Operator field.
You can use either an integer (+1) or data from the inside of the event payload. For example, use the “FinalScore” field as the value of the stat.
- Stat Rule Name - Enter a name that characterizes the statistic rule, and that you will easily remember and recognize.
- When you have all of the fields and values for your new statistic rule the way that you want them, click Add Stat Rule to create the statistic rule and close the dialog box.
Your new statistic rule is now listed on the Events & Stat Rules page whenever its event is selected.
Create a Hero Stat
To create a new Hero Stat
- Click on the Hero Stats & Game Progress pane on the Service Configuration page.
This should open a new Hero Stat entry screen if this is your first one. Otherwise, it will show a list of current Hero Stats for your product. If you have created Hero Stats previously, click New. The Add New Hero Stat window will pop up. - Enter a new, localizable Display Name for the Hero Stat. This is the string that is displayed to the user, so make it readable.
- Under Stat Instance, click Select an Instance, which will open the Add Stat Instance window, and select a Stat Rule from the list to use as the Hero Stat. You can edit the Stat Instance by clicking the pencil icon next to its name. Ensure that it is a value that can be easily sorted, especially if it will have an Ordinal of 1.
For info about selecting a statistic instance, see Selecting a Statistic Instance (Service Configuration).
Note If you have not previously set up your Stat Instances, this dropdown list will be empty. Before you create any Hero Stats, configure your Stat Instances. - Provide an Ordinal value for the statistic. The Ordinal value is the display priority, with the most important Hero Stat set to 1. You can’t have the same Ordinal value for two Hero Stats.
- Choose the Sort Order for the Hero Stat from the list. The choices are Ascending order and Descending order. Indicate Ascending if LOWER values are better, or Descending if HIGHER values are better.
- When you’ve finished configuring the Hero Stat, click Add New Hero Stat.
Enable a statistic for real-time activity (RTA)
Before you start, you must have used the following methods in your code to connect to the RTA services:
- ConnectToRealTimeActivity
- SubscribeToStatistic
- UnsubscribeFromStatistic
- OnRealTimeActivitySocketDisconnect (callback)
To enable a stat for RTA
- Click the Real-Time Activity Stats pane on the Service Configuration page for your sandbox, or click Real-Time Activity Stats from the left-hand menu.
This should open a new Add Real-Time Activity entry screen if this is your first one. Otherwise, it will show a list of current Real-Time Activities for your product. If you have created RTAs previously, click New. - Click Select an Instance under Stat Instance in the Real-Time Activity dialog box.
This will prepare a drop-down list with the Stat Rules defined for your product.
Note If you have not previously set up your Stat Rules, this drop-down list will be empty. Before you enable any statistics for RTA, configure your Stat Rules. - If the statistic rule you’ve selected is a templatized statistic, you must provide the details for the template, such that a statistic instance is specified (not the generic rule).
When you’ve finished defining the statistic instance you want enabled for RTA, click Add Stat Instance. - You can change the selected Stat Instance by clicking the Edit icon. After you have the right Stat Instance, click Add Real-Time Activity.
Configure Contextual Search
Configuring your title for contextual search is easy once you’ve set up the events and stats that power the tagging. See other existing XDP documentation on setting this up if you’re not already familiar.
To configure your title for contextual search, follow these steps:
- Navigate to the product instance, either by clicking its name in the left-hand navigation menu or in the table under Product Instances on the product main page.
- Click Contextual Search in the left-hand navigation menu.
Note Even if this is the first time you’ve visited this page, it’s possible that you will see stats already configured for contextual search. This is because all your hero stats are automatically set up for contextual search. You’re not required to keep these hero stats in your configuration, but they are generally excellent for sorting (and already done for you).
On this page, each of the stats is represented in the following manner:
Priority - Display Name (Stat Instance Name)
Each of these will be explained in more detail in the next section. - Click the green plus icon labeled New to add new a new stat for contextual search, or click the pencil icon next to an existing stat to edit it.
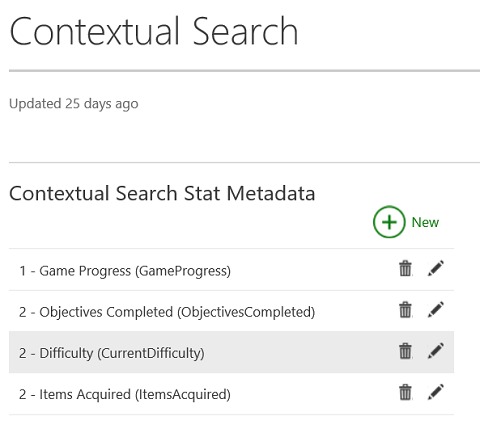
The image above is an example of the contextual search page.
Note Presently, the maximum number of stat instances you can configure for contextual search is 10. - Choose your stat instance. Click Select an Instance if you are adding contextual search metadata, or click the pencil icon next to the stat instance if you are editing contextual search metadata.
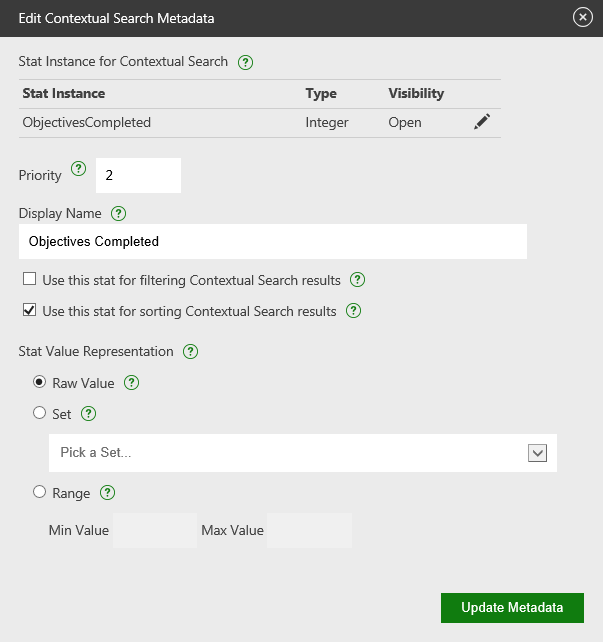
The above image is the screen that will appear if you choose to edit an existing contextual search stat.
The Add Stat Instance or Edit Stat Instance dialog box will pop up. Then select a stat rule from the drop-down menu and click the green button (labeled Add Stat Instance or Edit Stat Instance, respectively).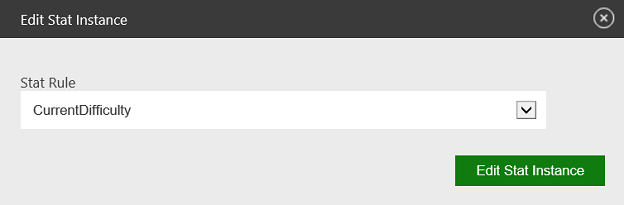
Note Only stat instances are supported - stat templates are not accepted. You should also be aware of the visibility you’ve set for the stat instance (configured in the Events & Stat Rules portion of XDP). Only stats that are marked as Open will appear in third party experiences. - Choose your stat Priority. This is a way to delineate the importance of this stat relative to others for search experiences/algorithms. The acceptable values are 1-10 (1 being the highest). Leave as 0 or blank for this to be ignored.
- Add your Display Name. This is a localizable string that is exposed to the end user.
- Check whether you will use this stat to Filter or Sort the results. You can check both in certain instances (if the value of the stat is a number - preferably in a defined Range).
- Choose how your stat value is represented. In this case you have 3 options:
- Raw Value - The stat is represented as is and has no range requirements. This is best used for sorting.
- Set - The values are mapped to individual localizable strings. This is best used for filtering. For more on sets and how to configure them, see Configure Sets (Service Configuration).
- Range - The values fall within a min and max range. This type is great if you want to filter and sort from this data.
- Click the green button at the bottom labeled Add Metadata if you are adding contextual search metadata or Update Metadata if you are editing. XDP will save your metadata and if there are any errors they will show up in red.
For a more in-depth look at contextual search, see Configure Contextual Search (Service Configuration).
Create an achievement
To create a new achievement
- On the Service Configuration Tasks page for the sandbox, click Achievements & Challenges, or click on Achievements & Challenges from the left-hand menu.
- On the Achievements & Challenges page, if the Add New Achievement dialog box is not already displayed, click New under Achievements to display it.
- In the following fields, specify the values that you want.
- Achievement Name - Enter the name for the achievement.
This text will be visible to users.
Maximum string length is 44 characters. - Description - Enter the description of the achievement when it is unlocked.
This text will be visible to users.
Maximum string length is 100 characters. - Not Achieved Description - Enter the description of the achievement when it is locked.
This text will be visible to users.
Maximum string length is 100 characters.
If the Hidden check box is selected, then this description will not be displayed in the list. - Unlocking Product - Specify the product required to unlock the achievement. This is typically the core game; however, some achievements may only be earnable within the DLC.
This field is used to distinguish achievements across the game’s products for user informational purposes. - Achievement Icon - Specify the achievement icon that serves as the visual representation or ‘badge’ of the achievement.
This image will be visible to users. It must be 1920x1080 pixels in size and in PNG format. The Xbox will automatically scale the image to thumbnail size when the user is viewing the achievement list, but selecting any individual achievement will set the image as the background.
If the Hidden check box is selected, then this image will not be displayed in the list until the user unlocks it. - Hidden - Select this check box to prevent the Not Achieved Description and the Achievement Icon from being displayed to gamers in the list of possible achievements.
- Challenge - Select this check box to make this achievement available only during a limited, specified time period.
When this check box is selected, additional fields are displayed:
- Start Date (UTC) - Specify the date and time when the availability of this challenge begins.
- End Date (UTC) - Specify the date and time when the availability of this challenge ends. The end date cannot be more than 3 months after the start date.
- Promo Icon - Identify the promotional icon for this challenge. Required. The image requirement is 424x424 in PNG format.
- Start Date (UTC) - Specify the date and time when the availability of this challenge begins.
- Estimated Time - Specify the estimated time that it will take a gamer to accomplish this achievement.
This information is displayed on the Achievements dashboard. - Deep Link - You can use this field to provide a direct link to the achievement in your title.
- Achievement Name - Enter the name for the achievement.
- When you have all of the fields and values for your new achievement the way that you want them, click Add Achievement to add the achievement and close the dialog box.
Your new Achievement is now listed on the Achievements & Challenges page. You should now set up Rewards.
Create a reward for an achievement
To create a new reward for an achievement
- On the Service Configuration Tasks page, click Achievements & Challenges.
- On the Achievements & Challenges page, under Achievements, click the achievement for which you want to create a new reward.
Important Ensure that the achievement that you clicked is selected (highlighted) before you continue. - Under Rewards, click New.
- In the Add New Reward dialog box, in the following fields, specify the values that you want.
- Reward Type - Click the type of reward that you want to create.
The value selected here controls which other fields are displayed.
- Artwork - A piece of art that can be given to the user. Examples include game concept art and behind-the-scenes photos from a movie.
- Gamerscore - A specified amount by which the user’s gamerscore is incremented.
- In-App - A reward that is delivered by the title or app itself to the user. Examples of in-app rewards include: in-game currency, temporary statistic bonuses, free subscription access, early access to content, and access to special maps, characters, or other in-game items.
- Artwork - A piece of art that can be given to the user. Examples include game concept art and behind-the-scenes photos from a movie.
- Name - For artwork and in-app rewards only.
Enter the name of the reward.
This text will be visible to users.
Maximum string length is 57 characters. - Description - For artwork and in-app rewards only.
Enter a brief description of the reward.
This text will be visible to users.
Maximum string length is 90 characters. - Display Icon - For in-app rewards only.
Specify the art that is to be displayed on this achievement’s detail page. - Artwork - For artwork rewards only.
Specify the art that is the downloadable reward content for this achievement.
The image requirement is 1920x1080 in PNG format. - Value - For gamerscore rewards only.
Specify the amount by which to increment the gamer’s total gamerscore. - In-App Value - For in-app rewards only.
Specify the code, ID, or other value that instructs the title to deliver the in-app reward to the user.
- Reward Type - Click the type of reward that you want to create.
- When you have all of the fields and values for your new reward the way that you want them, click Add Reward to create the reward and close the dialog box.
Your new reward is now listed on the Achievements & Challenges page whenever its achievement is selected.
To learn more about working with rewards and reward scenarios, see Achievements: Rewards in the XDK documentation.
Create a rule to unlock an achievement
To create a rule that unlocks an achievement
- On the Service Configuration Tasks page, click Achievements & Challenges.
- On the Achievements & Challenges page, under Achievements, click the achievement for which you want to create a new rule.
Important Ensure that the achievement that you clicked is selected (highlighted) before you continue. - Under Rules, click New.
- In the Add New Rule dialog box, in the following fields, specify the values that you want.
- Rule Name - Enter the name of the achievement rule.
This name is used only for display purposes only within the tool, and will not be visible to users.
Maximum string length is 1024 characters. - Type - Select one of the following types:
- Basic - Achievement is unlocked when the gamer achieves the specified threshold.
- Leaderboard - Achievement is unlocked when the gamer is among the N best scores at the end of the challenge time window, where N is equal to the threshold.
The Leaderboard option is supported only for challenge achievements.
- Basic - Achievement is unlocked when the gamer achieves the specified threshold.
- Action - Select one of the following actions:
- Min - Achievement is unlocked when gamer achieves getting below the defined threshold.
- Max - Achievement is unlocked when gamer achieves getting above the defined threshold.
- Sum - Achievement is unlocked when gamer achieves or surpasses the defined threshold.
- Min - Achievement is unlocked when gamer achieves getting below the defined threshold.
- Threshold - Enter the value for the threshold to be referenced by the selected Action.
- Participation Type - This option is displayed only for challenges.
Select one of the following participation types:
- Individual - Only the individual user will contribute toward the completion of this rule.
- Group - The title’s community of users will contribute toward the completion of this rule.
- Individual - Only the individual user will contribute toward the completion of this rule.
- Add Statistic Instance to Rule - Specify the statistic instance or instances upon which the rule is based.
If multiple statistic instances are selected for a single rule, then the action is treated as a logical OR. That is, the rule is satisfied as soon as any combination of the statistic instances meets the threshold.
Click on Select an instance to launch the Add Stat Instance picker. You can use the drop-down list to select the statistic rule whose value will replace the token {#} when shown to the user. Click Add Stat Instance after you’ve selected the statistic rule.
For information about selecting a statistic instance, see Selecting a Statistic Instance (Service Configuration).
To add more statistic instances, use the same procedure.
- Format - StatRuleName.[EventFieldA].[Literal]
- Example - CurrentDifficulty OR EnemyDefeated.DifficultyLevelId.1
For more information, please contact your developer account manager (DAM) or refer to the XDK documentation.
- Format - StatRuleName.[EventFieldA].[Literal]
- Rule Name - Enter the name of the achievement rule.
- When you have all of the fields and values for your new rule the way that you want them, click Add Rule to create the rule and close the dialog box.
Your new rule is now listed on the Achievements & Challenges page whenever its achievement is selected.
You can add more than one rule to an achievement.
Multiple rules in a single achievement are treated as a logical AND. That is, the achievement will only unlock when all rules have been satisfied.
Create a multiplayer session template
To create a new multiplayer session template
- On the Multiplayer & Matchmaking page for the product instance, if the Add New Session dialog box is not already displayed, click New under Session Templates to display it.
- In the dialog box, in the following fields, specify the values that you want.
- Session Name - Enter a name that characterizes the multiplayer session template, and that you will easily remember and recognize.
The name must be a text string, with a maximum of 128 characters. - Contract Version - This value is auto-populated by the system and denotes the current system version of the JSON contract. Do not edit it.
- Session Template (JSON text) - Specify the JSON data that describes the different attributes associated with a multiplayer session.
- Session Name - Enter a name that characterizes the multiplayer session template, and that you will easily remember and recognize.
- When you have all of the fields and values for your new multiplayer session template the way that you want them, click Add Session to create the session template and close the dialog box.
Your new multiplayer session template is now listed on the Multiplayer & Matchmaking page.
Create a matchmaking hopper for a multiplayer session template
To create a new matchmaking hopper for a multiplayer session template
- On the Service Configuration Tasks page for the product instance, click Multiplayer & Matchmaking .
- On the Multiplayer & Matchmaking page, under Session Templates, click the session template to which you want to add a matchmaking hopper.
Important Ensure that the session template that you clicked is selected (highlighted) before you continue.
- Under Matchmaking Hoppers, click New.
- In the Add New Hopper dialog box, specify the values that you want in the following fields.
- Name - Enter a name that characterizes the matchmaking hopper, and that you will easily remember and recognize.
The name must be a text string, with a maximum of 256 characters. - Min Group Size - Specify the minimum acceptable number of players.
Minimum value is 2. - Max Group Size - Specify the maximum acceptable number of players.
Maximum value is 256. - Should Rule Expansion Cycles - The default value is 3.
The default value should not need to be changed for normal player populations.
- Name - Enter a name that characterizes the matchmaking hopper, and that you will easily remember and recognize.
- Adding rules to your matchmaking hopper is optional. To add rules, use the procedure in the following subsection.
- When you have all of the fields, values, and rules (if any) for your new matchmaking hopper the way that you want them, click Add Hopper to create the matchmaking hopper and close the dialog box.
Your new matchmaking hopper is now listed on the Multiplayer & Matchmaking page whenever its session template is selected.
Add an optional rule to a matchmaking hopper
To add an optional rule
- In the dialog box for the matchmaking hopper, click Add New Rule.
- In the Add New Rule dialog box, specify values in the first four fields.
- Rule Name - Enter a name that characterizes the matchmaking rule, and that you will easily remember and recognize.
The name is a text string with a maximum of 128 characters. - Allow Wildcards - Select this check box if you want to allow the use of the wildcard character (*) for matching.
- Rule Type - Select one option:
- Must - Any potential participant who does not satisfy all Must rules is eliminated from consideration.
- Should - To the list of potential participants who satisfy all of the hopper’s Must rules, the hopper’s Should rules are applied to identify the most appropriate participants.
- Must - Any potential participant who does not satisfy all Must rules is eliminated from consideration.
- Data Type - Select one option:
- Number - A numerical value. This value is usually derived either from the title or from user statistics.
- String - A text string. This value is usually derived from the title.
- Collection - Items, typically DLC, owned by potential participants.
- Quality of Service - The network type, bandwidth, and latency available to each potential participant.
- Total Value - The total value.
- Number - A numerical value. This value is usually derived either from the title or from user statistics.
- Rule Name - Enter a name that characterizes the matchmaking rule, and that you will easily remember and recognize.
- For instructions about filling out the remaining fields in the dialog box, refer to one of the following five tables.
The table that you use will depend upon the selections you made for Rule Type and Date Type.
Number data type (Must rules only)- Attribute Source - Specify the source of the attribute to be matched from the drop-down list box:
- Title Provided - The value for the Attribute Name is provided from the title.
- User stat instance - The value for the Attribute Name is derived from the selected user statistic rule instance.
- Title Provided - The value for the Attribute Name is provided from the title.
- Attribute Name - For Title Provided, type or paste the name of the element to be matched.
For User stat instance, click Select an Instance to launch the Add Stat Instance picker. You can use the drop down to select the statistic rule whose value will replace the token {#} when shown to the user. Click Add Stat Instance after you’ve selected the statistic rule.
For info about selecting a statistic instance, see Selecting a Statistic Instance (Service Configuration).
- Format - StatRuleName.[EventFieldA].[Literal]
- Example - CurrentDifficulty OR EnemyDefeated.DifficultyLevelId.1
For more information, contact your developer account manager (DAM) or refer to the XDK documentation.
- Format - StatRuleName.[EventFieldA].[Literal]
- Default Value - For number-based rules, this value is always 0 (zero).
- Flatten Method - Select the method for calculating the required value across the entire party.
Select Min (minimum), Max (maximum), or Average. - Max Diff - Specify the maximum acceptable numerical difference between the highest value and the lowest value in the match group.
Number data type (Should rules only)
- Attribute Source - Specify the source of the attribute to be matched from the drop-down list box:
- Title Provided - The value for the Attribute Name is provided from the title.
- User stat instance - The value for the Attribute Name is derived from the selected user statistic rule instance.
- Title Provided - The value for the Attribute Name is provided from the title.
- Attribute Name - For Title Provided, type or paste the name of the element to be matched.
For User stat instance, click Select an Instance to launch the Add Stat Instance picker. You can use the drop down to select the statistic rule whose value will replace the token {#} when shown to the user. Click Add Stat Instance after you’ve selected the statistic rule.
For info about selecting a statistic instance, see Selecting a Statistic Instance (Service Configuration).
- Format - StatRuleName.[EventFieldA].[Literal]
- Example - CurrentDifficulty OR EnemyDefeated.DifficultyLevelId.1
For more information, please contact your developer account manager (DAM) or refer to the XDK documentation.
- Format - StatRuleName.[EventFieldA].[Literal]
- Default Value - For number-based rules, this value is always 0 (zero).
- Flatten Method - Select the method for calculating the required value across the entire party.
Select Min (minimum), Max (maximum), or Average. - Max Diff - Specify the maximum acceptable numerical difference between the highest value and the lowest value in the match group.
- Expansion Delta - Specify the cycle at which the search should become more relaxed.
Acceptable values are from 1 to 99.
String data type (Must and Should rules)
- Attribute Source - Specify the source of the attribute to be matched from the drop-down list box:
- Title Provided - The value for the Attribute Name is provided from the title.
- User stat instance - The value for the Attribute Name is derived from the selected user statistic rule instance.
- Title Provided - The value for the Attribute Name is provided from the title.
- Attribute Name - For Title Provided, type or paste the name of the element to be matched.
For User stat instance, click Select an Instance to launch the Add Stat Instance picker. You can use the drop down to select the statistic rule whose value will replace the token {#} when shown to the user. Click Add Stat Instance after you’ve selected the statistic rule.
For info about selecting a statistic instance, see Selecting a Statistic Instance (Service Configuration).
- Format - StatRuleName.[EventFieldA].[Literal]
- Example - CurrentDifficulty OR EnemyDefeated.DifficultyLevelId.1
For more information, please contact your developer account manager (DAM) or refer to the XDK documentation.
- Format - StatRuleName.[EventFieldA].[Literal]
- Default Value - Enter the required value.
Collection data type (Must and Should rules)
- Attribute Source - Specify the source of the attribute to be matched from the drop-down list box:
- Title Provided - The value for the Attribute Name is provided from the title.
- User stat instance - The value for the Attribute Name is derived from the selected user statistic rule instance.
- Title Provided - The value for the Attribute Name is provided from the title.
- Attribute Name - For Title Provided, type or paste the name of the element to be matched.
For User stat instance, click Select an Instance to launch the Add Stat Instance picker. You can use the drop down to select the statistic rule whose value will replace the token {#} when shown to the user. Click Add Stat Instance after you’ve selected the statistic rule.
For info about selecting a statistic instance, see Selecting a Statistic Instance (Service Configuration).
- Format - StatRuleName.[EventFieldA].[Literal]
- Example - CurrentDifficulty OR EnemyDefeated.DifficultyLevelId.1
For more information, please contact your developer account manager (DAM) or refer to the XDK documentation.
- Format - StatRuleName.[EventFieldA].[Literal]
- Set Operation - Specify the operation to be performed:
- Intersection - Returns the logical intersection of the two sets.
- Difference - Returns the logical difference between the two sets.
- Intersection - Returns the logical intersection of the two sets.
- Target Intersection - Returns the target (scoped) intersection of the two sets.
Quality of Service data type (Must and Should rules)
- Network Typology - Select the acceptable network type.
- Minimum Bandwidth - Specify the minimum acceptable bandwidth.
- Maximum Latency - Specify the maximum acceptable latency.
Total Value data type (Must rules only) You can’t select the Should rule type.
- Attribute Source - Specify the source of the attribute to be matched from the drop-down list box:
- Title Provided - The value for the Attribute Name is provided from the title.
- User stat instance - The value for the Attribute Name is derived from the selected user statistic rule instance.
- Title Provided - The value for the Attribute Name is provided from the title.
- Attribute Name - For Title Provided, type or paste the name of the element to be matched.
For User stat instance, click Select an Instance to launch the Add Stat Instance picker. You can use the drop down to select the statistic rule whose value will replace the token {#} when shown to the user. Click Add Stat Instance after you’ve selected the statistic rule.
- Format - StatRuleName.[EventFieldA].[Literal]
- Example - CurrentDifficulty OR EnemyDefeated.DifficultyLevelId.1
For more information, please contact your developer account manager (DAM) or refer to the XDK documentation.
- Format - StatRuleName.[EventFieldA].[Literal]
- Min Total Value - Enter the required minimum total value.
- Max Total Value - Enter the required maximum total value.
- Attribute Source - Specify the source of the attribute to be matched from the drop-down list box:
- When you have specified all of the fields and values for your new matchmaking hopper rule the way that you want them, click Add Rule to add the rule and close the New Rule dialog box. The new rule is added to the hopper.
- To add more rules, use this same procedure.
- When you have added all of the rules that you want, double-check all fields and values for your new matchmaking hopper, and then click Add Hopper to create the matchmaking hopper and close the dialog box.
Your new matchmaking hopper is now listed on the Multiplayer & Matchmaking page whenever its session template is selected.
Create a tournament definition
To create a new tournament definition
- On the Service Configuration Tasks page for the product instance, click Multiplayer & Matchmaking.
- On the Multiplayer & Matchmaking page, under Tournament Definitions, click New.
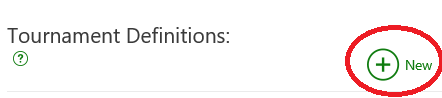
- In the Add New Tournament Definition dialog box, specify values in the following fields.
- Definition Name - A name that characterizes the tournament definition, and that you will easily remember and recognize. Must be a text string with a maximum of 100 characters.
- Display Name - A short display name for the tournament which will be the default locale string. This string is localizable.
- Description - The description for the tournament. All instances of this tournament definition will use this string as the default description. This string is localizable and overridable for each instance.
- Definition Template (JSON text) - Tournament definitions are JSON documents, and the Display Name and Description fields that you specified above are simply fields in the definition’s JSON. Here you can define the rest of the fields for your tournament, such as the sizes of teams, length of registration period, and number of teams. For more information about these fields, refer to Getting Started with Xbox Live Tournaments in the Xbox Live SDK documentation.
Here is an example tournament definition:
{
  'registration': {
      'duration': '12:00:00',
      'maxTeamCount': 1024,
      'minTeamCount': 2
    },
    'teams': {
      'sessionTemplate': 'TeamSessionTemplate',
      'minPlayers': 4,
      'maxPlayers': 4
    },
    'stages': [
      {
        'type': 'singleElimination',
        'minDuration': '01:00:00',
        'sessionTemplate': 'GameSessionTemplate',
        'rounds': {
          'minDuration': '00:15:00',
          'runGamesInParallel': 'false'
        }
      }
    ],
    'scheduling': {
      'once': [
        {
          'name': 'IndependenceDay',
          'startTime': '2016-07-05T03:00:00.0000000Z'
        },
        {
          'name': 'LaborDay',
          'startTime': '2016-09-08T03:00:00.0000000Z'
        }
      ],
      'periodic': [
        {
          'name': 'daily',
          'period': 1,
          'unit': 'days',
          'start': '2016-09-08T03:00:00.0000000Z'
        },
        {
          'name': 'weekly',
          'period': 7,
          'unit': 'weeks',
          'start': '2016-09-08T03:00:00.0000000Z'
        }
      ]
    }
  }
- Definition Name - A name that characterizes the tournament definition, and that you will easily remember and recognize. Must be a text string with a maximum of 100 characters.
- When you are finished, click Add Definition to add the new tournament definition and close the dialog box.
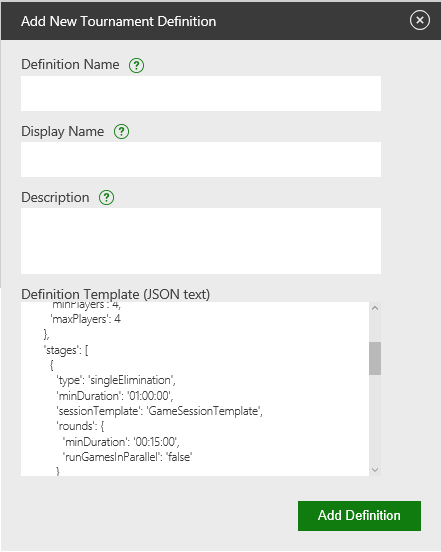
Your tournament definition is now listed under Tournament Definitions on the Multiplayer & Matchmaking page.
Create a leaderboard
To create a new leaderboard
- On the Service Configuration Tasks page for the product instance, click Leaderboards.
- On the Leaderboards page, if the Add New Leaderboard dialog box is not already displayed, click New and then, in the dialog box, specify values in the following fields.
- Leaderboard ID - Internal identifier for the developer to reference a particular global leaderboard.
- Stat Instance - Click on Select an instance to launch the Add Stat Instance picker. You can use the drop-down list to select the statistic instance to evaluate for the leaderboard. Select a Stat Rule (such as “EnemyDefeats”) from the drop-down list. If the Stat Rule has a Stat Field appended to it (such as “EnemyDefeats.GameplayModeId”), the Stat Field will automatically appear in the list of Stat Field(s). Click Add Stat Instance after you’ve selected the statistic instance.
For info about selecting a statistic instance, see Selecting a Statistic Instance (Service Configuration).
Note The data type of the statistic instance must be either INTEGER or DOUBLE, and not STRING or DATETIME.
The statistic instance isn’t displayed to the customer.
For more info, contact your developer account manager (DAM) or refer to the Xbox One XDK documentation. - Sort - Specify how you want the displayed gamers sorted:
- Ascending - The gamer with the lowest score is listed first.
- Descending - The gamer with the highest score is listed first. This is the default behavior.
Indicate Ascending if higher values are better, or Descending if lower values are better. Player scores will be ranked accordingly.
- Ascending - The gamer with the lowest score is listed first.
- Leaderboard ID - Internal identifier for the developer to reference a particular global leaderboard.
- When you have all of the fields and values for your new leaderboard the way that you want them, click Add New Leaderboard to create the leaderboard and close the dialog box.
Your new leaderboard is now listed on the Leaderboards page.
Create a Rich Presence string
To create a new Rich Presence string
- On the Service Configuration Tasks page for the product instance, or from the left hand menu, click Rich Presence Strings.
- On the Rich Presence Strings page, if the New String dialog box is not already displayed, click New.
- In the New String dialog box, specify values in the following fields.
- String Name - Enter a name that characterizes the Rich Presence string, and that you will easily remember and recognize.
String names can only contain alphanumeric characters or underscores.
Don’t begin string names with numerals.
Use underscores instead of spaces. - Build your presence string - Enter plain text into the text box for everything except the statistic instances you want to insert. After you’ve typed in the plain text portion, you’ll be ready to insert the tokens that represent a statistic instance value. For example, a presence string might be “Defeated goblin(s)!
- Insert token - If your presence string contains a statistic instance value, click in the position in the string where you will insert a token. In the previous example, you would place the cursor between “Defeated” and “goblin(s)” in the string “You have defeated goblin(s).”
Now, click Insert token. This will launch the New Token picker dialog.
In the New Token dialog, you will see a Token ID of the form {#}, where # starts at 0 for the first token, and increments for each token inserted into the string.
Click on Select an instance to launch the Add Stat Instance picker. You can use the drop-down list to select the statistic instance whose value will replace the token {#} when shown to the user. Click Add Stat Instance after you’ve selected the statistic instance.
If you are directly inserting the value of the statistic into your Rich Presence string, click New Token. If you want to use values from a set in the token (and take advantage of being able to localize the strings in the set), select a set by using the drop-down list. When you are finished, click New Token. In the previous example, you would see a string like “Defeated {0} goblin(s)!”
For info about selecting a statistic instance, see Selecting a Statistic Instance (Service Configuration).
For more information, please contact your developer account manager (DAM) or refer to the XDK documentation.
Note dateTime statistics can’t be included in Rich Presence strings.
Note Rich Presence strings may be up to 44 characters in length.
- String Name - Enter a name that characterizes the Rich Presence string, and that you will easily remember and recognize.
- When you have all of the fields and values for your new string the way that you want them, click Add String to create the string and close the dialog box.
Your new string is now listed on the Rich Presence Strings page.
Create a Game DVR string
To create a new Game DVR string
- On the Service Configuration Tasks page for the product instance, or from the left-hand menu, click Game DVR.
- On the Game DVR page, if the Add Game DVR String dialog box is not already displayed, click New. In the Add Game DVR String dialog box, in the Display Game DVR String field, enter the text string that you want.
The maximum number of characters allowed in a Game DVR string-including blank spaces-is 22. - When you have the string the way that you want it, click Add Game DVR String to create the string and close the dialog box.
- Your new string is now listed on the Game DVR page.
Create a set
Sets are a group of key value pairs that will be associated with a statistic instance in your Rich Presence. For example, suppose you are using a Rich Presence string, “Playing in {0}.” {0} in this case, is the level the player is currently in and will be plugged in via a set. If you’re going to be using a statistic called “CurrentLevel” to track what level the player is in, you’ll need a set of level names to go with “CurrentLevel.”
To create a set
- On the Service Configuration Tasks page for the product instance, or from the left-hand menu, click Sets.
- On the Sets page, click New under Sets to display the Add New Set dialog box.
- In the dialog box, in the Set Name field, specify the set name. The set name must either start with a capital letter or digit and contain only letters, numbers, and underscores. You will eventually associate the set with a statistic instance, so we recommend to name the set as similar as possible to the statistic instance. For our example, we name the set “CurrentLevel.”
- Click the Add Set button to create the set.
- Click the newly created set so you can add members to it.
Important Ensure that the set is selected (highlighted) before you continue.
- Under Members, click New.
- In the Add New Set Member dialog box, specify the values that you want in the following fields.
- Member Name - A value of the statistic instance that is associated with the set. For our example, the first level of the game is represented as “Level1” in the statistic. So, we use “Level1” for the member name. Now, in our Rich Presence string, whenever the statistic equals “Level1,” the Rich Presence string will pick this member of the set.
- Display Name - The default string that will show up as part of your Rich Presence, whenever the statistic equals the value specified in Member Name.
- Member Name - A value of the statistic instance that is associated with the set. For our example, the first level of the game is represented as “Level1” in the statistic. So, we use “Level1” for the member name. Now, in our Rich Presence string, whenever the statistic equals “Level1,” the Rich Presence string will pick this member of the set.
- When you have all of the fields and values for your new set member the way that you want them, click Add Set Member to create the set member and close the dialog box.
Your new member is now listed on the Sets page whenever its set is selected.
You can add multiple members to a set. Continue to add members as necessary.
Configure Storage
You can manage paths for different storage types and upload files to global storage.
You can manage paths and access policies for these storage types:
- Global
- Connected Storage
- Trusted Platform
- Untrusted Platform
- JSON
- Device
- Session
To create a path for a storage type
- Select the Storage tile on the Service Configuration Tasks page for the product instance, or click Storage from the left-hand menu.
- On the Storage page, under Storage, click one of the storage types.
- Under Path Prefixes, click New.
- In the Add New Path Prefix dialog box, specify the new path prefix in the Path prefix field.
- To specify a read-only policy for this storage path, click Add policy and specify a principal item in the drop-down list or text box. To add more items, click the + symbol.
- To specify a full-access policy for this storage path, click Add policy and specify a principal item in the drop-down list or text box. To add more items, click the + symbol.
- Click the Add Path Prefix button to add the new path prefix to the list under Path Prefixes.
To upload files to global storage
- Select the Storage tile from the Service Configuration Tasks page or from the left-hand menu.
- On the Storage page, under Storage, click the folder icon for Global.
- To create a new folder other than the default folder (/…), click Create New Folder. Specify a folder name that is from 3 to 63 characters long and contains only letters, numbers, and underscores. If you create a folder that remains empty when the page is refreshed, that folder will be removed. To avoid having the newly created folder removed, ensure that you upload files into the folder. Otherwise, use the default folder to store files.
- To upload files, click Select Files to Upload and pick the files that you want to upload.
- Assign a file type (binary, JSON, or config) to the files that you want to upload, check the check boxes for the files, and click Upload File(s).
Note File names must contain only letters, numbers, underscores, dashes, and/or periods and must not end with a period, or the upload will fail.
- After you’re done uploading files, the default folder (/…) contains the full list of files and their containing folders.
Configure the Network Security Authorization List
To configure the Network Security Authentication List
- Select the Network Security Authorization List (NSAL) tile from the Service Configuration Tasks page, or from the left-hand menu.
- For each authentication service listed that your title will support, check the Add to list check box on the corresponding tile.
- When you have checked all services that you want to use for authentication, click Save.
- After you save the configuration, publish to a development sandbox. For info about how to do this, see Publish to a Development Sandbox.
Configure Access Policies
To add a read-only or full access policy:
- Select the Access tile from the Service Configuration Tasks page for the product instance, or click Access from the left-hand menu.
- On the Service Configuration Access page, under Scopes, click the Edit icon for the service that you want to add a policy for.
- In the Edit Scope Policies dialog box, click Add policy for read-only or full access.
- Specify a policy component in the combo box. If you want to add another component to this policy, click the + symbol, and specify that component.
- After you’ve completed adding policies, click Save Policies.
Configure Localized Strings
You can export an XML file from a product instance’s Localized Strings page that contains all of the product instance’s default strings (for example, Achievements, Hero Stats, Game DVR, and so on), include localized strings for any of the default strings for any language and locale, and then import that modified XML file back into XDP.
To export and modify a localized strings XML file
- Select the Localized Strings tile from the Service Configuration Tasks page for the product instance, or click Localized Strings from the left-hand menu.
- On the Localized Strings page, click Export Strings.
- Save the exported XML file to your local machine.
- Open the XML file in Excel, include the localized strings that you want, and then save the XML file with the changes.
After you include all of the localized strings to the XML file, you need to import that modified XML file back into XDP.
To import a localized strings XML file
- Select the Localized Strings tile from the Service Configuration Tasks page for the product instance, or click Localized Strings from the left-hand menu.
- On the Localized Strings page, click Import Strings.
- Select the localized strings XML file that you want to import.
These errors appear on the Localized Strings page.
Configure community managers
Configure a community manager to make posts on your product’s game hub. The account linked to a community manager will use the localized title of the product as its gamertag and the box art as its gamerpic. Followers of the game hub will see the community manager’s posts on their activity feeds, and anyone can view the posts on the game hub itself.
To configure a community manager
- Create a new Xbox Live user account specifically for use as a community manager. Don’t use a personal account because any personal activity will also be posted to your product’s game hub feed. You can create a new Microsoft account and then link that to Xbox Live. You don’t need an Xbox Live Gold subscription to be a community manager.
- In XDP, navigate to your product, expand the product instance in the left navigation, and select Community.
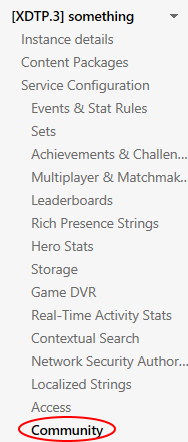 Note You can only configure community managers in development sandboxes; however, community managers will only show up in the game hub once the product instance has been published to the RETAIL sandbox. Therefore, you should configure your community managers in your development sandbox, verify that the XUIDs correspond to the correct gamertags (see the next step), and then publish the product instance to the RETAIL sandbox. Then you’ll be able to see the community managers’ posts on the game hub.
 - On the Community page, under Xbox User Account Lookup, select Gamertag, enter the Gamertag of the account you wish to use, and select Search. This will give you the XUID (Xbox User ID) of the account.
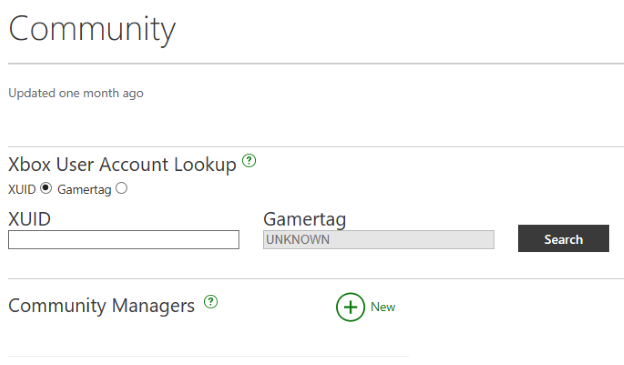
- Next to Community Managers, select New.
- In the Add Community Manager dialog box, enter the XUID you got before.
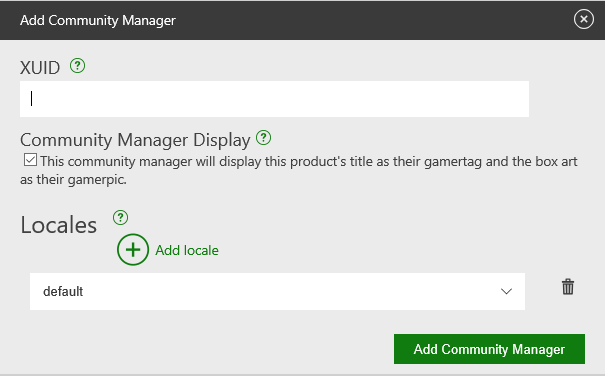
- If you want this product to be your community manager’s primary product and replace the gamertag and gamerpic with the product’s title and box art, respectively, check the box under Community Manager Display. This also means that when a customer selects the community manager’s account, they will go to this title’s game hub. If you don’t set a primary product for a community manager or if you set multiple primary products for the same community manager, the primary product will default to the most recently linked product.
- In the drop-down menu under Locales, either select a locale for this community manager to post in, or leave it at default to post to all locales. You can also select Add locale to add multiple locales. To delete a locale, select the trash can icon next to the locale.
- Select Add Community Manager. This community manager is now linked with your product!
You can link an account to multiple products-for example, you can link it to both the full version and the demo version of a product, or to multiple entries in a series. However, Microsoft recommends that you not link one account to multiple unrelated products (for example, products in different series). When you post from an account that is linked to multiple products, the posts will appear on each product’s game hub.
You can also link multiple accounts to the same product. A common example of this is if you want different accounts for different locales.
To edit a community manager
- On the Community page for your product instance in XDP, locate the community manager account that you want to edit under Community Managers and select the pencil icon in its row.
- Make your edits. Note that if you change the locales, this affects both past and future posts. So for example, if you previously set the locale to default and later change it to en-US, all previous and future posts made by the community manager will now only be visible in en-US locales.
- Select Save Community Manager to save your edits.
To delete a community manager
- On the Community page for your product instance in XDP, locate the community manager account that you want to delete under Community Managers and select the trash can icon in its row.
- If you’re sure that you want to delete the account, select Delete in the warning dialog; otherwise, select Cancel.
Compare product instance data for one or more sandboxes
Use the compare data feature to determine the differences between product instances in two different sandboxes. Using this comparison can also help you quickly determine if a sandbox has the latest version of the product instance.
To compare product instance data for one or more sandboxes
- On the XDP dashboard, in the Search For list, select Product.
- Type the name of your product, and click the Find icon.
- If needed, select Product in the left column, locate the name of your product, and select it.
- Under Product Configuration, click Compare Data, or select it from the left-hand menu.
- Under the Left Side, in the Choose Sandbox drop-down list, select one of the product instances you want to compare.
- Under the Choose Sandbox list, select either Draft or Published.
- Under the Right Side, in the Choose Sandbox drop-down list, select one of the product instances you want to compare.
- Under the Choose Sandbox list, select either Draft or Published.
- Select the sections, such as, Catalog and Marketplace or Service Configuration that you want to compare.
- Click Compare.
- Review the results of each line item. You may see the following options:
- A circle with an arrow pointing to the left. This indicates the item exists only in the product instance for the sandbox on the left.
- A circle with an arrow pointing to the right. This indicates the item exists only in the product instance for the sandbox on the right.
- A circle with a not equal sign. This indicates that the item exists in both sandboxes, but doesn’t match. Additional details regarding the mismatch are provided.
Publish the service configuration
When you have your service configuration set up the way that you want and you are ready to publish it.
To publish a service configuration
- On the Service Configuration Tasks page for the product instance, click Publish.
- On the tile for the product instance for which you want to publish the service configuration, click Publish.
- On the Publish Product page, check the Catalog and Service Configuration check boxes, selecting what you want to publish; ensure that you have the correct sandbox specified in the Destination Sandbox field; and then click Submit.
Note Publishing your product does not affect the CERT or RETAIL sandboxes.
Additional notes
A few things to be aware of:
- After you have created an event, a statistic rule, or an achievement, you can edit it, but you can’t delete it.
- If you want to make changes in the service configuration before your product goes to retail, just make the changes that you want, and then publish the service configuration again.
- When your product is already in retail, you can change only a subset of the fields in the service configuration.
In this section
Configure Events (Service Configuration)
Procedures for adding and changing events.
Configure Stats (Service Configuration)
Procedures for adding and changing stat rules.
Configure Hero Stats (Service Configuration)
Procedures for adding and changing hero stats.
Configure Real-time activity (Service Configuration)
Procedures for adding and changing real-time activities (RTAs).
Configure Contextual Search (Service Configuration)
Procedures for tagging media from your title, including broadcasts and game clips, with real-time stats.
Configure Achievements 2017 (Service Configuration)
Procedures for creating achievements by using Achievements 2017.
Configure Achievements and Challenges (Service Configuration)
Procedures for adding and changing achievements and challenges.
Configure Rewards for Achievements (Service Configuration)
Procedures for adding and changing rewards for achievements.
Configure Rules for Achievements (Service Configuration)
Procedures for adding and changing rules for achievements.
Configure Multiplayer Session Templates (Service Configuration)
Procedures for adding and changing multiplayer session templates.
Configure Matchmaking Hoppers (Service Configuration)
Procedures for adding and changing matchmaking hoppers.
Configure Tournament Definitions (Service Configuration)
Procedures for adding and changing tournament definitions.
Configure Leaderboards (Service Configuration)
Procedures for adding and changing leaderboards.
Configure Rich Presence Strings (Service Configuration)
Procedures for adding and changing Rich Presence strings.
Configure Game DVR strings (Service Configuration)
Procedures for adding and changing Game DVR strings.
Configure Sets (Service Configuration)
Procedures for adding and changing sets.
Configure Storage (Service Configuration)
Procedures for configuring storage.
Configure the Network Security Authorization List (Service Configuration)
Procedures for configuring and changing the network security authorization list (NSAL).
Configure Access Policies (Service Configuration)
Procedures for configuring access policies.
Configure Localized Strings (Service Configuration)
Procedures for configuring localized strings.
Configure Community Managers (Service Configuration)
Procedures for configuring community managers.
Selecting a Statistic Instance (Service Configuration)
Procedure for selecting a statistic instance from statistics rules that already exist.
Copying Service Configuration from One Sandbox to Another Sandbox
Procedures for copying a service configuration from one sandbox to another sandbox.
Downloading the Events Manifest file
Procedures for downloading the Events Manifest file.